
Nine Vegetables Procrastinating Queers Can Still Grow from Seed in May!
Hey there, my procrastinating yet effervescent gay friend. I’m so glad you’re here and that you’re contemplating the possibility of growing at least one vegetable. And are you here because you’re wondering what vegetables to grow from seed in May? That’s great!! We’re doing great. I’m here to tell you it is not too late to plant some vegetables right now, this very month in fact! I am also in this situation, in your shoes, that I am by some quantum miracle standing in your shoes at the same time as you with this problem — I have been overwhelmed with work and all things life and have not planted my garden and now I need to need to seriously get on my game and get some seeds into the ground. And you! You can still sow many of these vegetables from seed in May and then reap the rewards, in some cases, as soon as June!
In my particular part of US Zone 6b, the climate’s pretty rainy and also has serious heat waves that last for weeks, but with a growing season that drops off by mid October. It’s too cold, too short a growing season for a lot of vegetables that might be easier to grow in more southern zones (eggplants die in my garden, sweet potatoes are spindly shadows of their southern cousins). You also can’t as easily grow plants that prefer cooler climates in the middle of summer, but if you’re more north, you might get away with this.
So, what’s in this list? We are listing vegetable seeds you can plant, now! Why seeds? Seeds are cheaper than seedlings or starts — you can get an entire pack of seeds for about the price you might need to shell out for a single seedling, depending on the plant, and you’ll get a bigger harvest from an entire seed packet than a few plants. You won’t see things like tomatoes or peppers on this list because those needed to be started a minute ago and if you really must grow tomatoes or peppers, you’re going to have to go to a greenhouse and get some seedlings. I’m sorry. It’s May and that’s just the way it needs to be if you want any kind of a reasonable tomato situation. The option to pour your love and attention into a tomato plant you start from seed does exist, but you have to know that if you do this now you might get, like, a single tomato for your efforts. This seems like a pretty unfulfilling relationship is all I’m saying.
So, none of the following seeds need to be started indoors at this point. In fact, most do better if you direct sow them. “Direct sow” means just putting those seeds into the ground instead of starting them indoors. More gardening terms: when I say “succession planting” that means, instead of planting something all at once, you’ve planted some, then wait for a period of time, then planted more in order to stagger the harvest. “Full sun” means 6-8 hours of sun, “partial sun/shade” is 4-6 hours of sun a day aaaaand none of these will be shade plants. Make sure you read the directions on the seed packet before planting anything (look for spacing directions and follow them, etc.), and if you’re feeling zippy, you could also give the variety a Google to see what people recommend! There is oodles of gardening advice out there, including some gardening advice previously published right here on this very site!
Before you start sowing your vegetable seeds, however, a warning, especially, as a helpful commenter pointed out, for those in East Coast US / Rust Belt cities, which is to screen your garden soil for lead. You should take samples from several points in your garden and get each of them screened. Alternatively, if that isn’t do-able, then the raised bed route might be your best bet. My girlfriend’s constructed me simple raised beds from some reclaimed untreated lumber. (Which means it is not the pressure-washed and treated, POISONOUS arsenic-laced kind of reclaimed lumber okay? Please be careful!) You can make raised beds out of all sorts of things just check to make sure the materials you’re using aren’t hazardous as hazardous materials can leech into the ground and into your food and into you! You’ll also need to go purchase some soil if you aren’t sure of the contents of yours, which, again, is an added expense. However, at the end of the day, it might be the best route for you, and also, container gardening is a great avenue for anyone growing vegetables on an outdoor concrete pad, balcony, rooftop or other urban gardening situation.
Let’s grow some beautiful plant babies!
This post was originally written in 2021 and updated/republished in 2022.
Carrots and Beets
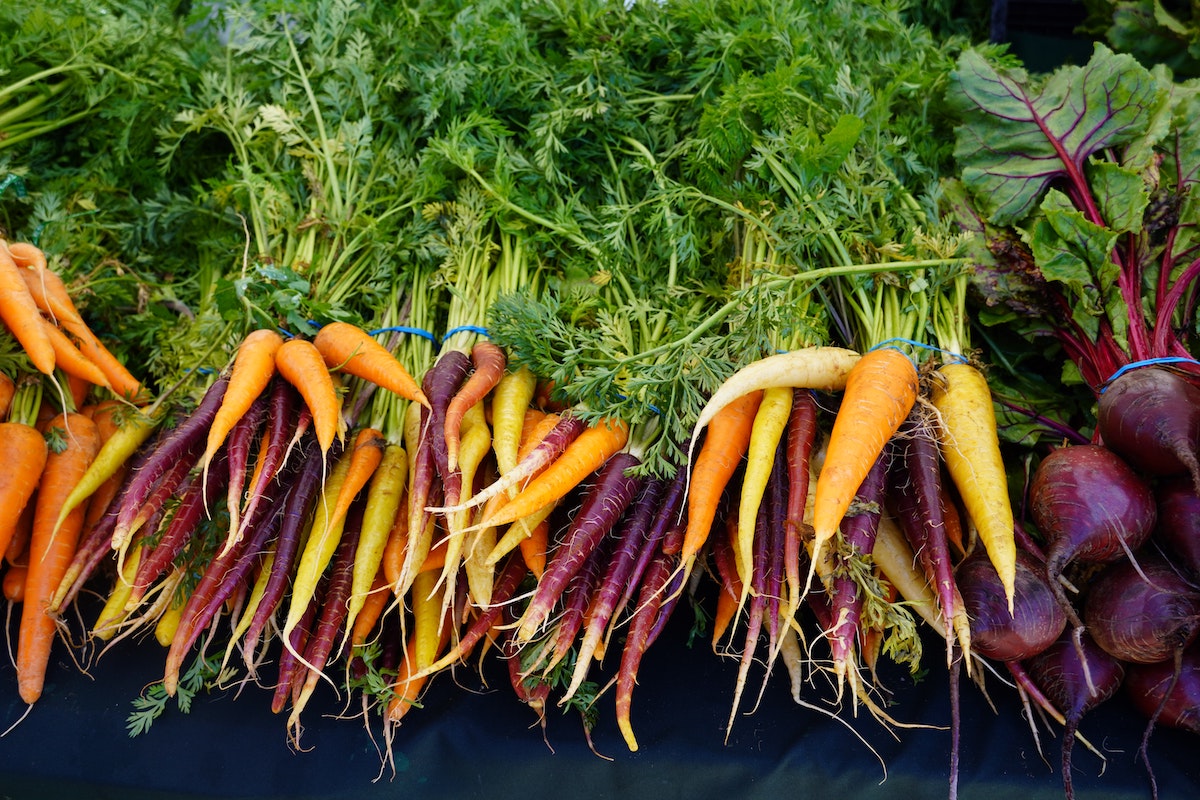
Be sure to keep your carrot seeds damp after you sow them and well through sprouting. They do not like to dry out!
You’re bold. It’s almost too late for these. They grow best in cool spring weather, so it is time to get MOVING on sowing your beets and carrots.
The reason these are ranked as “most difficult” is that you need a certain soil consistency for these to do well. Beets and carrots can actually thrive in raised beds and containers because of the level of control you have over the soil, but you need to make sure the containers are deep enough. Root vegetables prefer loose soil that also retains water and somehow also has good drainage. So, if your soil has a significant clay content, like mine, you’re going to have trouble — moreso with beets than carrots. Carrots are kind of tough and will battle their way through the soil as best they can and then you’ll just have kind of funny looking carrots. Beets will tucker out and refuse to grow if the soil’s not loose enough. So, if your soil is full of clay (You can tell just by handling it. Does it feel like clay and stick together a lot and is really heavy…like clay?), I recommend just giving up and growing these in a container or raised bed. Carrots can be used to better the soil, but we’re growing vegetables for validation here! We want results!
Notes for growing carrots and beets from seed: Make sure the seeds remain damp for the couple of weeks or so it takes to get them to sprout. You can also plant these two things together and they’ll help each other out. Once they sprout, you’ll need to “thin” them. Just make sure only one plant is growing per spot. I recommend using scissors to snip away extras so you don’t disturb the root. Congrats, these extra seedlings are 100% edible so now you can sprinkle some carrot seedlings on top of your toast in the morning (wash them first please) and feel super fancy. Bonus note: beet greens are edible, great sauteed. Carrot greens are edible, make an awesome pesto.
What you need to know about carrots and beets as vegetables you can grow from seed in May!
Sun / Shade: Full sun
Time to Sprout: 10-14 days for beets, 14-21 days for carrots
Time to Harvest: 50-60 days for beets, 60-80 days for carrots
Container-friendly: Yes!
Self-pollinating / Needs pollinating: Irrelevant
Peas
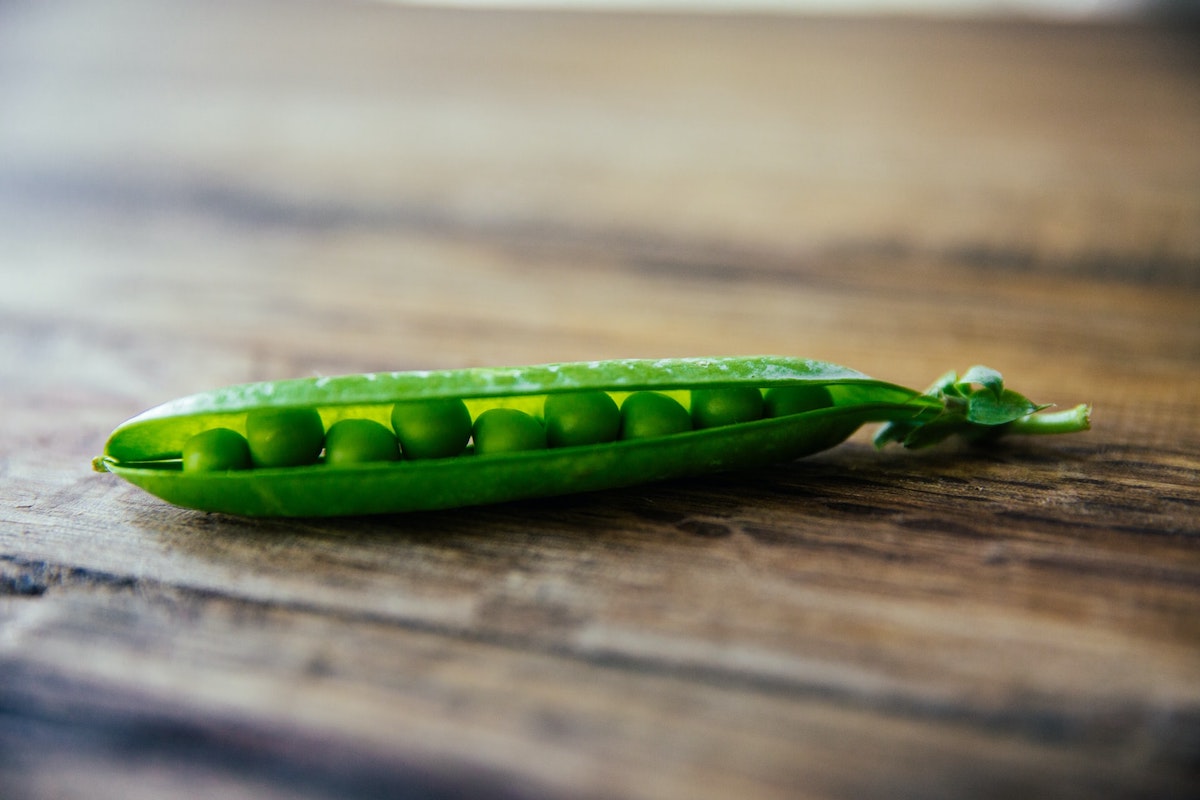
I love to pick fresh sugar snap peas in the morning and have them with breakfast!
The absolute first thing I would get in the ground right now are some peas. Peas are one of my favorite vegetables seeds to plant in April and May. You are almost too late for these, but we’re not here to follow the rules, we’re here to get some things in the ground! These are soooooo easy, except for the trellis. New to gardening? Get some sugar snap pea seeds. You can eat them off the vine and it will make you feel like you’ve done everything right. Peas are relatively easy once you figure out the trellis situation, most varieties are ready to start harvesting in 60 to 70 days (a short period of time for vegetables), and the difference between fresh peas off the vine and store bought is really night and day, which is why they have VIP, completely reserved space in my spring garden this year.
Need a trellis? You don’t have to buy one! You can use your knot-tying skills to make one with some twine, or you can make one with chicken wire, which is what I’ve done because it’s really pretty fast once you get a little used to working with the chicken wire. Unroll it at least 5 feet, preferably more, attach it to things so that it slants from the bottom of the ground, upward, either by using the ends of the chicken wire itself, zip ties, twine, or other wire. You can attach it to an existing fence, or width-wise between two boards that you then lean against something, like the side of a building. A twine trellis can be hung from above like a rope ladder, which it is, but for pea vines. This is chicken wire. You will also need pliers or wire-cutters in order to cut it. Bonus: you can also use the chicken wire to keep critters out of your garden.
Container Gardening Tips for Peas: If you need to conserve space, I recommend trying a dwarf variety of pea. Some don’t even need to be trellised. These will grow in containers AND all peas are self-pollinating so you can grow them in places where you won’t have a lot of pollinators like bees coming around. Also, peas only need partial sun so if you have a shadier situation, they’re a good option.
What you need to know about peas:
Sun / Shade: Partial Sun
Time to Sprout: 7-14 days
Time to Harvest: 60-70 days
Container-friendly: Yes
Self-pollinating / Needs pollinating: Self-pollinating
Bush Beans
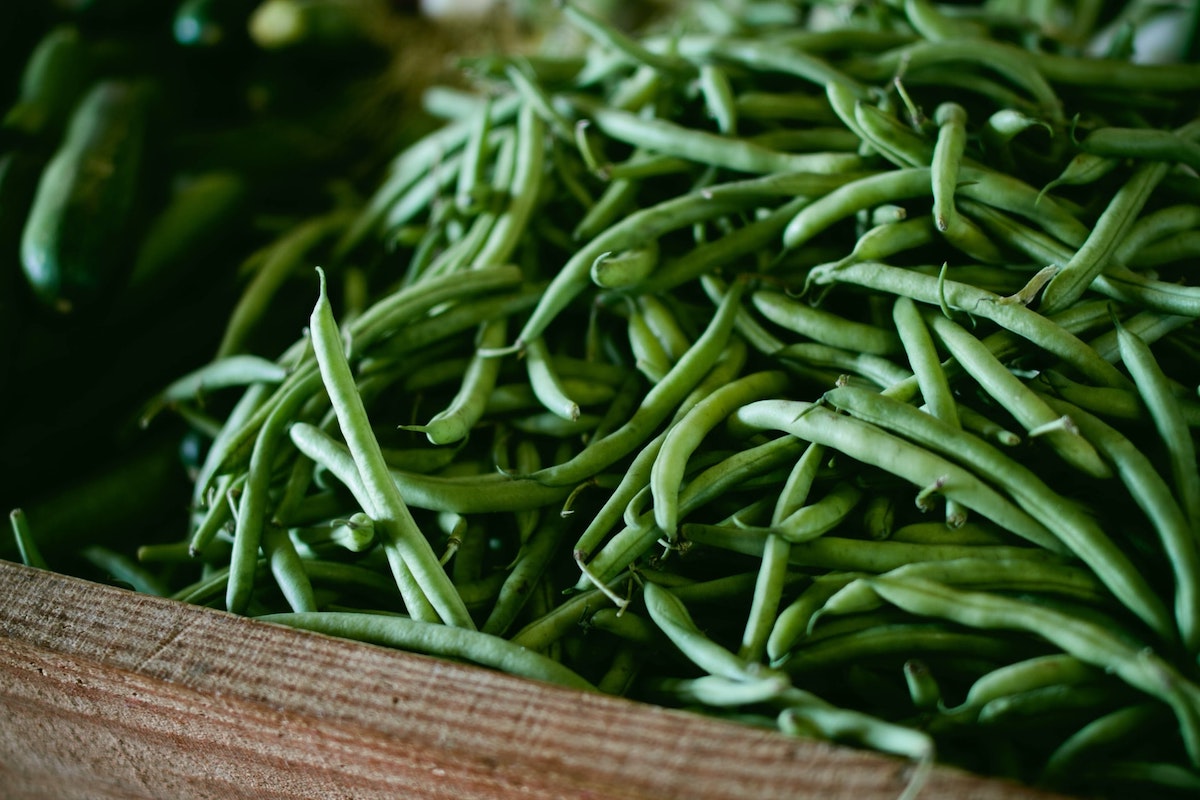
Bush beans are the easy baby sibling of pole beans. Be careful, though, when sowing your green beans. I’ve found that birds LOVE to pick these out of the ground. You might want to cover them with a cage, chicken wire, or a net until they sprout.
Beans are best to direct sow because they have delicate little roots and they hate it when you mess with them! Sow them where you want them and leave them there. As with any of the vegetables listed in this post, they’ve had human intervention that has helped cultivate them into the varieties we have today, and it’s important to recognize the thousands of years of labor and knowledge that have gone into the varieties that you consume, including some of our most common strains of beans, many of which are indigenous to the Americas. The genus Phaseolus are the way they are today because of indigenous farmers in North and South America who intentionally cultivated these varieties over millenia. That’s thousands of years! The Phaseoli are your pintos, your limas, but also, runner beans which are incredibly exciting because of their flowers! I’m planting this variety and am as thrilled by the prospect of flowers as I am of beans.
Beans can be roughly divided into two types, based on their trellising needs: pole and bush. Pole beans require trellising, bush beans don’t.
We’re covering bush beans because this list is supposed to be for gardening procrastinators who want to grow vegetables from seed this May, maybe after a quick trip to the store, and you maybe didn’t have time to get a trellis together! With bush beans, there’s no need to worry about that — they just grow on their own, in a little bush, thus their name. So if you don’t want to or aren’t able to make a trellis situation happen, this is a great route. Green beans of the bush variety will give you a continuous harvest for a while once you have them planted and fresh green beans are the best. You can buy seeds for blue lake green beans and do all the things you normally do with them once they’re done growing.
They also don’t need to be fertilized much since they make their own nitrogen, making them a great companion plant (a plant planted near another plant that helps it grow) for nitrogen hungry vegetables.
Now, for the reason these beans aren’t ranked as having more ease — I recommend you soak the beans overnight. This will require you to do some foreplanning, about 12-24 hours of planning ahead, but I believe in you! Put the beans in a dish of water the night before you want to plant them. You are now 1% less of a chaotic queer.
Container Gardening Tips for Beans: You can plant beans in a container, especially bush beans! Make sure your soil’s deep enough and just do your best with the spacing instructions. They’re self-pollinating so you don’t have to worry about hand-pollinating or getting some pollinator insects to visit. Great for a little outdoor patio or balcony situation that gets a lot of sun!
What you need to know about bush beans (which are an excellent choice to grow from seed in May):
Sun / Shade: Full sun! Heat!
Time to Sprout: 6-10 days
Time to Harvest: 40-60 days, Note: I like to go out and pick these each morning when they’re fruiting. You want to do this to keep the plant producing more beans.
Container-friendly: Yes!
Self-pollinating / Needs pollinating: Self-pollinators!
Pole Beans
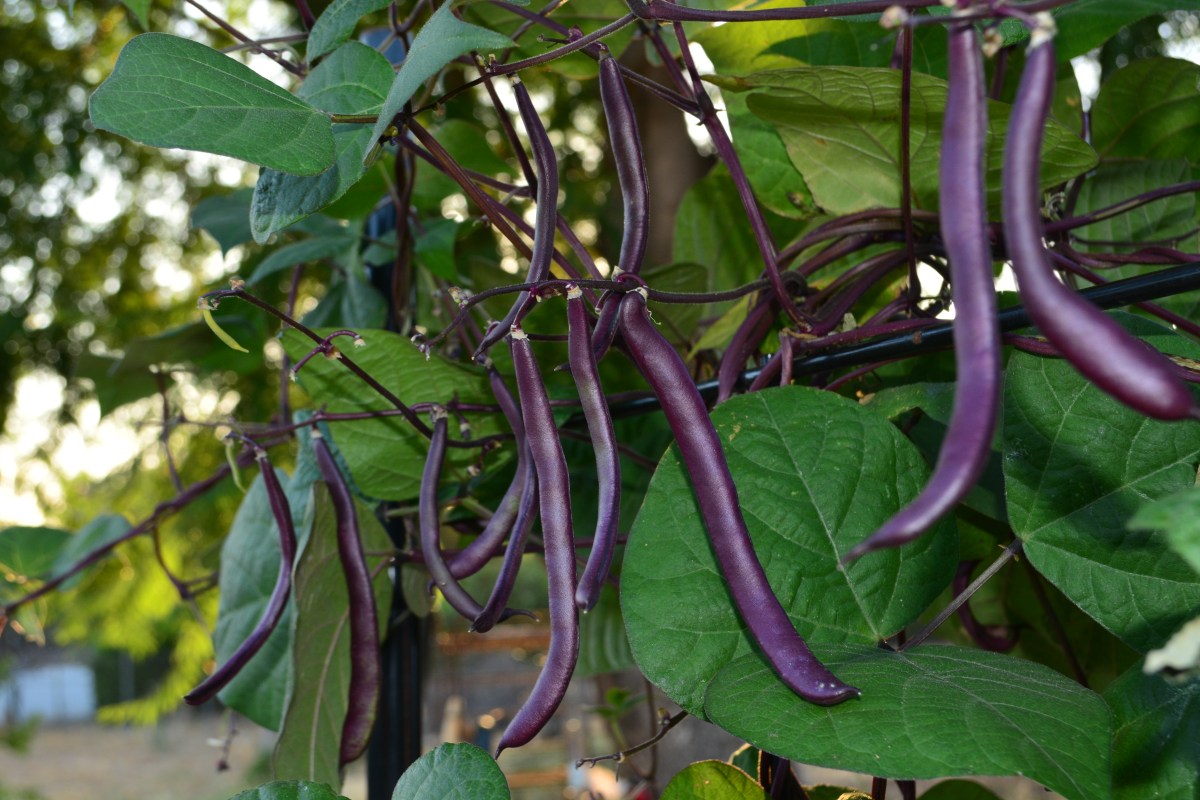
Pole beans a hardy choice of vegetable to grow from seed this May! They are also just a great choice, I think, if you want to grow a vegetable in your garden that will taste seriously different fresh than it does from the supermarket.
Pole beans are next up! These are still super easy to grow, but they do require something to climb. You can use anything from a fence (one that has enough gaps for them to hold onto), to a trellis, a pergola, to, yes, poles that you literally stake up next to the pole beans. You’ll want whatever they’re climbing to be at leat 6 feet high, but ideally up to 8 feet. These are supposed to be planted after your last frost date which might not have even happened yet, they love sun and also will do well all summer long so you know what? No need to worry that you feel behind on gardening. Grab some beans and get going!
A bit about varieties here! There are some of these that you eat fresh, much like bush green beans. For example, Blauhilde beans are best used fresh. I love to just fry them up with butter and, yes, they are amazing. I grew these last year and picked some off the vine at least every other day while they were producing. On the other hand, you might try something that is more of a baked bean or a soup bean, such as the Good Mother Stallard bean. For these, you don’t harvest every day — from the time you sow their seeds in the ground, you just take care of them (water, weed, keep pests away) and let the pods dry out on the stalks. Dry beans aren’t harvested until they are all the way dry and the pods have released them inside of the pod. (Check your seed packet for an estimate on when this might be but it will be some months.) Then, yank out the whole plant by the roots and take it somewhere to pluck all the pods off the plant and “thresh” them or remove the beans by hand. Maybe get a friend to help you or put on a nice podcast. Store in some of those (clean!) glass spaghetti jars you’ve been hanging onto if you’re anything like this queer over here, and admire your handiwork. You actually now have beans you can use now — or that you can enjoy in the fall and winter! Look at you!
What you need to know about pole beans if you want to sow them this month:
Sun / Shade: Full sun! Heat!
Time to Sprout: 5-10
Time to Harvest: Like 3 months (check the seed packet but also use your observational skills! They will rattle when dry!)
Container-friendly: you could do a raised bed for sure
Self-pollinating / Needs pollinating: Self-pollinators!
Squash / Pumpkins

Do you have room in your garden / place you are growing things? Do you love squash? Do you want to grow your own pumpkins for Halloween? My spooky friend, now is the time to get those in the ground. These will need lots of space. An advantage of pumpkins specifically is that they’re good for reclaiming space from invasive species because…pumpkins win? In Pittsburgh, we have a huge knotweed problem (an invasive plant maybe also holding the whole city up because everything is built on cliffs and hillsides — I try not to think too much about it). Anyway, planting pumpkins in an area knotweed is trying to take over actually results in just… pumpkins! Magic.
Squashes also include zucchinnis which are legendarily easy to grow and productive, if you’re looking for what is maybe the hands-down easiest variety of squash. Winter squashes, deceptively, get planted now and are just harvested much later. These include your pumpkins, also things like your acorns and your butternuts.
I BELIEVE you can successfully grow some squashes in containers, but have not attempted this myself. Squashes like to spread their viny selves all over the place, so you will still need s p a c e.
Pollination and Other Notes for Squashes: Squashes DO need to be pollinated by pollinating insects, but you can actually hand pollinate these. Have you ever wanted to be the bisexual unicorn for two squash blossoms looking for a third? Now, you can! Hand pollinating is what it sounds like. You can get a cotton swab, old toothbrush, whatever and go scoop up some of the pollen from the male blossoms and then gently deposit it in the female blossom and spread it around. Here is a good visual for what to look for in male vs female squash blossoms, both of which are on the same plant. You can also pull the petals off the male flower, pick it, and stick the stamen into the female flower, but then you don’t have a male squash blossom to eat, which is sad because you can eat the male squash blossoms when you’re done. Don’t eat the females if you actually want squash, though! Blossoms are great battered and fried or stuffed with cheese (or your chosen briney, vegan stuffing) and baked.
Squashes may be the #2 most pest-ridden plant I’ve ever planted. (#1 being close-to-the-ground-greens slugs get after.) These squash bugs are a menace. If you’re okay with it / not attempting 100% organic gardening, diatomaceous earth works well for keeping these under control. I use it sparingly, but find it helpful. You may want to avoid it if you’re avoiding pesticides entirely. I have also seen people deal with squash bugs by manually removing them with tape. Like, get a roll of sticky tape and use it to stick up all the pests. This seems like a good idea because squash bugs can bite so you don’t want to just be reaching in there and scooping them up!
Also, I am just kind of looping cucumbers under squashes here. In my garden, they’ve experienced the same pest issues but are also, I hear from folks in the comments, pretty easy!
What you need to know about squash and pumpkins before planting them from seed this May:
Sun / Shade: Full sun
Time to Sprout: 7-10 days
Time to Harvest: really depends on your variety, but REALLY easy to tell just by looking. Is there ripe squash? You sure? Is it about time for this squash to be ready? Yes? Pick it.
Container-friendly: Yes?
Self-pollinating / Needs pollinating: Needs pollinating
Dill

Fresh dill, or dill weed, is a delight AND really easy to grow from seed. It doesn’t seem to me to be very picky in terms of soil and you don’t have to do much besides churning the soil around a bit with a trowel and sprinkling the seeds on top. (Skip the digging if you’re planting in a pot, just sprinkle). You can succession plant dill so you have fresh dill all summer long. This is great for omelettes, pickles, salads and dressing, anything you want dill in. Super easy and more cost effective than if you were to buy this much fresh dill from the store. Bonus points if you save the seeds for next year or dry some dill for the winter.
What you need to know about dill to grow this veggie from seed this May:
Sun / Shade: Full sun, deals okay with shade
Time to Sprout: 10-14 days
Time to Harvest: Once the leaves are ready, fully mature after about 90 days
Container-friendly: Yes
Self-pollinating / Needs pollinating: Irrelevent for eating, but should take care of producing seeds itself!
Radishes

This Fairy Tale Theater episode, starring Shelley Duvall, and the witch’s radishes within will haunt me forever. Are you a witch or witch-adjacent person who wants to grow your own “special radishes”? Wherever you’re coming from with gardening, radishes are magic. They sprout within a week, grow super fast and mature within 22-70 days. You’ll know because their tops will peek out of the soil when they’re close to ready. You can also succession plant these seeds for more radishes! Another thing to do with radish seeds is to plant them near other plants that you want to lure pests away from. They’re basically a sacrificial vegetable, then, that you use to keep pests occupied while other, more delicate plants like your carrots and beets grow. Radishes are also fun for kids to try because of their quick turnaround time, but that doesn’t mean you need kids to bask in that productive feeling that comes from seeing radishes sprout after just a few days.
What you need to know about radishes to plant them this May:
Sun / Shade: Full sun but also not the fussiest
Time to Sprout: 2-5 days
Time to Harvest: 22-70 days, depends on variety
Container-friendly: Yes
Self-pollinating / Needs pollinating: Irrelevent
Arugula / Rocket

Are you craving something that is really, really easy? Easier than anything else you have going on right now? In need of something that can come together faster than answering a slightly in-depth email or even washing a load of dishes? ARUGULA, friend. It’s arugula. I just throw these seeds around into empty areas of the garden like Johnny Rocket-Seed and once they sprout, you have arugula in a little over a month. You can succession plant arugula for a good while though it doesn’t love heat. This is a great way to have fresh salad greens that have not turned to slush because you forgot them in your crisper drawer. It doesn’t grow well in mid / high summer though, so get planting. Arugula also grows really, really well in containers, especially if you have partial shade. Can probably also be grown indoors. Pick it before it bolts (flowers). What are you waiting for? Plant some of this leafy green veggie this May and then tell us about all the arugula dishes you get to create!
What you need to know about arugula and rocket to grow them this May:
Sun / Shade: Full sun but tolerates shade
Time to Sprout: About 7 days
Time to Harvest: 40 days after seeding or when the leaves are at least 2 inches long
Container-friendly: Yes
Self-pollinating / Needs pollinating: Irrelevent
Melons

Bold of you. Bold of me! Are melons a vegetable? They’re in the same family as squashes and cucumber so I feel fine about looping them in here. These are another one where, like your pole beans, you are actually not late to the party! These like the heat so you actually want to be planting these after your last frost date. My absolute latest possible frost date for my region is mid-May. You can look yours up here.
Now, I hate cantaloupes and most kinds of melon excepting watermelon, so I am just going to pretend we’re growing watermelon and only watermelon! Don’t show me your cantaloupes! Watermelon is a vegetable (or fruit if you like) that can be planted even in regions skirting the edge of too cold so long as you plant these vegetable seeds after mid-May. Of course, if your region is warmer, you can get right to it! Again, check your frost dates, or just wait until the daily weather is hitting more than seventy degrees or so each day and the soil’s had some time to warm up.
These are big plants, much like their squash friends above. You’re also going to need to keep those pests at bay, and be in there weeding and taking care of these babies. Another note: the watermelons you get might not be nearly as big as the ones you see at the supermarket. That’s okay!! They might ripen with a diameter as small as your hand. Read up on the seeds you’re purchasing for more info on the variety. However, if you choose to go the growing-food-from-supermarket-plant-seeds route this May, you could wind up with anything (including something that does not quite resemble the plant you got it from — because genetics). These need warm soil and plenty of time to grow, so, again, make sure you are looking at the time you’ll have to grow these (until your first frost date of the fall) before you get going! I’ll be really curious if you decide to throw some watermelons into the mix for the vegetables you’re planting this May! Let me know if you’re trying them in the comments!
What you need to know to grow watermelon:
Sun / Shade: Full sun
Time to Sprout: 5-10 days
Time to Harvest: 3 months or more
Container-friendly: not really
Self-pollinating / Needs pollinating: one plant can pollinate it but you’ll need bugs to help (or you can get in there and help yourself!)
OKAY! What vegetables are you growing from seed this May now that you’ve read this? What veggies HAVE you planted already? Which of these vegetables are you going to grow from seed this May? What do would you recommend folks plant? We’d love to hear more from you and see your sprouts in the comments!
How To Post A Photo In The Comments:
Find a photo on the web, right click (on a Mac, control+click), hit “Copy Image URL” and then… code it in to your comment like so:
If you need to upload the photo you love from your computer, try using imgur. To learn more about posting photos, check out A.E.’s step-by-step guide.