This Queer House, Vol 10: New Year, Newly Organized Queer House
New Year’s resolutions don’t work for me. They’re are too absolute, too black and white, to ever be realistic for my lifestyle. For instance, I have already broken every 2018 resolution I made — both the ones I said out loud and the ones I kept in my head. But I also love New Year’s Resolutions! They represent all those wonderful concepts of change and growth and striving to be better, however you choose to define it. In that spirit, January’s This Queer House is all about organizing your space.
What You’ll Need:
- Cleaning supplies – The actual supplies will depend on what kind of space you’re organizing. A whole room? You’ll want a vacuum or broom and mop. Just tackling your desk? Maybe a spray cleaner is all you need. (See the end of the column for an all-purpose DIY cleaner recipe.)
- Scrap paper and marker/pen
- Space – Be prepared for this project to take up more physical space in your home than you expect it to.
What To Do:
1. Identify the area. If you’re overwhelmed by the idea of organizing your home, it’s totally okay to start small. Instead of trying to declutter a whole room right off the bat, just aim to organize one section — maybe a shelf or other surface that tends to collect junk. For our project, my wife and I chose the guest room closet and surrounding area.
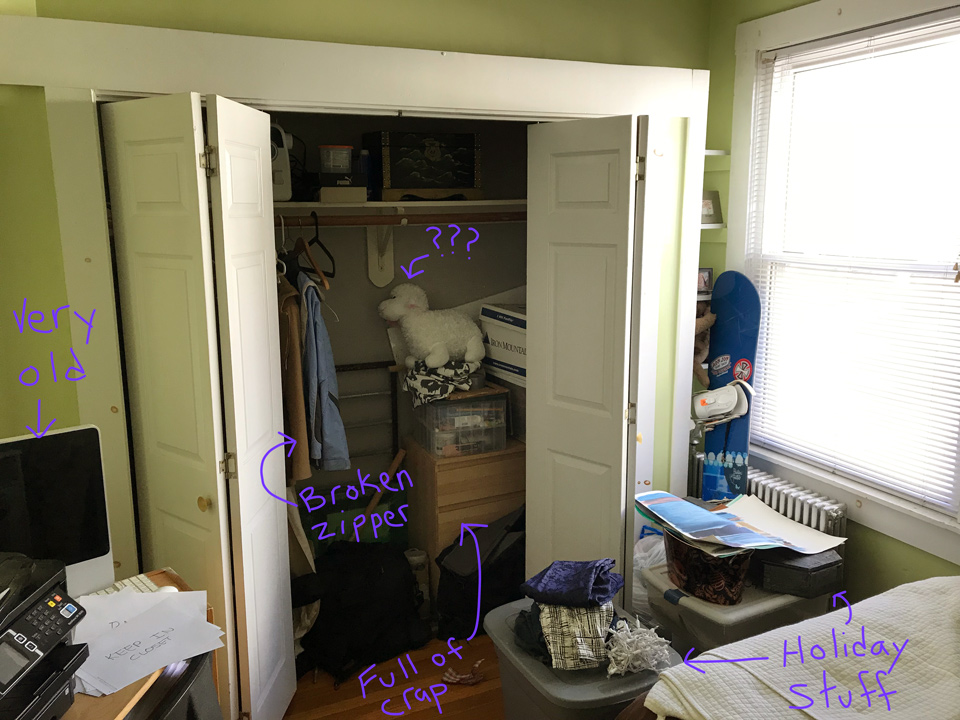
Our guest room closet aka the place where random junk goes to die
2. Completely empty the space. This is where having extra room will come in handy. Things will definitely get worse before they get better, and it’s good to just let the mess expand at this point.

Taking over most of the house
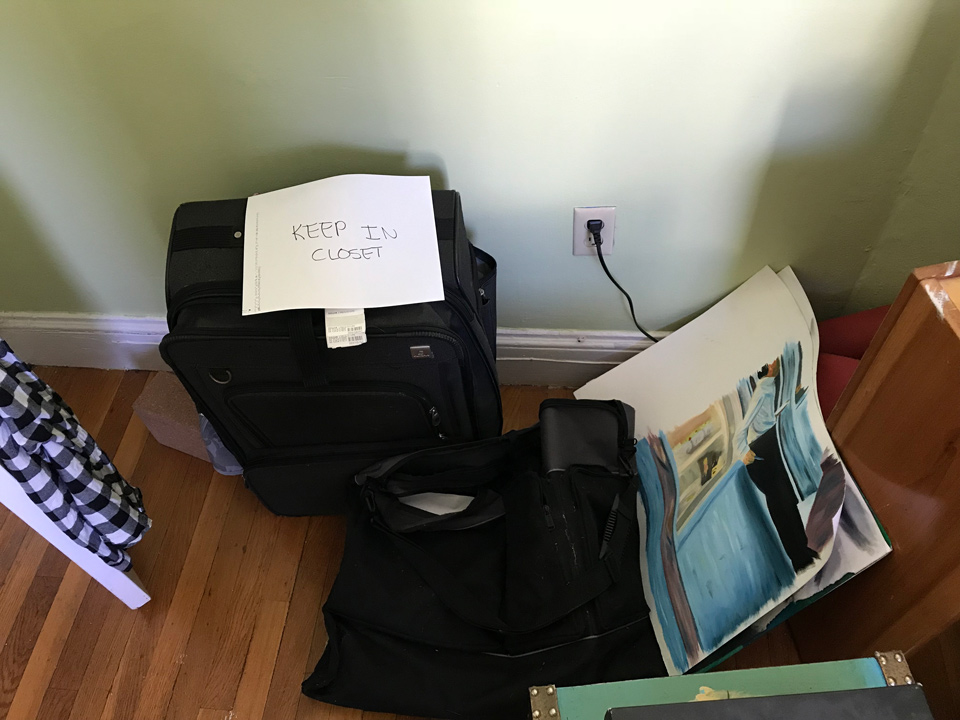
3. Sort everything. Use the paper and marker to make signs so you can group various types of stuff together. If you have enough space, it can be helpful to create piles in different rooms so things don’t accidently get pushed from one heap to the other. For our closet, we grouped things by the following categories:
-
- Trash/shredder
- Donate/give away
- Move to basement
- Keep in closet
We tried to limit the “keep in closet” pile as much as possible
4. Clean thoroughly. This is your chance to really deep clean a spot that may not usually get much attention. Maybe I’m weird, but I find that extremely satisfying.
5. Implement an organization system. Once you’ve gotten rid of the trash/donate piles, it’s time to put things away. The goal here is to set up a system that will allow you to use your space well — and won’t devolve into a total mess again in a few months. Think realistically about which items you truly need often so they can be the most accessible, and give every item, no matter how small, an assigned place.
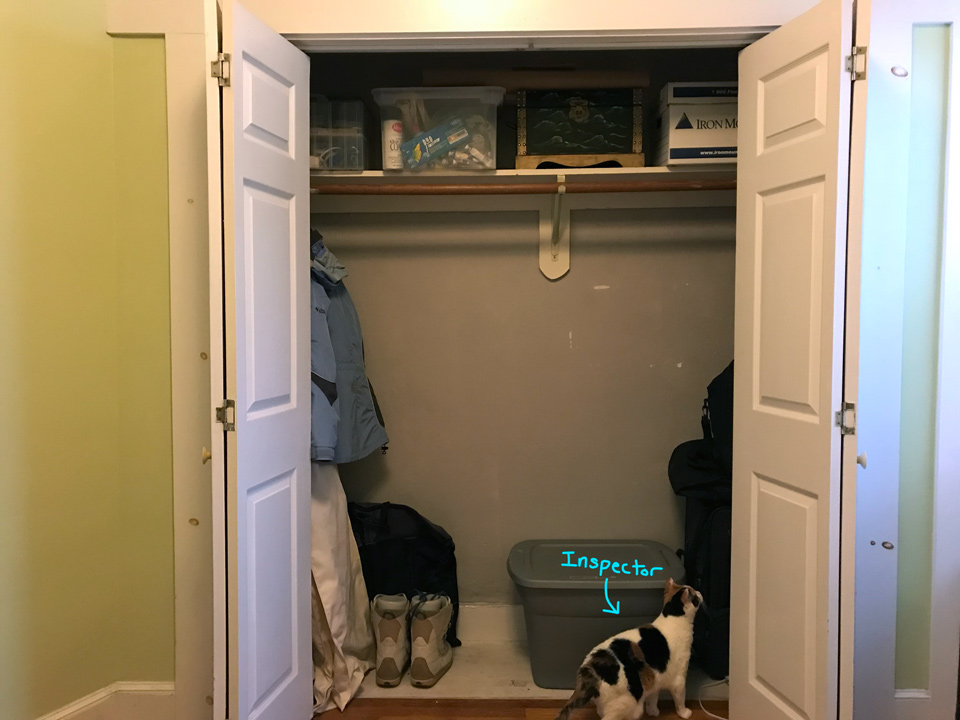
This closet is now much less anxiety-inducing for me!
And there you have it! It’s okay if your end result isn’t completely bare and minimal and perfect; the most important thing is feeling in control of the spaces you create. As I mentioned before, you can apply this basic technique to any or every part of your home to get organized in 2018.
All-purpose cleaner recipe
My wife and I use this daily for general surface cleaning around the house and it works great! Every now and then we have to bust out the big guns for the stove (Magic Eraser), but this spray is perfect 90% of the time.
- 1 part water
- 1 part white vinegar
- A few drops of dish soap (you can use essential oils instead, but we never have any)
Author’s note: this is my last monthly This Queer House column, but I’ll still pop up every now and then with new DIY projects and crafts. Please do let me know if there’s something you want to see here in the future! You can email me at jenna@autostraddle.com or find me on twitter @jennalykes.
This Queer House, Vol 9: End of Year Mailbag
It’s December, which means another year is almost in the books. Here at This Queer House, we’ve had some ups (my dining room furniture looks great!) and some downs (one word: caulk).
To finish the year off strong, I took to twitter to answer your burning DIY questions.
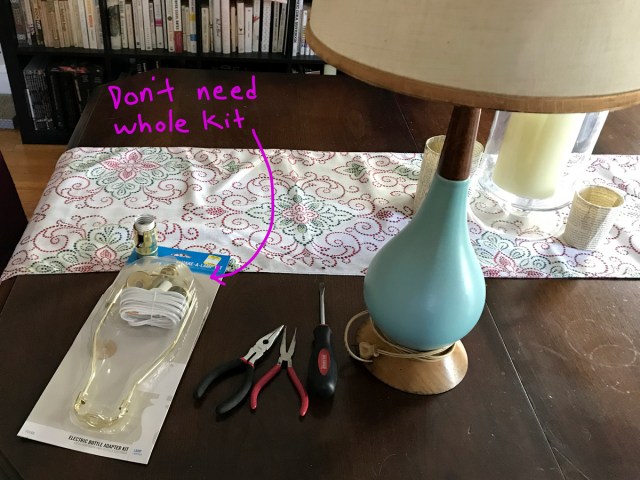
Question one is from @mchodora, who writes, “I need help rewiring a lamp. Please!”
Let me tell you what, the idea of rewiring a lamp is a lot more daunting than doing the actual thing. I borrowed an old, out of order lamp from a neighbor, and the whole project took well under an hour. Here’s how I did it:
What You’ll Need:
- Lamp
- Rewiring Kit – I accidentally bought a lamp-making kit, which came with a whole bunch of parts I didn’t need. All you really need is a new cord and socket and you should be able to reuse the old hardware.
- Pliers – I like using needle nose, for dexterity.
- Wire cutters – Many pliers have built-in wire cutters, so be sure to check.
- Screwdriver
What To Do:
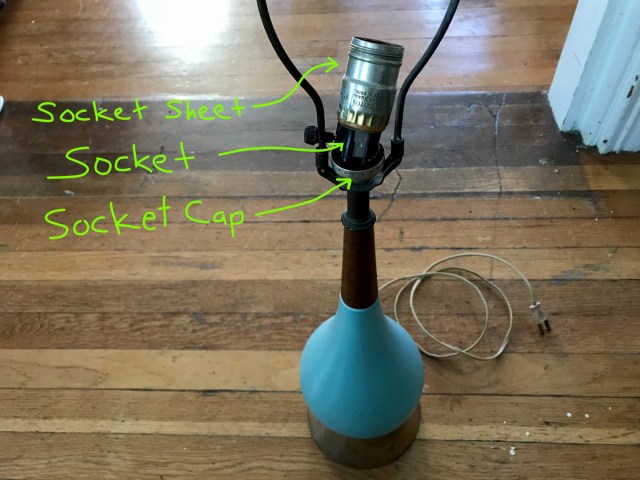
1. Take off the shade and remove the lightbulb. If it’s an older lamp, like the one I was working on, you might need to use some WD-40 and pliers to get the top cap off.
2. Remove the socket sheet and pull out the old socket. The socket sheet should just slide right off. I was able to pull the socket out of the socket cap easily, but you may need to use your screwdriver and gently pry it out.
3. Cut the cord and remove it.
4. Thread the new cord through. My lamp was a bit tall and tricky to get the cord through, so I took it all apart.

5. Reassemble the lamp (optional). If you took your lamp apart in step 4, now is the time to put it back together up to the socket cap.
6. Tie an underwriter’s knot with the cord extending out of the socket cap. I had absolutely no idea what this was, or how to do it, but I found a woman on YouTube who showed me how. She is lovely!

Halfway to an underwriter’s knot.
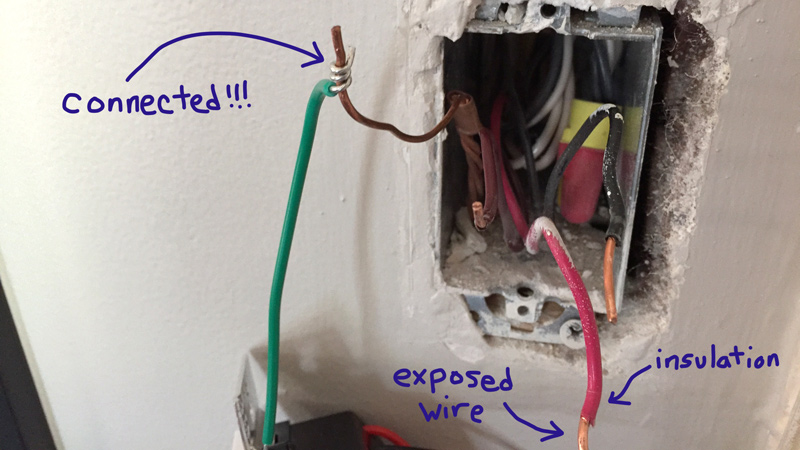
7. Identify the neutral conductor. Your kit should tell you which one it is. My kit claimed that one conductor had ribbing on the insulation, but tbh they both kind of looked ribbed. I asked my wife for a second opinion and she said, “Yeah, I think you’re probably right, but it’s a 50/50 chance anyway – just go for it.” Wise words when dealing with electrical work, indeed.
8. Connect the wires. Again, consult your kit here because they should tell you which wire should go to which screw. Loosen up the screws, wrap the conductors around, and then tighten the screws up.

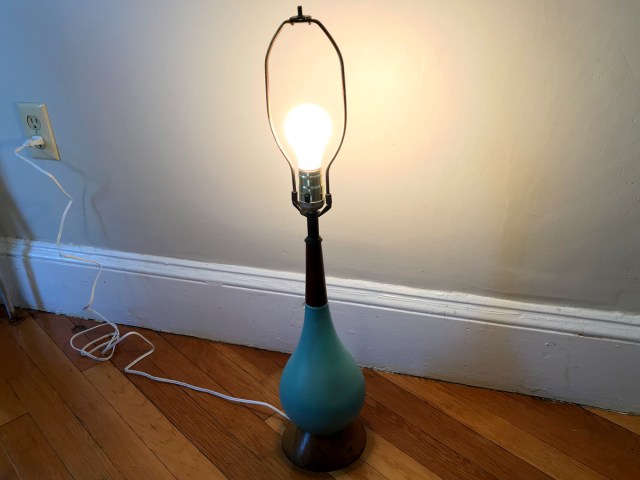
9. Push the socket into place and cover it with the socket sleeve. That’s it! All that’s left to do is grab a bulb and plug it in.
The next question comes from @33katiek: “Love this column! I’d also love to know how to replace moldy silicone between my vanity unit and the tile backsplash!”
Katie, just reading this question gave me intense flashbacks to a column I wrote a few months back where I replaced the caulk in my bathtub. Assuming what you need to do is similar to that, I’ll direct you there and let you learn from my mistakes.
Our final mailbag question, from @lucyhallowell, asks, “how do you stop a toilet from running?”
This actually happened to our toilet recently, and it wasn’t too difficult to get it to stop. Here are some possible fixes:
-
- Check the fill tube. If something is wrong with the connection of the fill tube, the tank might not properly fill up. Check to make sure the tube is firmly secured onto the fill valve and that it sticks up about an inch out of the overflow tube.

-
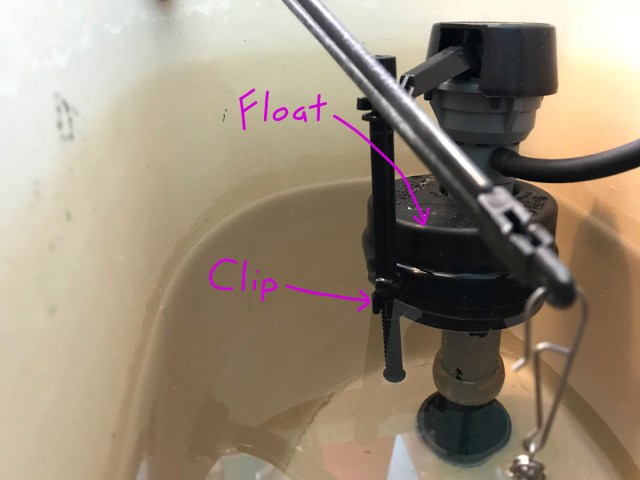
- Adjust the float. If your float is set too high, it could cause water to spill back into the overflow tube and make the toilet keep running. The float should be easily adjustable – look for a clip to squeeze.
-
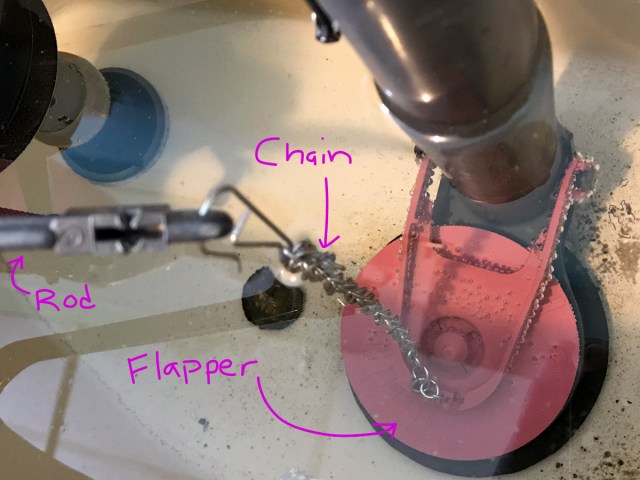
- Check the flapper chain. Ideally, the chain should connect the flush rod (the piece that attaches to the actual handle on the outside) to the closed flapper (the red seal on the bottom of the tank) with just a little bit of slack.
- Replace the flapper. This is what we had to do to fix out toilet, which would run intermittently, and it seems to be a common issue. If the flapper doesn’t seal thoroughly, the water will leak through slowly and cause the toilet to run. We weren’t able to match the type of flapper exactly, but buying a universal replacement has done the trick. Flappers are easy to install – most snap right on.
Well that’s it for This Queer House in 2017. I’ll see you with more DIY tips/projects/lessons in 2018!
This Queer House, Vol 8: Baby, It’s Cold Outside
Winter in New England can be magical: crisp days full of fresh snowfall, and nights spent cuddled under a cozy blanket. I love it all. (Well, I love it for at least the first few months. Ask me again in March.) Something that’s not so awesome about New England winters, however, is paying your heating bill. Living in a drafty old apartment can be especially frustrating, because you’re spending money to heat up air for it to just escape outside. In this month’s This Queer House, I’ll show you how to get your home ready for winter by keeping the warm air in and the cold air out with a DIY draft stopper, as well as a few other helpful tips.
What you’ll need:
- Fabric – One yard of fabric will be more than enough to make a draft stopper. Depending on the size of your door or window, you can probably get about three stoppers out of one yard of fabric.
- Sewing machine/supplies – I guess if you don’t have a sewing machine you could try to hand sew the entire thing, but I wouldn’t recommend it.
- Needle and thread – You will definitely need to hand sew a small opening to finish the stopper.
- Measuring tape/marker/scissors
- Recycled newspaper cat litter – I used a brand called “Yesterday’s News” because that’s what Martha Stewart told me to do and I always listen to Martha.
What to do:
1. Measure your doorway or window. The most common door width is 32″, and that’s what all my doors are, but you should measure to check yours.
2. Cut your fabric. You need a rectangle of fabric that’s the width of your door/window + 1″ on either side by a length of 9 ¼”. So if your door is 32″, cut a piece of fabric that’s 34″ x 9 ¼”.
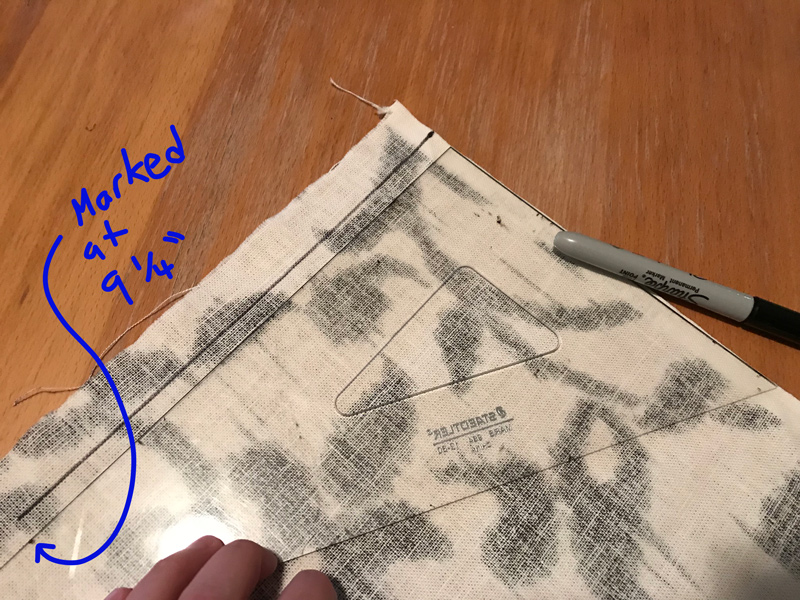
I use a triangle and mark the measured length on it- that way my corners end up square.
3. Sew the edges. Fold the fabric in half lengthwise (with the less pretty side of the fabric facing out) and sew it around the edge. Make sure to leave a small gap (2-3″) on the long side so you can turn the whole thing right-side in and fill it up. I haven’t used a sewing machine since I made a kangaroo costume in 6th grade, so my wife helped me out with this step.
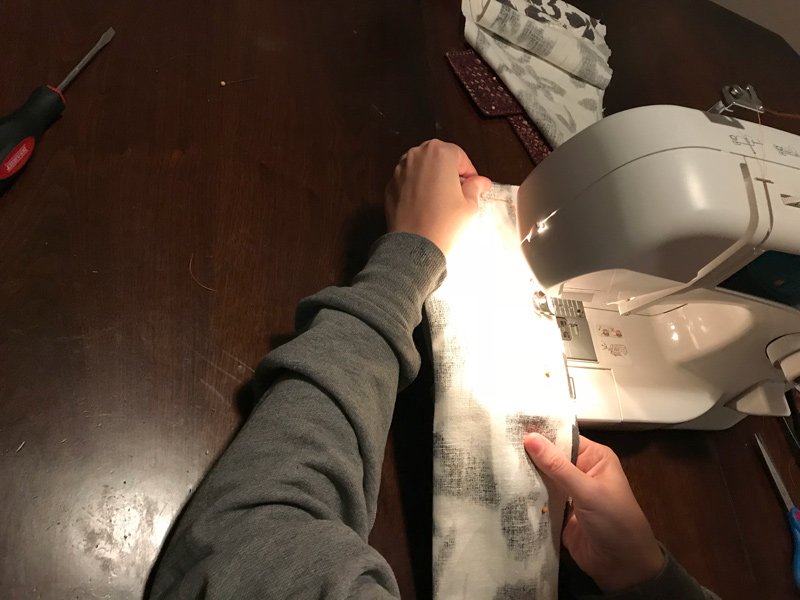
My wife is the hero I need, but don’t deserve.
4. Fill it up. I made a quick funnel out of paper and tape to make this process a little easier. You want to fill the draft stopper up, but don’t overfill it so much that it’s totally stiff.
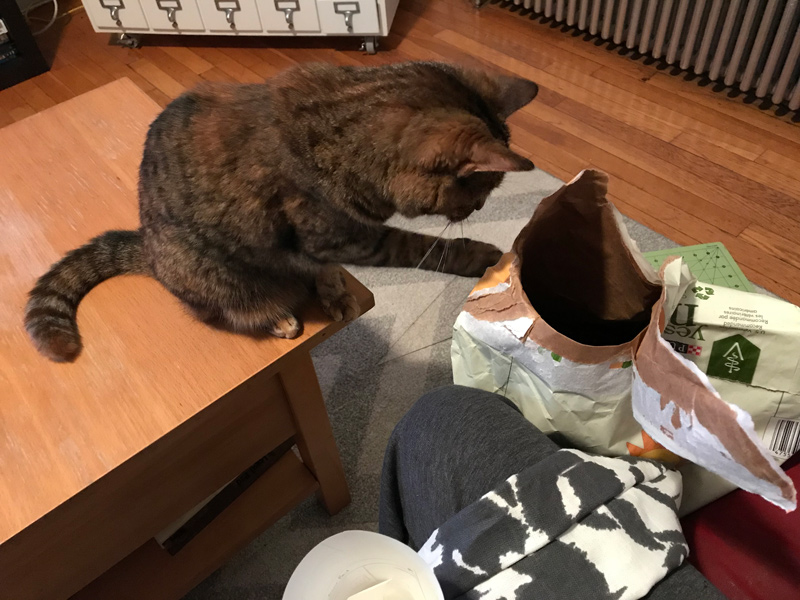
Flapjack was less than helpful during this, but, to be fair to her, I was basically playing with kitty litter right in front of her.
5. Hand sew the opening. I’m not the best seamstress, but you don’t have to use a pretty stitch – just get the job done.
6. Stop those drafts! Use a draft stopper anywhere you notice cold air leaking under a closed door or window.

More winterizing tips
Other ways to seal drafts – The most simple way to keep warm air in your home is to keep your blinds or curtains closed – especially if they aren’t on windows that get direct sunlight. You can also check for drafts around the edges or your windows and seal any gaps you find with exterior caulk. (See here for more info on caulk, and also I hope you’re better at using it than me.)
You can also seal your windows with an insulation kit, which essentially means you cover them in plastic wrap. Unfortunately, my cat weirdly loves to chew on plastic, so this doesn’t always go well or last very long in my house. One thing I really do like about the window insulation kits I have bought is the Frost King logo.
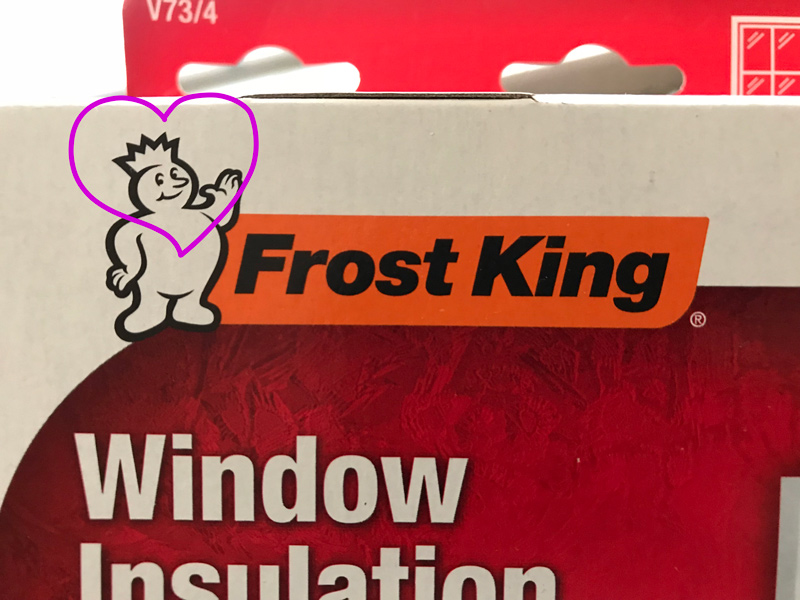
Look at this lil buddy!
Check your heating – Make sure the heat is actually working well. If you have a hot water radiator, check that the entire thing is giving off the same amount of heat. If one side is getting hot, but one side is staying cool, you might have to bleed your radiator. You can do this by taking a radiator key (or just a flathead screwdriver, depending on the valve) and slowly turning it counterclockwise. You’ll hear a rushing sound, which is good – you want to release the trapped air. Once water starts to drip out, you can close the valve. Your radiator should work fine after that.

Hot water radiator valve + key
I hope these tips help keep you warm in the coming months. As always, please share any other techniques you may have picked up over the years in the comments.
Please let me know if you have any DIY related questions or projects that you would like me to answer or address in next month’s column. You can leave those in the comments here or hit me up on twitter (@jennalykes) or email (jenna@autostraddle.com).
This Queer House, Vol 7: Halloween Decorations on a Budget
Halloween is my wife’s favorite holiday. Some people get excited about Christmas carols or lighting the menorah, but Steph’s eyes light up at the mention of a psychological thriller movie marathon. Things get pretty festive in our apartment around this time of year, is what I’m saying. Instead of spending all our money at the local Target Booporium™, I decided to branch out from my usual semi-practical This Queer House tutorials and create a few DIY Halloween decorations on a budget. Get ready to get spooky.

Clockwise from top left: Halloween-themed Luminaries, Bloody Handprint Window Clings, Seasonal Stenciled Doormat, Mini-foam Coffin
Project #1: Halloween-themed Luminaries
What You Need
- Empty, clean cans in any size
- Something sharp — I happen to have an awl, but you could use a hammer and nail in a pinch
- Black marker
- Black paint
- Tea lights
What To Do
1. Draw your design. I made one jack-o-lantern and one with a few bats on it. Because you’re going to be punching holes, bigger designs end up looking better. My smaller bat ended up just kind of looking like a blob.
2. Punch some holes. Because my tool was very sharp, it wasn’t too difficult to just push it through the can. If you’re using a hammer and nail and find that it is denting the can, you can first fill the can with water and freeze it.
3. Paint the can. I think black is best (as it provides the most contrast), but feel free to use whatever color you want. You might have to re-poke some holes if the paint fills them in.
4. Would you light my candle? Luckily, I happen to have literal hundreds of tea lights because I convinced my wife I just really needed them when we were at Ikea several years ago.
The Cost
Dollar amount: Only like $3 on cheap black washable paint. (In retrospect, I probably should’ve sprung for some better quality stuff though.)
Time and emotional amount: Not bad! Less than an hour to draw my designs and punch the holes. Dealing with the crappy paint did take a small emotional toll on me, however, and I might get new paint eventually to finish them.
Project #2: Bloody Handprint Window Clings
What You Need
- Elmer’s Glue
- Food coloring (lots of red and a little bit of blue)
- Cling wrap
- Scotch tape
- Heat gun (optional)
What To Do
1. Spread out the cling wrap and tape it down. Protip: pick a spot that’s out of the way for set up. That way you can leave the project alone to dry for as long as you need to.
2. Mix up your blood-glue. I poured food coloring directly into the Elmer’s bottle, because it seemed like less to clean up and also easier to apply. (And it was!) I used almost a full container of red food coloring and 3-4 drops of blue for about 3.5 oz of glue.
3. Make handprints/splatters. I applied the blood-glue to my hand to make some rough prints, but then applied more directly from the bottle to make sure they were thick enough. Also, they tend to shrink a bit as they dry, so it’s best to make things a little bigger than actual size.
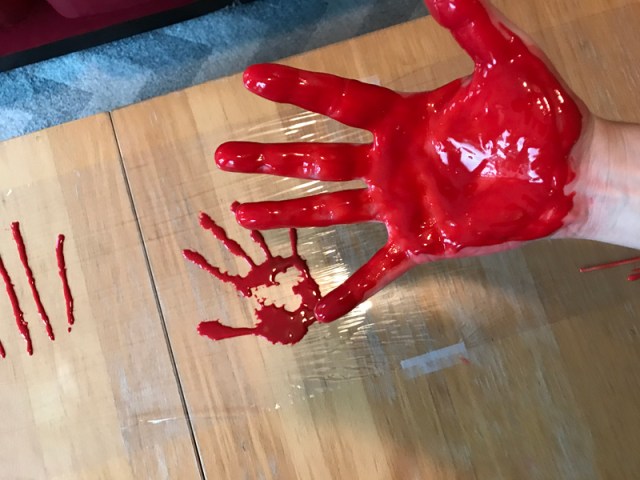
My hands were red for quite a while after this, use gloves if you’re not into that.
4. Let it dry. This took way longer than I expected (about 2 whole days). We ended up moving the whole piece of cling wrap to another room because we wanted to use our living room table, which, as you’ll see in step 5, was a mistake.
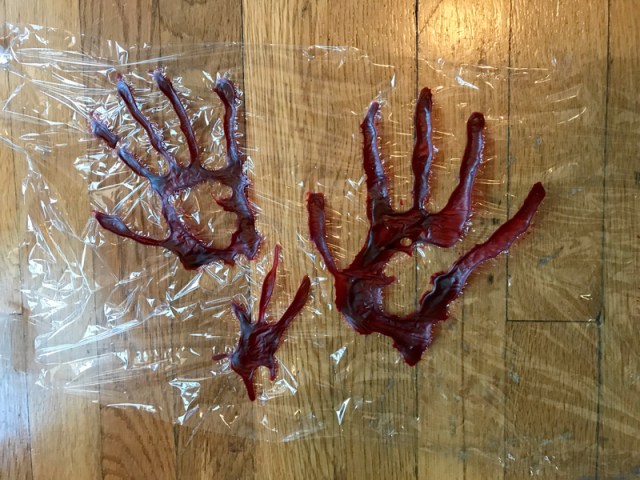
Very crinkly handprints
5. Apply to windows. The handprints and splatters came off the cling wrap really easily, but I had a tough time getting them to stick on my windows. I think that they tightened up and dried wrong because we moved the cling wrap.
I figured heat would help them stick, so I tried a regular hair dryer at first and that didn’t do anything but frustrate me. It never quite got hot enough, but it also blew too much air even on the lowest setting. I was about to throw in the towel when I remembered that I convinced my wife we needed a heat gun when we were working on our wedding crafts. (Are you seeing a theme here?) The heat gun worked perfectly, but I did burn my fingers a little.
The Cost
Dollar amount: 0$! I had everything for this project around the house already.
Time and emotional amount: Between the actual time it took for the blood-glue to dry and the angst and physical pain when I tried to stick handprints to the window, this project felt like more trouble than it was worth.
Project #3: Seasonal Stenciled Doormat
What You Need
- Plain doormat
- Fabric paint of some kind and brush
- Stencil OR supplies to make your own stencil (poster board, blade, cutting mat, pencil/marker, ruler)
- Scotch tape
What To Do
1. Get your stencil ready. If you’re using a pre-made stencil, you’re done with step 1! Congrats! If not, make one now. I printed out a very scary vampire cat and then drew a grid to make it easier to scale up. Once I sketched out the design, I cut it out with my blade.
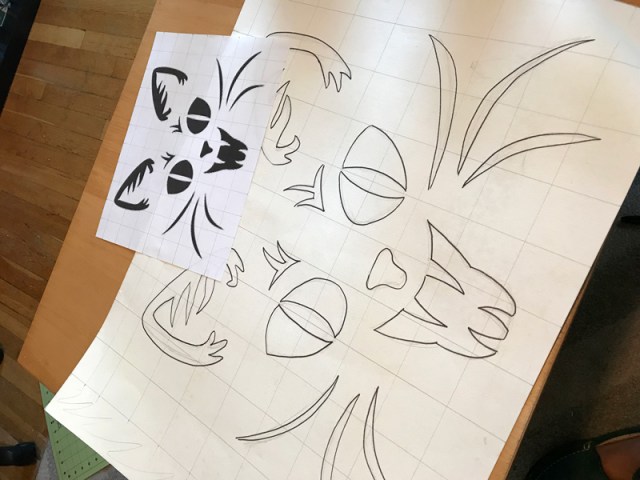
Look at this terrifying kitten!
2. Tape the stencil to the doormat.
3. Paint it. This is where things went awry for me. I bought spray fabric paint, because I figured it would be super easy and quick. Reader, it was not. First of all, the can ran out of paint in about 20 seconds. The paint that did come out did not show up on the dark fabric at all. This was a failure.
4. Paint it, take two. This time I used regular fabric paint and a brush, and it worked a lot better. My doormat has textured grooves in it, which I didn’t think would matter for spray paint, but turned into an annoyance when using a brush. But I persevered, don’t worry.
5. Proudly display.
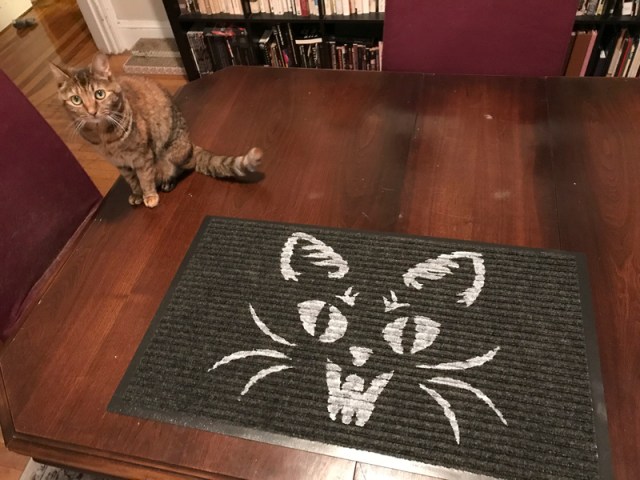
Actual cat not impressed.
The Cost
Dollar amount: The most expensive project of the bunch for me because of the paint mishap, but you could do it for around $12 or so.
Time and emotional amount: Altogether, probably about 2 hours to make the stencil and paint. Some emotional stress because of the spray paint, but overall — not unenjoyable!
Project #4: Mini-foam Coffin
What You Need
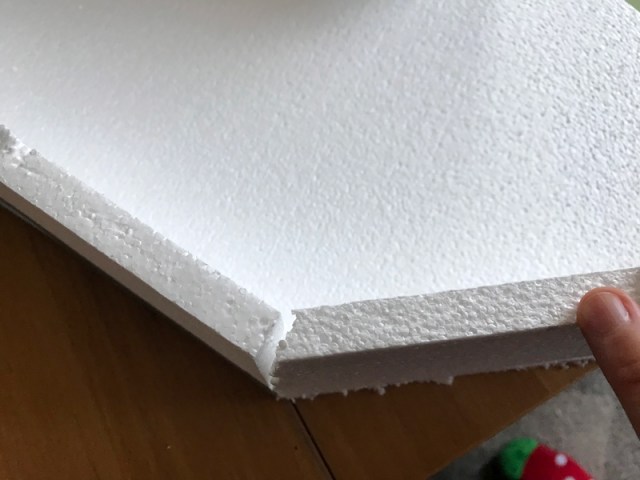
- Foam — I got it at a craft store, but you could also hit up a hardware store and it would probably be cheaper
- Blade
- Ruler
- Duct Tape
- Screwdriver or other blunt instrument to create texture
What To Do
1. Measure and cut your foam. I first measured and cut the top piece to look like the coffin shape I wanted. Then I traced that to create the bottom and measured out the sides by holding pieces up to each edge of the top. It was very scientific.
2. Assemble bottom and sides. The Duct Tape is easy to work with and it’s actually a forgiving fastener, so it’s not too hard to hide mistakes if you didn’t cut everything perfectly straight. I did have to trim some of the corners in order to get them to fit properly, but I just carved away a little at a time until things fit.
I’m a carpenter, basically.
3. Add wood texture to the lid. I used the screwdriver to dig into the foam and create the illusion of wooden boards.
4. Paint it. The crappy quality paint actually worked pretty well on this because it ended up looking like a gray wash on the whole thing. Then I was able to add more paint to a few areas and create a little depth.
5. Add weird stuff inside. It would be awesome and creepy to put a doll in a coffin this size, but we are a very strict Doll-Free Household, so we settled for a hand.
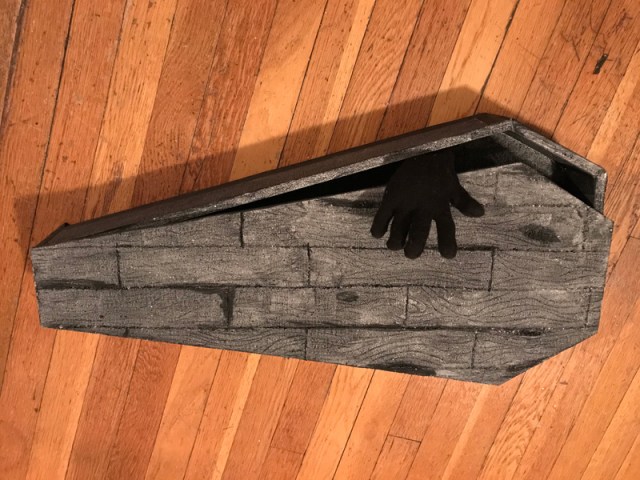
Idea for the hand and hand placement by my wife. October is truly her time to shine.
The Cost
Dollar amount: About $15 for foam and duct tape, and I reused the cheap paint from Project #1.
Time and emotional amount: This took the longest in terms of time spent actively working; I would guess around 4 hours, probably. Despite that, I actually really like building projects on any kind, so this was my favorite of the bunch.
Now all we need to do is buy a ton of candy (even though we live on the second floor and don’t get trick or treaters) and our home will be ready for Halloween. I plan on spending the next week living in a state of nearly constant terror, as I love scary movies but am a total wimp about them. I hope you all enjoy this most wonderful time of the year!
This Queer House, Vol 6: Of Mice and Murder
I do not like mice. I mean, I am obviously aware that they can be kind of cute and even smart, but you know what? There are a lot of animals that are even cuter and smarter, and they don’t try to hang out in my apartment uninvited. It’s like, do you pay rent here? Do you do the dishes? You absolutely do not, mouse. All you do is make me feel unsafe in my own home.

Yes, I am aware this is technically a cartoon, BUT THE SENTIMENT STANDS.
My wife and I have been living in the same apartment for three years and, up until recently, we had been blessed by the Mouse Powers That Be. Never once had we seen or heard any sign of pests whatsoever. I think you probably know where I’m heading with this, but I’ll tell you the facts anyway.
The beautiful sanctity of our apartment was cruelly dashed a few weeks ago when Steph, my wife, woke up to a grisly murder scene in our dining room. The perpetrators, aka our cats, did a real number on the “victim” (though I use that term loosely). And even though our cats are obviously heroes (and so is my wife because she did not wake me up before disposing of the body), the damage is done. The illusion of safety has been shattered and now I’m a paranoid mess who runs their robot vacuum maid (Rosie the Roomba) for protection almost every day.
So, what can you do to protect yourself from the same nightmare that has befallen me?
Preventative care around your home
Keep it clean. Here’s the thing: mice are going to be around, especially if you live in a city. As much as I wish it were not the case, there’s just no getting around that. My whole thing is just to hope that someone else’s apartment is more appealing to a mouse than mine is. To that end, I recommend cleaning regularly and storing food in airtight, unchewable containers whenever possible.
Figure out where mice could get in. If you have have any holes in your walls, take a look at last month’s This Queer House and fix them. If there are gaps in other places (like near pipes or under your cabinets or appliances), you can seal them with caulk or stuff them with steel wool, which mice cannot chew through. Make sure you look really hard for gaps! Those little fuckers can get through tiny spaces, like even one the size of a dime.
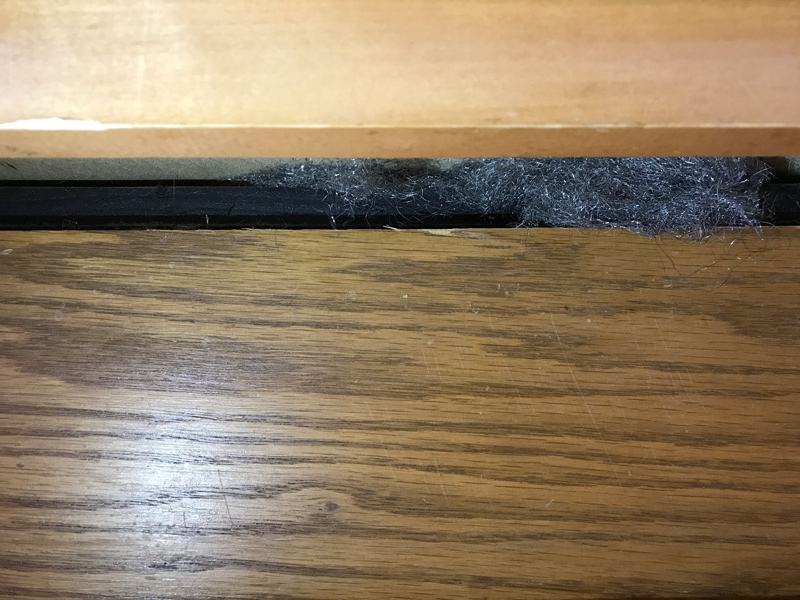
Actual steel wool in my actual kind of crappy kitchen
Get a cat!

Look at my little murder bbs I love them so much
Natural mouse remedies
Peppermint oil. I have read that mice do not like the strong smell of concentrated peppermint, so one thing you could try is to soak cotton balls in peppermint oil and leave them in susceptible areas of your home. I honestly do not know if this actually works, but even if it doesn’t it’ll leave your house smelling minty fresh so there’s really no downside.
Used kitty litter. I guess this is a thing people do. Not sure if there’s a black market for cat piss or anything, so you’re on your own there.
Less natural, but not murder-y
Ultrasonic Pest Repellents. These are things that plug into the wall and emit high frequency ultrasonic waves, which allegedly keep rodents (and other pests) away. However, Steph told me that she once watched a mouse casually amble across her dorm room floor, with no fucks to give, TOWARD one of these things, so I make no guarantees about their effectiveness.
Non-kill traps. I have heard that these traps work great as long as you bait them well (peanut butter seems to work best), but I’m not a huge fan for a few reasons. One, you have to deal with a live mouse at some point. Hard pass from me on that front. Also, like, where are you going to release that thing? How far do you need to go so that it doesn’t just immediately come back inside? Seems like A Lot™ in my opinion.
Burn them all with fire
Bait traps. These were recommended to me after my recent scare, but I haven’t tried them out yet. The premise is that the mouse comes into the trap and takes the bait (poison) and then they go die somewhere else. This could either be a very good or very bad thing depending on where that somewhere else is.
The “Rolling Log” bucket trap. I watched a youtube video about this and honestly I’m pretty scarred, so I don’t want to talk about it. The video is called “11 Mice In One Night. The Rolling Log Mouse Trap In Action. Best Mouse Trap Ever,” and you can check it out here (cued up to where the action starts), if you’re into that sort of thing.
Classic snap traps.

I hope things go better for you than they usually do for Tom
Ah yes, the Tom and Jerry Gold Standard. If you didn’t know already, I’m a total wimp about mice (and most things tbh) so I have never actually used one of these. It’s probably gross to clean up, but if you are planning to kill your rodent intruders this kind of seems like the best way to do it.
NOT recommended
Sticky traps. Listen, I know there is a section of this column called “Burn them all with fire,” but sticky traps seem inhumane even to me. Let me tell you a little story about one of the worst nights of my life. When Steph and I were just wee little scamps in college sharing a twin-sized bed, all of the mice in my neighborhood decided to mount a calculated attack on my apartment.
I won’t go into all the details, but there were at least five mice spotted in a span of like maybe twenty minutes one night. I ended up crouched on top of my toilet wearing nothing but underwear and galoshes. Steph ended up throwing a mouse on a sticky trap (that was trying to chew its own arm off) out my second story window into the dumpster below. We all do things we’re not proud of in the heat of battle, okay? Anyway, the point is just don’t get sticky traps.
Welp, fucking good luck out there. Do you have any other tips? Share them in the comments, please, for my sanity.
This Queer House, Vol 5: How to Patch Walls and Other Easy Moving Tips
Happy Back-to-School season! Even though I finished school some time ago, I still get excited around this time of year. For me, September will always feel more like a new beginning than New Year’s Day. I don’t know if it’s like this where you live, but here in Boston September 1st also means that everyone and their mom is moving. Specifically, it means Allston Christmas and U-Haul trucks getting stuck on Storrow Drive and convincing friends to perform several hours worth of manual labor in exchange for beer and pizza.
If you’re moving this fall, one way to help ensure that you get a full security deposit back from your landlord or management company is to repair any obvious issues in the apartment. In this month’s This Queer House, I’m going to take you through one of the easiest cosmetic fixes — patching small holes in your walls — and talk about a few other ways to leave your apartment looking as un-beat up as possible.
What you’ll need:
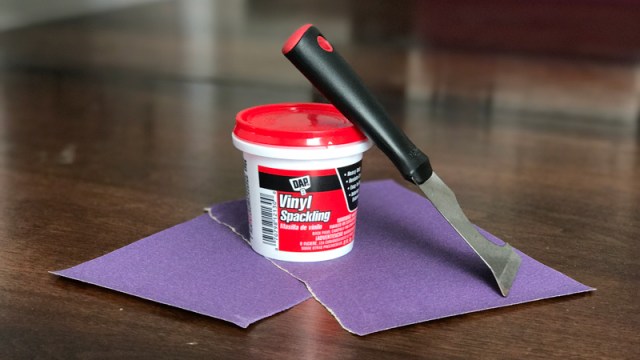
- Spackle – I happen to just have Vinyl Spackling, but if you are either impatient or new to the process you might want to check out the kind that has Dry Time Indicator. It goes on pink and dries white, so you don’t have to worry if it’s ready to sand or paint. (I have some feelings about why they made the “easy version” spackling pink, but I’m not going to get into that right now.)
- Putty knife or similar tool – I used a 5-in-1 tool for this and it worked fine.
- Sandpaper – You definitely don’t want to use sandpaper that’s too rough – between 100-150 grade should be good. (I used 120, if you were wondering.)
- Painting supplies (optional) – If the wall wasn’t white (or close to it) to begin with, you’re going to want to paint over the patch.
What to do:
1. Assess the damage. I’m going to illustrate how to fix any hole or gash that is approximately half an inch or less in diameter (basically just about any kind of nail or screw hole). If you’re looking to patch something larger, skip down to #5 for some more information about that.
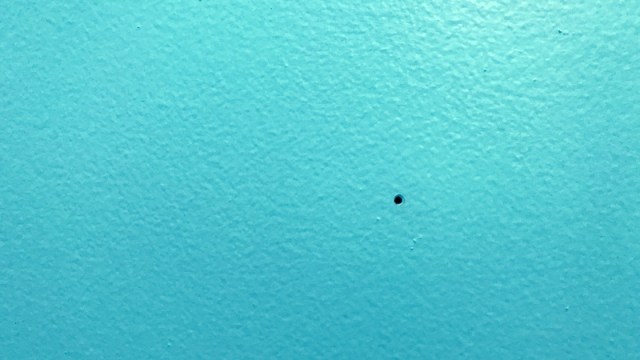
No, *YOU* made a hole in your wall just to repair it for a DIY column.
2. Apply spackle and let dry. If the hole is on the larger side, you might want to apply one layer of spackle to fill it up. Then let that dry and apply a second layer to make it is fully covered. If it’s just a small nail or thumbtack hole, one layer should be fine. Make sure to apply the spackle thick enough to cover the hole, but keep in mind that the thicker the bump the more you are going to need to sand it down to even the wall out. Don’t get too wild with it, is what I’m saying. Check the packaging for any exact specifications in terms of drying time and temperature/moisture restrictions.
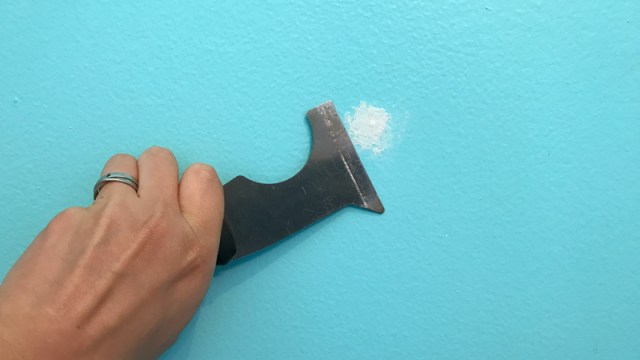
Applying the spackle.
3. Sand the surface down to match the wall. Be gentle and use your fingers often. (HEYO) But seriously, no need to apply a ton of pressure right off the bat because this stuff should sand really easily. As you’re sanding, run your fingertips across the wall to check for smoothness.
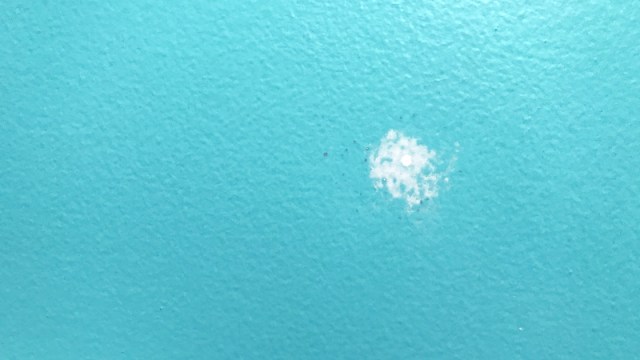
After sanding.
4. Paint patch to match wall color. (optional) There are a lot of variables for this step. If the walls are close enough to white, you can probably get away with not painting over the patch. If the walls are dark or vibrant and the patch is really obvious, I sure hope you have the exact paint (or at least know the exact brand/shade) that was used in the first place. If not you can try to match it, but that’s a real gamble and you might end up having to paint the whole room.
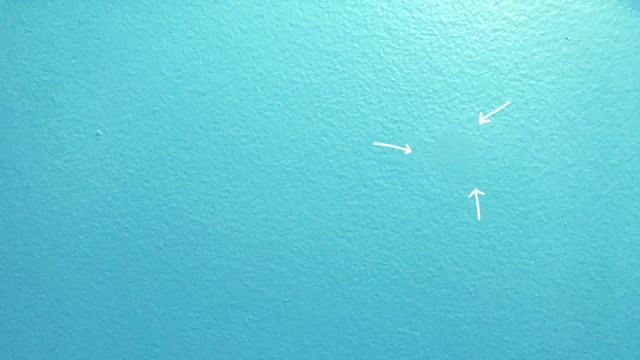
I bet you can’t even tell where the hole used to be! I put arrows to help you, don’t worry.
5. What do I do if I have larger holes in my walls? For anything bigger than about a half an inch or so, you’re going to want to add some extra stability before you spackle the hole. A ton of different brands sell kits with instructions that should have you covered up to about 6in or so in diameter. Basically, you just apply a self-adhesive fiberglass patch over the hole and then cover it all up with spackling (multiple layers, letting each layer dry between coats). In this case, you do want to use extra spackling and cover an area larger than the patch by a few inches. That way as you’re sanding, you can gradually feather the edges to meet the wall and make any slight bump less obvious.
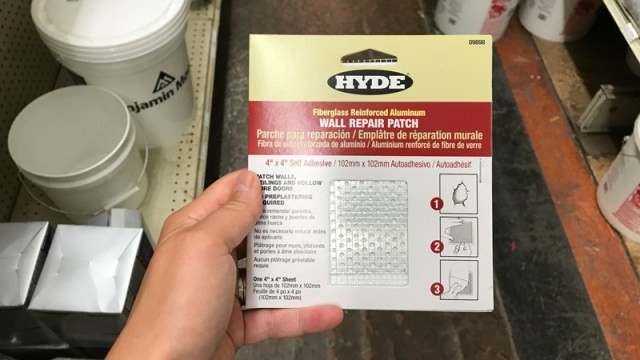
I almost bought this, but then I decided I did not want to create a several inch wide hole in my wall.
If the hole is bigger than six inches, what are you even doing in your apartment? I am not equipped to help you with that.
Other staples for when you’re moving and you want your security deposit back:
- Magic Eraser – Listen I wanted to hate this product, but it actually is fucking magic. Use this on any aggressive stains in your apartment and no one will know how many parties you had.
- Wood stain pencils or markers – These can come in handy for any obvious scrapes or scratches on wood floors that you didn’t notice until you moved the furniture.
- Trim paint – If the paint matches (or is very close to matching), you can touch up any obvious scrapes or chips without re-painting everything.
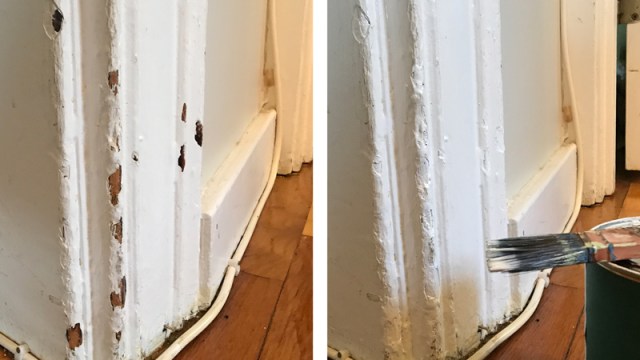
Before and after one really quick/semi half-assed paint job. Looks a lot better with almost zero effort!
Well there you have it, fellow queer renters. I hope these tips help you get back your full security deposit whenever a U-Haul is in your future.
This Queer House, Vol. 4: Easy Wood Restoration
Once upon a time, when my wife Stephanie was still my girlfriend, we moved (on very short notice) from Washington, DC to Boston into an apartment we had never seen in person before. The next few months were absolutely wild — full of packing and unpacking, new job situations, and last minute wedding planning/crafting. After things calmed down, Steph and I finally had a chance to assess our apartment, which was bigger than anywhere we had lived before. Big enough, in fact, that we had a whole extra room and no furniture to fill it.
So, like the good queers we are, we found ourselves in a rented U-Haul truck on New Year’s Eve 2014, heading to meet a man about a cheap Craigslist dining room set. The furniture was more than a little gently worn from years of use, but it was a solid set that just needed a little extra love. The technique I used then (and re-created more recently to freshen it up) is not a full restoration — I did not sand everything down and start from scratch. What we’re doing here is more like restoration-lite, but it should be enough to salvage a Craigslist (or yard sale or attic) find nine times out of ten.
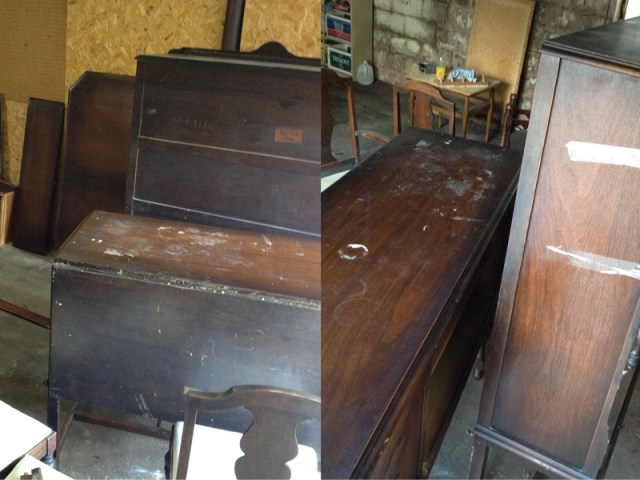
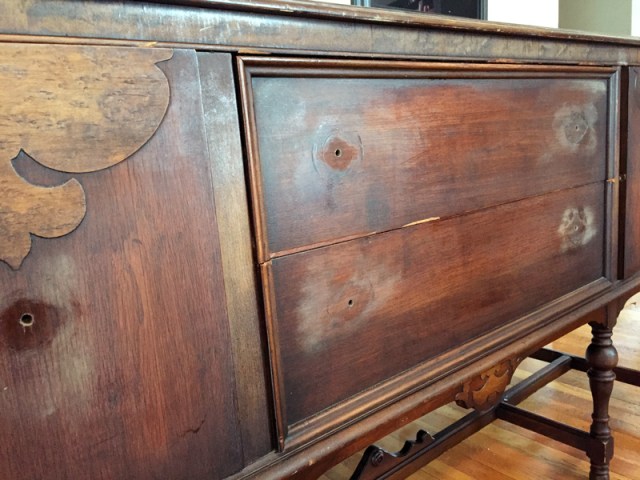
2015 Before pics. Pretty rough shape.
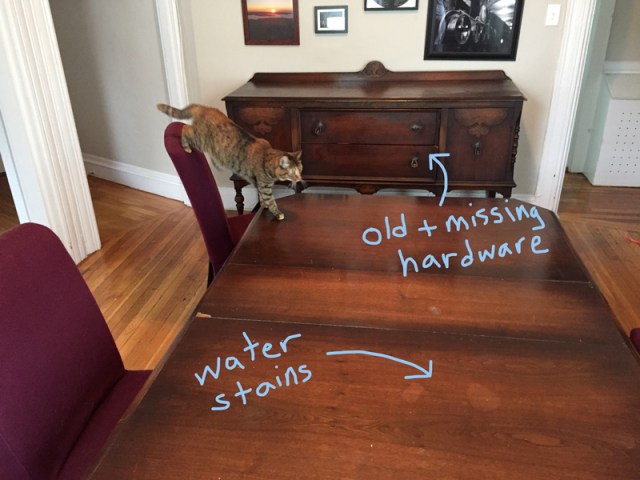
2017 “Before” pics. Not as bad, but not great.
What you’ll need:

This is the most awake/excited Ellie has ever looked in her whole life! Clearly a fellow DIY lover!
- Murphy’s Oil Soap – This is really the best, 10/10 would recommend keeping a bottle for random projects around the house.
- Lemon or Orange Oil – I have heard that it’s not too hard to do a homemade version of this. If anyone out there has tried it, please advise in the comments.
- Steel Wool – Grade #0000
- Rags – I always cut up old t-shirts as needed, because I have way too many.
- Denatured Alcohol – Optional
- Paste Wax – Also optional, but recommended
- Hardware (cabinet knobs or pulls) – Optional, dependent on project
What to do:
1. Remove hardware (optional). If you’re replacing knobs or pulls, take them off now so you can clean the furniture really well without them.
2. Scrub it down! Use about ¼ cup of the Murphy’s for every gallon of water, mix it all up in a bucket, and give the furniture a deep cleaning. When I was a kid, I always thought my mom was crazy because she used extremely hot water when she did the dishes. I have apparently become my mother (BUT ONLY IN THIS VERY SPECIFIC WAY) because I nearly burnt my damn hands washing the furniture. But you know what? I really do feel like hot water gets things cleaner, so I’m going to go ahead and recommend you use the hottest water you can stand here. (My wife very intelligently suggested wearing gloves for this. Great advice that I did not follow!) Also, have a dry rag handy at all times, because you don’t want to let a lot of excess water sit on the wood. Use the classic wax on, wax off technique, is what I’m saying.
3. Use denatured alcohol to remove water stains (optional). The most important thing about this step, if you’re doing it, is to use as little alcohol and force as possible so you don’t totally strip the finish. Dip a tiny corner of a clean rag into the alcohol and let it seep into the material before you start to very gently rub at the water stains.
4. Buff it with steel wool to remove any other stains/paint/dirt/etc. This step also requires a light touch; you basically want to affect the wood as little as possible while still getting the desired result. Go with the grain of the wood and do what feels right. At this stage, your furniture is probably going to look even shittier than when you began. That’s okay! Everything is going to be fine.

If it looks like this, you didn’t ruin anything probably!
5. Replace hardware (optional). When I lived in DC, one of my very favorite places was Community Forklift, which is a nonprofit reuse center for home improvement supplies. They have a huge warehouse, and it’s full of all sorts of treasures! When we moved to Boston, I was bummed to say goodbye, but I found out recently about Habitat for Humanity ReStore and bought my hardware there! It’s really similar to Community Forklift and also there are locations all over the US! Go forth! You’ll be supporting a good cause while getting home improvement supplies for cheap.
Pre-hardware replacement buffet.
6. Clean it again. Get back at it with the Murphy’s to remove any steel wool dust/dirt/etc. (Same as step 1.)
7. Polish with citrus oil of your choice. Depending on the brand or type of oil the directions might differ slightly, so just do whatever the bottle tells you. This stuff smells nice and makes the wood look real shiny and new!
8. Finish with paste wax (optional). I had never used this before, but I decided to give it a try this time and I really liked the finish. The end result is less high gloss and more of a luster, which I really like. You might want to test this on a small less-visible part of the wood to see if you’re into it before committing to buffing it onto your whole piece.
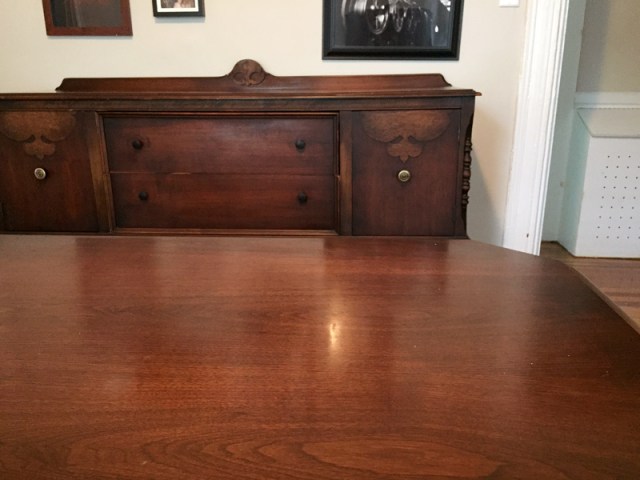
I fucking love my dining room, y’all.
So there you have it! Please bear in mind that this tutorial isn’t going to save every piece of old wooden furniture in the world. If you find something that is deeply scratched or stained — and you want it to look brand new — you’re probably going to need to do a lot of power sanding instead. I happen to think perfect can be very boring, though, so I love using this easy technique to extend the life of old furniture and I hope you do too.

Buffet after and before (2015).
This Queer House, Vol. 3: How to Recaulk Your Bathtub Before Crying In It
I am going to be honest with y’all: this month’s DIY project almost broke me. Even though I’m obviously not a professional of any kind, I have done a lot of random (and sometimes difficult) projects over the years and I generally feel confident about my ability level. Re-caulking my bathtub, however, was not only more work than I was anticipating, the work itself was also a lot fussier than I thought it would be.
To illustrate my struggles, here is a chronological list of all the moments I wished I had a Time-Turner so I could go back and plan a different DIY:
- Shopping for supplies, I had to ask a teenage boy at my local hardware store, “Excuse me, where can I find the caulk?” Those were not words I was expecting to say at this point in my life.
- Hunched over in my bathtub scraping out remnants of gross old caulk at 10:30pm on a Saturday night as I questioned my life choices.
- When I realized it was potentially a little too humid to be doing this project, on account of the fact that my tape was not sticking to anything.
- The moment right after I finished the project and had a minor breakdown because it looked like something a kindergartener did.
- Post-breakdown-and-angry-workout, kneeling in my bathtub on already bruised knees as I attempted to bathe without turning on the shower
:deep cleansing breath:
Anyway, it’s in the past now. I’m moving on. There are lessons to be learned here from my misfortune, probably, so this might end up reading more like a what not to do than a tutorial. Let’s get into it, okay?
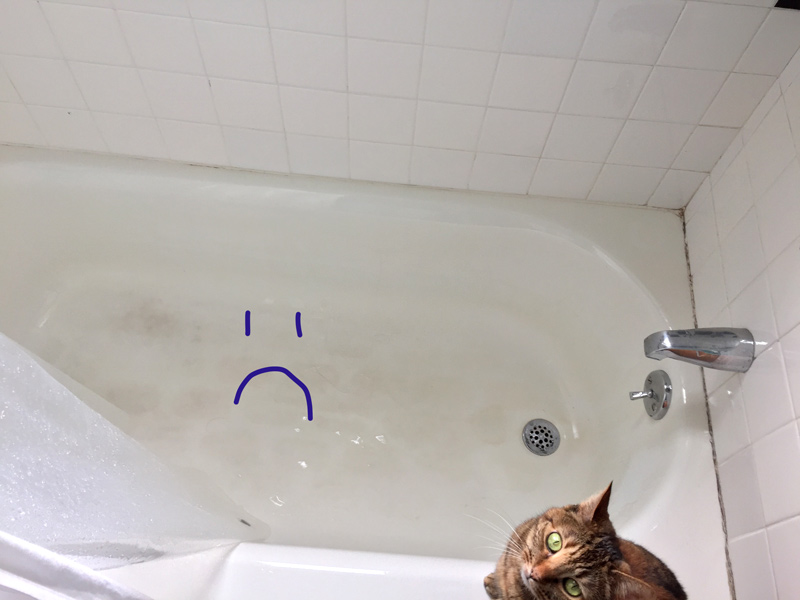
My tub, before. Gross, right?
What you’ll need:
- A tool to scrape out the old caulk – I used a 5-in-1 painters tool, and the little sharp edge came in really handy. If you don’t have one of these, you could use a putty knife or something similar.
- Rags or an old sponge – to help clean out the gaps.
- Painter’s tape
- Caulk – I used silicone, because it’s flexible and stays waterproof longer than acrylic.
- Caulking gun – Make sure the caulk you buy fits in your gun.
- Utility knife or other blade – I keep a blade handy on just about any DIY project. You never know when you might need it.
- (Optional) Very Helpful Assistant
JK this is just Flapjack. My actual helpful assistant was my wife.
What (or maybe what not) to do:
1. Are you sure you want to do this? Take a moment to think about it. Really, you’re sure? Okay, proceed to step 2 then.
2. Remove old, probably nasty caulk. This took a lot longer than I thought it would. I started with the grossest area, which actually was the easiest and quickest to remove. When I got to less moldy parts, the pointy end of my tool was really key. I basically just jammed it in and pried the caulk out. (P.S. If you read parts of this tutorial out loud it sounds filthy.)
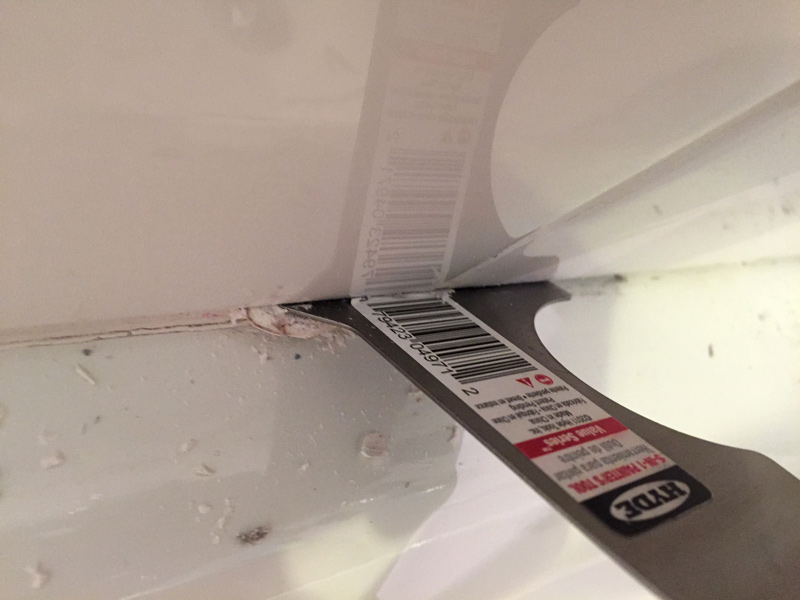
Don’t be afraid to go deep.
3. Clean the surfaces really well. I used water and bleach to wipe down the seam and surrounding areas several times to make sure I got every last bit of caulk out. As I mentioned before, there are apparently products made specifically to remove silicone caulk, and I bet they’re really helpful.
4. Let it dry. I left the tub to dry overnight. In retrospect, I very strongly recommend saving this project for a humidity-free weekend for reasons that will become clear in step five.
5. Tape off the seam. This one is really important! Caulk guns are somewhat difficult to wield, so taping off the area you want to caulk will, in theory, keep your lines neat and trim. Taping on tile is never the best, but I had an especially tough time getting mine to stay put and I’m assuming it had to do with the moisture in the air.
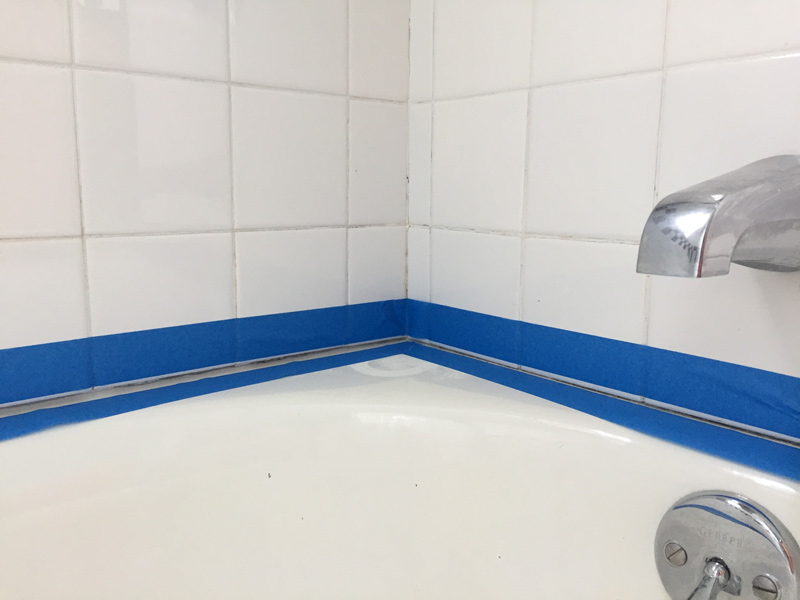
Slippery af
6. Prepare and load your caulking gun There are a few sub-steps to this one. First of all, you have to remove the little cap that will be on the caulk. It sounds easy, but this was weirdly difficult for me and I wish you better luck. Next, trim the tip at about a 45 degree angle – you can use your utility knife/blade or your caulking gun most likely has a built-in trimmer. Find the hole that’s near the trigger, insert the tip of your caulk in until you’ve reached the point you want to snip, and pull the trigger.
Ta da! Then, stick a long, thin pointy object down the tip of the caulk to pierce the opening. You can use a long nail, or, again, your caulking gun should have a built-in tool, this time along the bottom of the barrel. The last thing to do is spin the long metal bar in the caulking gun so it retracts out of the barrel, leaving an open gap to load the caulk.

Locked and loaded.
7. ABC (Always Be Caulkin’) You might have to pull the trigger a few times to get the caulk going, but once it starts it should flow pretty well. If you find that not enough caulk is coming out, you can trim the tip and widen the hole. You want to fill all the gaps well, so don’t be stingy with the amount of caulk you use. Note: If you are not using silicone caulk, you should fill your tub with water at this stage so the caulk doesn’t crack or break later. Even though I was using silicone, I filled the tub partially because I figured it couldn’t hurt.
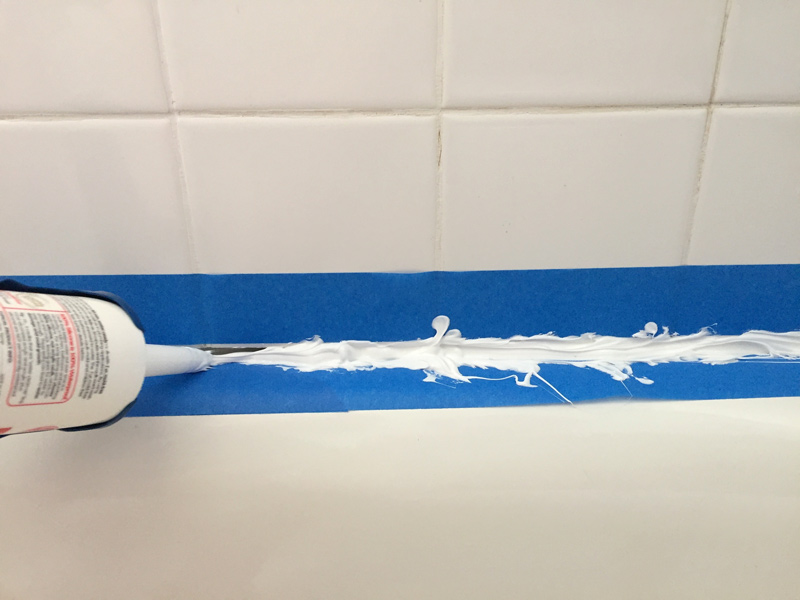
Fill those gaps
8. Smooth it out Try to work through step seven quickly, because you want to smooth the caulk out as soon after applying as you can. They sell tools for this, but I just dipped my fingertips in water and it worked fine. If you use this technique, I recommend either A) listening to your wife and wearing a disposable glove or B) realizing that water won’t remove silicone caulk. I had a moment of panic that my hands would never be clean again, but then my wife handed me a rag and everything was fine.
9. Remove the tape This is where it really went wrong for me. I do a lot of house painting, and I usually let the paint dry before removing the tape. DO NOT DO THIS. REMOVE THE TAPE ASAP. I left it on for a few hours before my wife asked about it and I realized my error. The caulk had already started to set and so pulling the tape off was more annoying than it should’ve been. I used my blade to trim the edges quite a bit.
10. (Optional) Cry in your bathtub I’m being a little dramatic, but if you are going to cry don’t turn the shower on. You should ideally let the caulk cure for 24 hours.
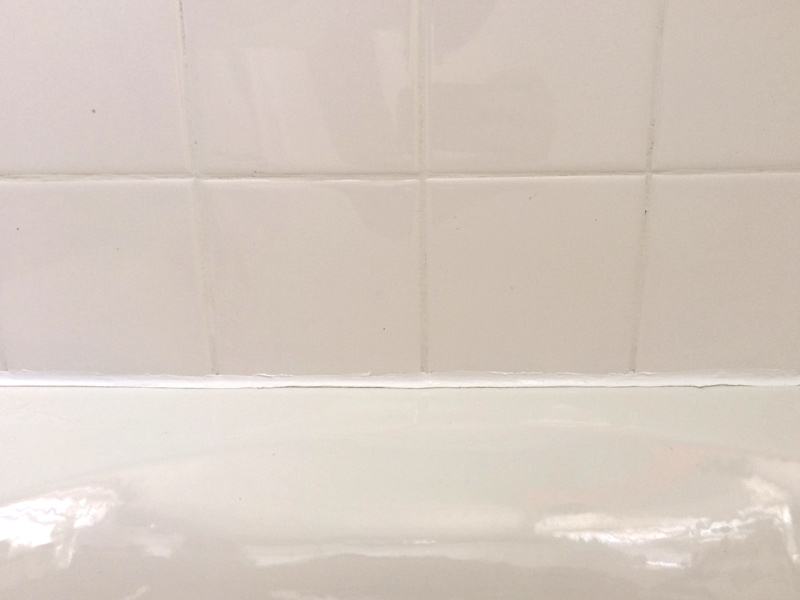
Finished. Meh.
So there you have it. In the end, I’m not sure if I did this project or if this project did me, but I made it to the other side. As always, I welcome project feedback/tips and suggestions for future projects in the comments!
This Queer House, Vol. 2: It’s Electric!
Does it feel like spring where you are? I hope so, because it finally feels like spring here in New England and I’m very excited about it. I work from home, and tend to turn into a bit of a recluse over the colder months, but I am feeling much more interested in being social now that things are warming up. Having people over is the best way to be social, in my opinion, because you get to hang out with friends and/or family but you don’t actually have to leave your house! It’s a win-win.
Whether you’re hosting a dinner party, having some friends over to watch a movie, or “hanging out” with your crush, being able to dim the lights is a great way to help set the mood. (Sidebar: do people still say “hanging out?” I’ve been with my wife for a over a decade now, so please advise.) DIY electric work can seem really complicated and overwhelming, but I’m here to tell you that it’s not as scary as it looks. I have now installed two dimmer switches in my apartment and lived to tell the tale. Ready? Let’s go.
What you’ll need:
- A new dimmer switch. You can find them for as low as $6 at Lowe’s, or check out the selection at your local hardware store.
- NOTE: Make sure to check your dimmer switch packaging to find out what kind of lightbulb you need. The first time I installed a dimmer, I did not have the right bulb and I spent several minutes thinking I messed everything up. I didn’t though, so that was nice.
- Flat and/or Phillips-Head screwdriver. Depending on your switch and plate, you might need one or both.
- Small pliers. Needle-nose pliers are my go-to for wiring. Mine have a wire cutter built in, which you probably won’t need for this project, but it’s nice to have.
- Electrical tape. This is another item you might not need, but it’s good to have a small roll of electrical tape around the house.
1. TURN OFF THE ELECTRICITY. If you only remember one thing, I hope this is it: please don’t get electrocuted. To turn off the electricity, first you have to find your fuse box. Usually it’s in the basement for a single family home and in a hallway if you live in an apartment. Once you find it, open it up and figure out which fuse controls the power for the room you’re working on. If the fuses aren’t labeled, you can just guess and switch fuses off and on until the right light goes off. Which is what I did.
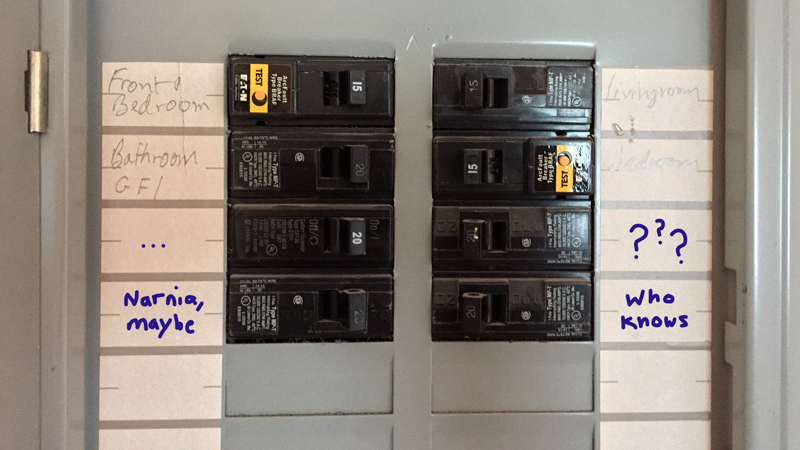
My landlord labeled half the fuses, because that makes perfect sense.
2. Take off the front plate and unscrew the switch from the wall. If your home is old, like mine, this part can be a real pain in the ass. I had to chip away a little plaster with my screwdriver and use some elbow grease to unscrew my switch. You can do it, though. I believe in you.
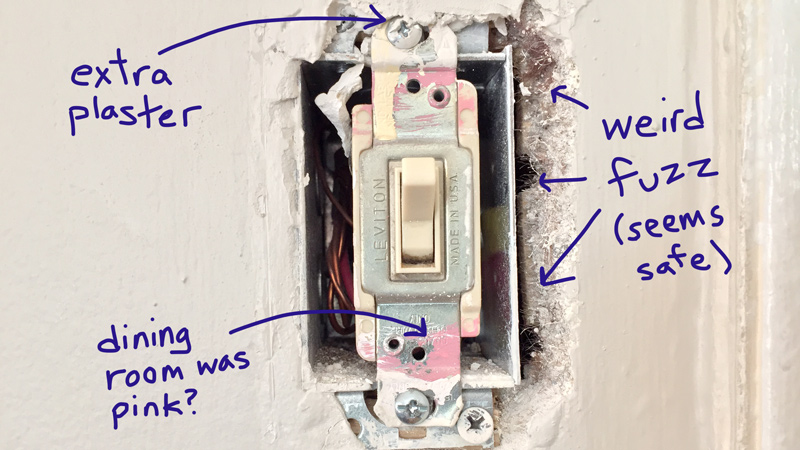
You never know what you’re gonna find in an old house.
3. Pull the switch out and look at the wires. Don’t be afraid to give the switch a good tug if the wires are bent or stiff. You don’t want to rip the switch out of the wall, but you definitely want to be able to see all the wires. The number of wires you have is going to depend on the type of circuit. A single-pole circuit (just a regular light switch) will have three wires, while a 3-way circuit has one extra wire. A 3-way switch is when you have two switches that operate the same light (2 switches 1 light, if you will) and before you ask, yes — that is the official and real name of the circuit, and yes — it makes me laugh every time I see it.
Everyone’s wiring is going to look a little bit different, but there are a few important consistencies:
- The common wire: This will either be marked “common” or it will be connected to the switch by a different colored screw (usually either black or copper).
- The ground wire: This is usually a bare copper wire with no insulation — though it may also be green.
- The other wire(s): These don’t really matter very much for what we’re doing actually, but they’re there and they will need to be connected.
- NOTE: If all your wires look the same, you might want to tag the common wire with a little piece of electrical tape so you don’t lose track of it.
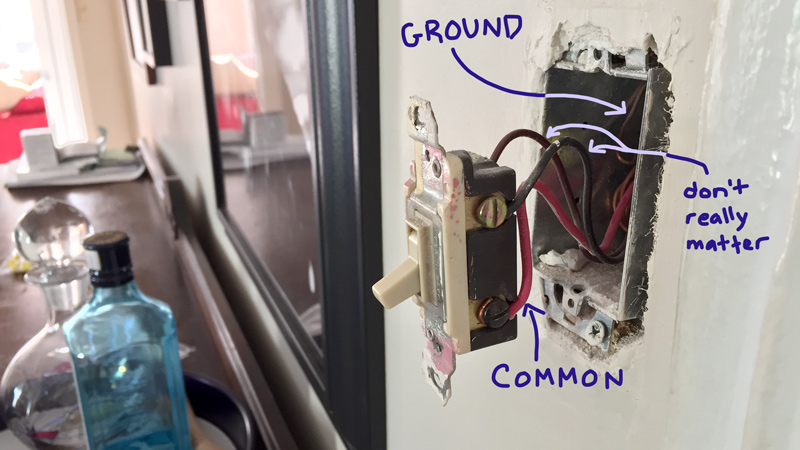
My ground wire wasn’t attached to the switch by a screw, which is why it looks like it’s hiding in the wall.
4. Disconnect wires from the old switch. Just go ahead and loosen the screws on the switch until the wires are loose. The wires will probably be hooked around the screws, so you just need to unhook them and they should come off easily.
5. Take a look at your new switch. Depending on the type of switch you bought, there will either be screws along the sides or there will be wires sticking out. If you have the former, you’ll make the new connections by hooking your wires on and simply tightening the screws. If you have the latter, which is what I had, you will have to twist and connect the two sets of wires and then screw caps on (which should be provided). More on that later.
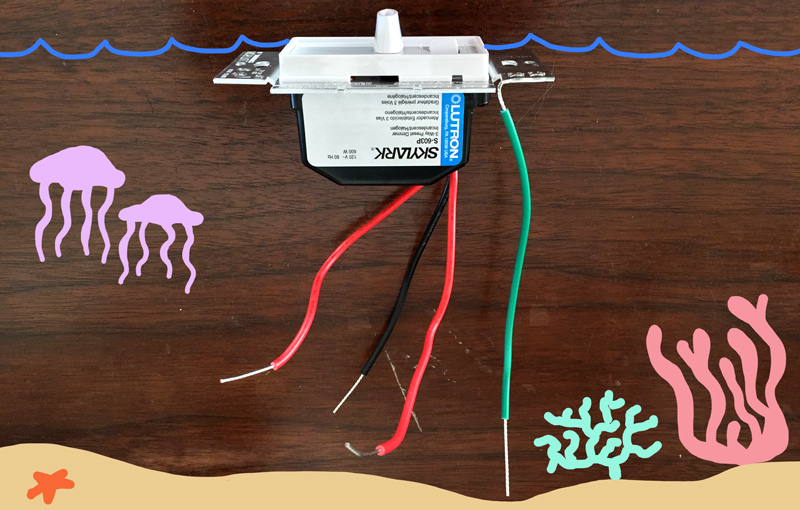
This new switch happens to look just like what I imagine a cool ocean exploration machine would look like.
6. Make your new connections. Check your packaging for this one — it should be very clear about where the wires need to go. Connect the ground wire first, and the common wire second. The extra one (single-pole circuit) or two (3-way circuit) wires will fill in the open gap(s). If you are connecting wires, you just need to twist them together — pliers can be helpful here if the wire is stiff. If your wire isn’t exposed enough to connect, you can use wire-cutters (which are often built into pliers) to gently cut through the insulation.
Ground wire connected and ready to be capped.
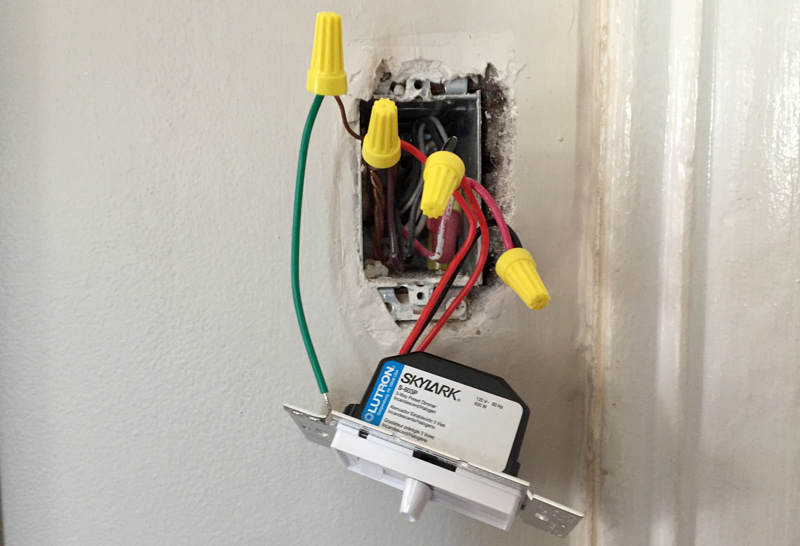
All connections made!
7. Stuff all those wires back into the wall and screw in the new switch and plate. This part can be kind of tough if your wires are long. Honestly, I just kind of crammed them in as best I could and pushed the switch into the opening until I could get the screws started. The wire connections should be quite strong, so you don’t have to worry about dislodging them.
8. Turn the electricity back on and test out your new dimmer switch! Hey, you did it! (Hopefully!) And next time you have people over, be sure to casually work your dimmer switch installation into conversation to properly impress friends and loved ones. “Oh, here, let me just turn down the lights,” you’ll say, like it’s no big deal, “It’s a 3-way circuit, by the way, you know how those go — extra wires to deal with. Good thing I’m a professional.” 10/10 will probably maybe amaze and astonish.
This Queer House: Outfitting Your Toolbox, Hanging Pictures Properly
Hello and welcome to This Queer House, a monthly column where you and I can walk together through the sometimes scary world of home improvement. I’ll answer your questions, take you step-by-step through DIY projects, and generally help you to be handier in your everyday life. You might be thinking to yourself, “Wow, that sounds great! But why should I listen to this clown?”
Dear reader, here are my qualifications:
- Completed a semester of high school woodshop in 2003 (I think I got an A)
- Was a member of the City Year Civic Engagement team 2010-2011 (We built picnic tables and painted murals at pretty much every public school in Washington, DC)
- Successfully installed a dimmer switch last year and only almost electrocuted myself one time
- This outfit:

I mean, come on.
Wynn recently made A Butch’s Guide To Your First Toolkit. It’s great; you should check it out! So let me show you what’s in my toolbox and then we’ll get to our first project: hanging stuff on the wall!
What’s in my toolbox?
In general, I am not a proponent of any particular brand of tools over another. My toolbox has been built up over the years from a combination of things my dad passed down to me and whatever cheap new or used tool I needed at the time. I have found that you can make most any project work even when you don’t have the ideal equipment; you just have to be creative with what you have.
+ Hammer: Obviously, it’s necessary for hanging things on your wall (or removing old nails from the previous tenant), but it has many other uses! One of my favorite alt-uses is to pound a nail into a wall or other surface and then take it out so you have a starter hole for a screw. It’s like a drill replacement, basically.
+ Screwdrivers: Flat head, Phillips head, Multi-bit. The Multi-bit is mostly handy for if you ever lose either your flat or phillips (not to name names cough me). Also, there are a bunch of options for bits! Like so many that you will probably definitely never use them all, but you’ll be secure knowing they’re there.
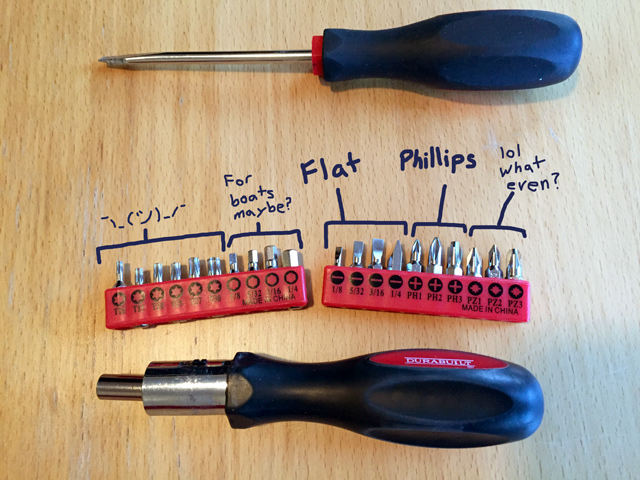
Top: regular flat head screwdriver, Middle: look at all those bits (The bits! The bits!), Bottom: multi-bit screwdriver.
+ Level
+ Measuring tape
+ Pencil: ABM. Always. Be. Markin’. Seriously though, measuring and marking are often the most important parts of any project. More on this later.

The holy trinity of wall hanging projects, pictured here in front of the gallery wall I used them on.
+ Ladder: Obviously this won’t fit in a toolbox, but having a step stool or small ladder is handy. In a pinch, though, you could just stand on a chair or table (but please be careful and don’t get mad at me if you fall).
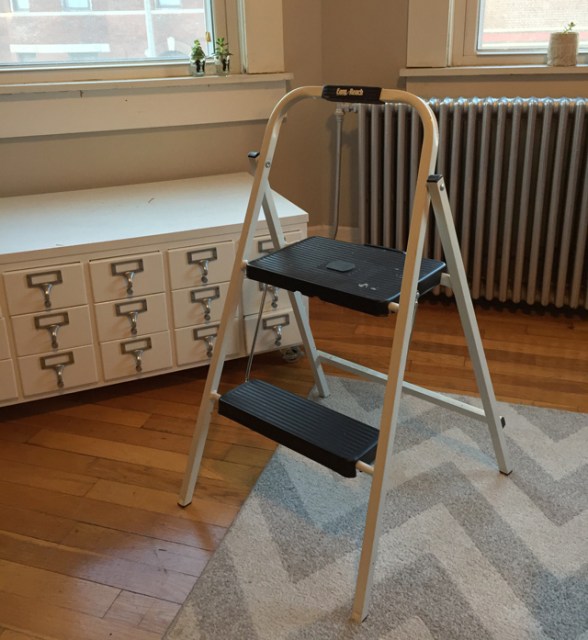
We call this our “Steph stool” in my house, because my wife is named Steph and she’s pretty short. (Steph not pictured)
+ Pliers: There are lots of different types of pliers, but I am partial to the needle-nose variety as a good first purchase if you don’t have any heavy duty projects planned. Pliers, in general, are really handy for removing old screws that have been stripped. Also, try to find some with wire cutting capability built in if you can.
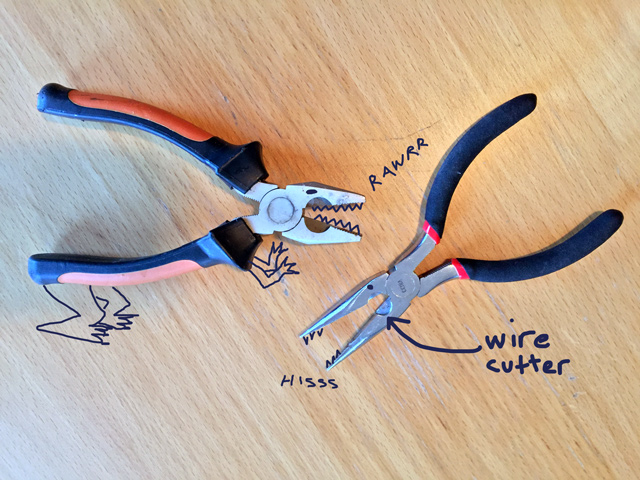
Lineman’s pliersaurus v Needle-nose plier-croc: coming soon to Syfy
+ Wrenches: I have a standard set and an adjustable wrench (which I can’t find), but you can definitely get away with either/or. To be honest, I don’t use wrenches a whole lot so I’m not sure why I have so many?
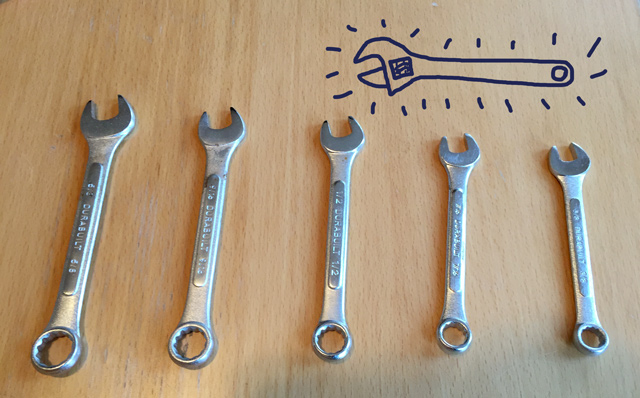
This is my standard set of wrenches and I drew you an adjustable one too so please use your imagination.
+ Sandpaper of varying grains: Sometimes you have to make things smoother. You want to be smooth, right?
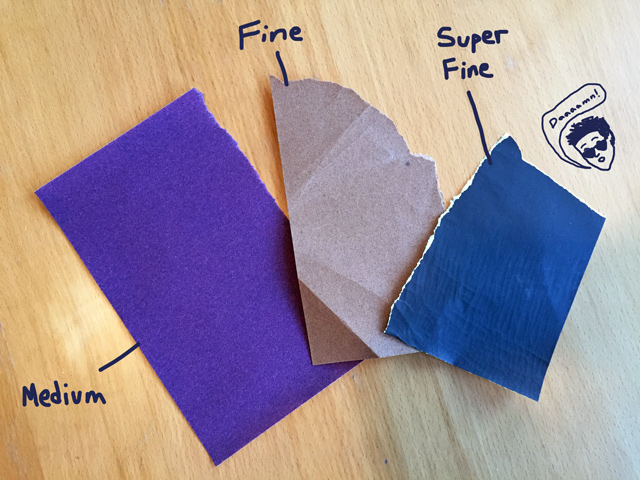
SUPER FINE. GET IT?
DIY Tutorial: How to hang things on your wall
Since this is our first project, we’re going to start off with something fairly simple: hanging multiple objects on a wall with even spacing. I’ll be using some super cheap mirrors from Ikea, but the basic concept will work for most any wall decorations you could possibly want.
1. Make a plan. This is a good first step for all DIY projects, to be honest. Have you ever heard the phrase “measure twice, cut once?” It is a thing for a reason. For this particular project, my plan involved taking measurements of the mirrors and the wall space, and then making some simple calculations to figure out the spacing.

My quick sketch of how I wanted the mirrors to look above our bookshelf.
2. Measure and mark the wall. I happened to be starting off with a wall that had a very old nail sticking out of it. I tried half-heartedly to remove it, but that thing has probably been there since about 1942 and is covered in multiple coats of paint. Luckily, it worked out fine to use the existing nail as the starting point for one of my mirrors. Using a level to keep things straight, I measured out from the nail 32 inches in either direction (the distance between mirror center points that I came up with in my sketch). I also double-checked the alignment by measuring up from the bookshelf and confirming that my two new marks were the same distance up the wall.
3. Hammer time! Before moving on to measure the bottom row, I decided to put up the top three mirrors and make sure everything was looking good.
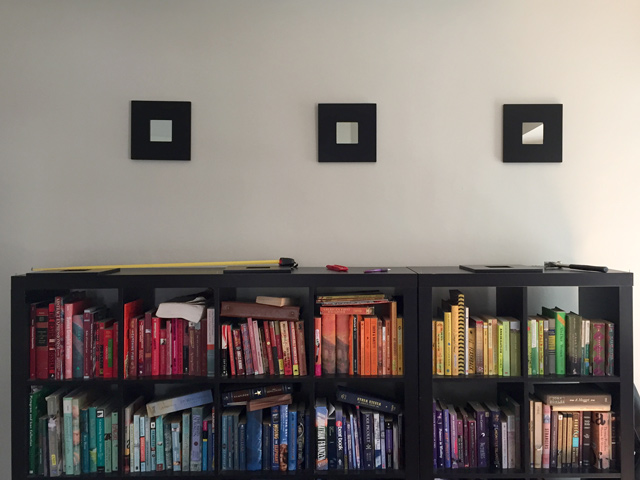
Wooooaaaahh we’re halfway there.
4. Measure and mark the wall, part 2. I wanted the top edge of the bottom row of mirrors to share an axis with the bottom edge of the top row, so I had to do a little extra measuring. First I checked the distance between the top edge of a mirror and where the nail for hanging goes (about two inches). Then, I marked the halfway point between two of the mirrors already hung up on the wall to ensure everything would be centered and spaced well. From there, I measured down toward the bookcase about two inches to account for the space between the top of the mirror and where it would hang from the nail.

5. Throw the plan out the window (sometimes). In this particular case, I ended up calling an audible on my original plan and only hanging five of the mirrors. The placement of that existing nail threw things off, and I was going to have to move the bookshelf way off-center of the wall to hang all six mirrors. There’s a good DIY lesson to be learned here: plan your project thoroughly, but be willing to be flexible.
6. Finishing touches. The very last thing I did was use a couple of cut up Command strips (which is just double sided tape, basically) to ensure the frames would stay level. Like I said earlier these are cheap mirrors with only the one nail hole, so they aren’t super stable. Having to constantly adjust them would’ve driven me crazy, so I used a level and stuck them onto the wall.
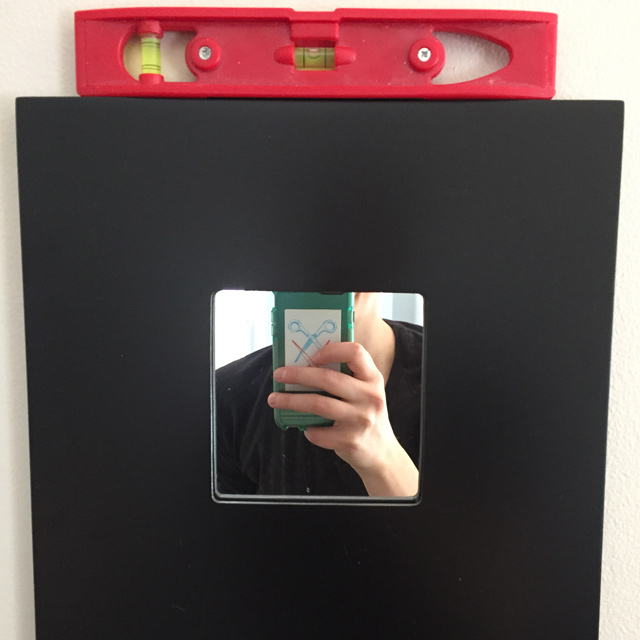
A level: the only type of straight I can get down with.
And that was it! The whole thing probably only took me about half an hour or so, but I have a lot of experience hanging things up so don’t stress if it takes you longer. Just take your time, measure early and often, trust your instincts, and you’ll be a pro at hanging stuff in no time.

Ta da!
Do you need advice on a DIY project? Let me know about it here in the comments, by email (jenna@autostraddle.com), or on Twitter and I’ll do my best to help you out in a future column. I have rented apartments my entire adult life, so there is a limit to the level of project I can take on (no kitchen demolition, for example, no matter how badly I want to). The plus side of this is that I have a lot of years of experience creatively, but not permanently, altering spaces, so don’t be shy.