This Is How We Do It: Living That Fresh Bread Lifestyle
Sometimes I wish I actually could live an Instagram- or Pinterest-worthy life, but we all know that’s not realistic. There is one thing, however, that makes me feel a little bit like my home life is in order; it’s also got the added bonus of making my apartment, however cluttered and terrible, smell like a bakery. That, friends, is baking fresh bread whenever I want to. In fact, there are stretches of time where I bake fresh bread every other day. And I’m busy! So I figured I’d share some of my tips and tricks with you, in case you wanted to live that fresh bread life too.
The Easiest Recipe in the World
My bread baking adventures began when I tried to make bread in a slow cooker, which I found out was a big fat lie after many sad, barely edible attempts. But my desire to enjoy effortless fresh bread didn’t go away with that epic disappointment, so I searched for REALLY easy bread recipes. I found this, the easiest bread recipe in the world.
The reasons it’s so easy are a) it’s three ingredients and water and b) it requires no kneading. It’s also really resilient — you can mess it up and correct it and it mostly doesn’t change how it tastes. Once I effed it up and didn’t add enough flour and I still managed to fix it. But it does take quite a long time to rise; at least 12 hours to be exact. You should read through the recipe and follow it for real the first time you make it, but I will let you know the changes I’ve made to it—I whisk together the 3 cups flour, 1/4 teaspoon active dry yeast and 1 teaspoon of table salt even though it calls for 1 1/4 teaspoons. Like I said. I’m busy. I don’t have time for that extra 1/4 teaspoon, and also it doesn’t change the way the bread tastes that I can discern. (This came about by accident because I make this recipe from memory and I remembered it incorrectly.) Then I go ahead and add the 1 1/2 cups of lukewarm water and, instead of using my hand like in the New York Times video, I use a wooden spatula. Otherwise I get all sticky, and I don’t have time for that. Cover it with cling film and let it sit for the rise time — but we’ll talk about the rise time later, when we talk about fitting it into your schedule. First I want to tell you about the tools that have made this go quickly and easily for me (and have cut down on the clean up, too).
My Tool Recommendations
For mixing the bread, I recommend a big ole 8-cup pyrex with a handle on it, so you can turn it out easier. Also nothing sticks to pyrex and, if you have a dishwasher, it’s totally dishwasher-friendly!
I do use cling film, but I reuse the same piece of cling film for the entire process of one loaf because I try not to use too much plastic when I can help it.
There is nothing better for bread baking than a Silpat mat — it’s a French silicone mat that is supposed to be used in place of parchment paper in the oven, but I use it to turn bread out on because I don’t have to flour it. That cuts down on clean up immensely, because I don’t have flour all over the butcher block and because a lot of the time it just rinses clean and I add the tiniest bit of soap and that’s it. This is one of my favorite kitchen tools literally ever.
So the temperature for bread baking is really high — in this case (and in most cases) it’s 450 degrees F. My oven mitts actually couldn’t handle it, so I did my research and came up with Grill Armor Gloves (they’re good up to 932 degrees F!). I like them because they give me dexterity and also no hot hands.
And last, you do need a 3 to 5 quart, oven-safe-at-450 degrees container with a lid to bake this in. I use a cast-iron dutch oven, and that’s my only concession to something that’s not the easiest. But honestly, aside from having to dry and oil the thing every time I clean it, it’s not the hardest to clean because bread releases really well from it. However, if you want something a little easier to use, get an enameled dutch oven.
Great, now we’re set to actually bake it. But how to find the time?
How To Fit It Into Your Life
Okay, so the thing about this is a rise on this bread can take 12-18 hours, with success even if you let it rise as long as 24 hours. That’s what makes this so good — even if your day changes unexpectedly, probably this bread will still be okay. Now I set my own schedule and prefer to get down to the serious work in the afternoons and evenings (morning for journaling and tea and all that good stuff). So I’m going to give you the times I actually do this, and then I’m going to suggest other times for different sorts of schedules.
7pm the night before: Measure out all the dry ingredients into your favorite pyrex, and whisk them together. Add the water, stir it up and cover it with a piece of cling film. Set aside overnight.
8am or 9am (13 hr or 14 hr rise): You’ll know the dough is ready when the upside is peppered with little air bubbles.
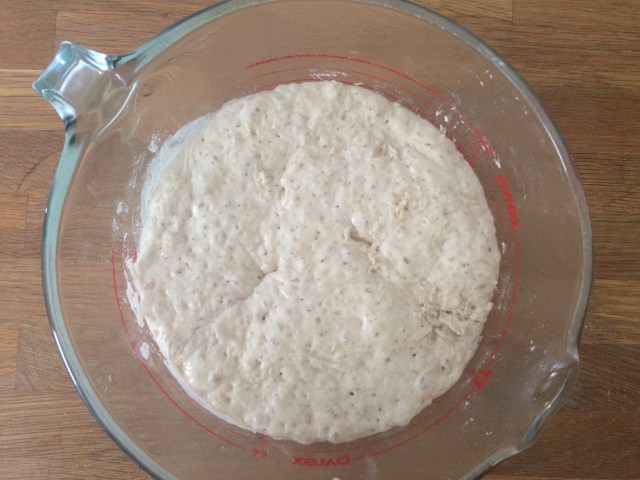
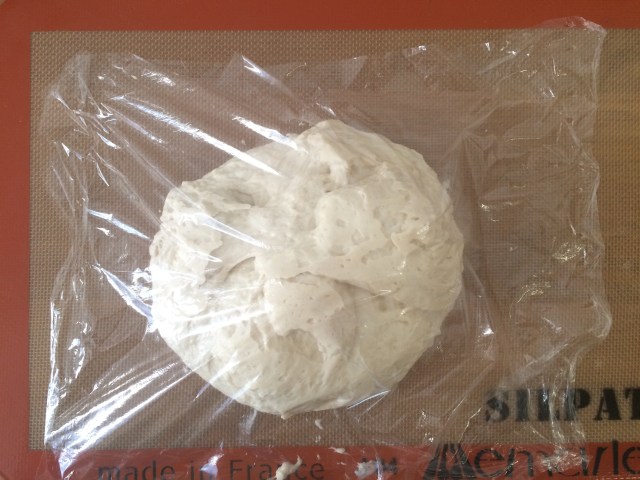
If it looks like that, remove the cling film and set it aside. Turn the bread out onto the Silpat mat. Fold it over itself a few times and cover the resulting dough ball with the same exact piece of cling film. Do it pretty loosely—the dough is gonna get bigger again.
8:30am or 9:30am: Grab the dutch oven or whatever be-lidded, oven safe at 450 degrees container you’re using and put it in the oven. Preheat the oven to 450 degrees. This means that, when you eventually put the bread in it, the cookware will be SEARING hot. That’s key, as it helps form the crust. Doing it during the preheat saves time because you’re busy. Let it sit in the oven, though, for at least half an hour, even though your preheat will likely be done before that.
9am or 10am: Remove your dutch oven from your oven oven very carefully using Grill Armor gloves, because as previously mentioned it is SEARING. Using a trivet or your stove, set it down and remove the lid. Sprinkle a little flour in the bottom of it. Fold the dough over on itself a few more times and then legit just toss it right in there. FUCK SHAPING THE BREAD INTO SOMETHING FANCY YOU’RE BUSY AND IT’LL BE GORGEOUS ANYHOW. Just trust me here. Put the lid back on the dutch oven, put it back in the oven oven, and let it bake for half an hour. Inhale deeply over this next half hour because your apartment will smell awesome.
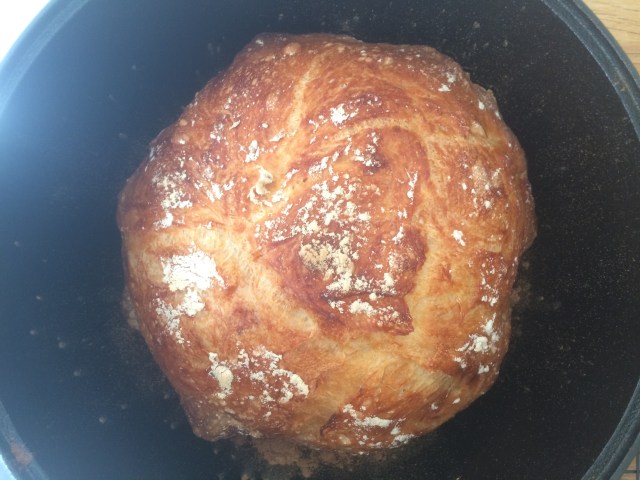
9:30am or 10:30am: Using your Grill Armor gloves or equivalent favorite heatproof hand-thing, remove the lid and set it on a trivet or your stove. Let the bread go for another 15 minutes. This’ll make the crust nice and brown.
9:45am or 10:45am: Remove the bread and put it on a wire rack to cool. This is the actual hardest part: let it cool for real. That’s what forms the lovely internal structure of the bread. If you simply cannot wait until it’s entirely cool, let it stop being searing at least. Listen to the bread crackle as the crumb structure is birthed into this world.
Need bread for the breakfast hours? Start the whole process at 6pm the night before and turn the bread out at 6am, preheat 6:30 am, bake at 7am, bread by 8am. Prefer some fresh dinner bread? Teach at school? Then start the process at 10pm the night before and leave it for a 17hr or 18hr rise and turn it out at 2 or 3 pm. That means bread by 5 pm! Need to run an unexpected errand? NO FUCKING PROBLEM. Once I timed poorly and went to go eat lunch with my visiting mother when I should’ve been baking the bread and guess what? Turned out and under plastic, I was sure it would be over-proved, but NO DIFFERENCE. This recipe is ideal for people who give just the bare minimum amount of shits about bread baking in relation to the rest of your life.
Now I find one loaf lasts me and my fiancée two days. The crust is always better on the first day, and I highly recommend not storing it in anything for that first day. It’ll hold up without going stale. But when you go to bed that night, wrap it in either wax paper or tin foil; I can say with certainty that plastic does it no favors, and neither does a covered cake plate (I was trying everything at the time).
Now I also want to stress to y’all — if you don’t care about eating fresh bread, that’s perfectly fine. No rule exists that I’m aware of that says you have or have not your shit together if you can spend time baking bread. And nothing says that your fresh bread lifestyle isn’t a Saturday-Sunday thang, or other days off adventure; that is also a perfectly valid fresh bread lifestyle. I will also tell you that it is one million times less expensive than buying bread of the same quality (okay, not actually one million times, that’s hyperbole) and if you show up to a party with one of these loaves, everyone will love you especially if you’ve coordinated with someone who has good taste in in cheese.
So what about you? What are your secrets to shoehorning some quality homemade bread into your schedule? Do you have a favorite easiest bread recipe in the world?
This Is How We Do It: Knife Skills Are Life Skills
Welcome to This Is How We Do It, a series wherein we’ll be discussing projects both inside the home and out and explaining, you know, how we do it.
I believe a good sharp knife is the most important tool in a kitchen. In this article I’m going to explain how to select a good knife, how to keep it sharp, how to clean and maintain it, and how to use it properly.
What kind of knife should I get?
You absolutely do not need a knife block or an entire set of knives for regular everyday cooking. Instead, take that money you’d spend on a set and buy just one good knife.
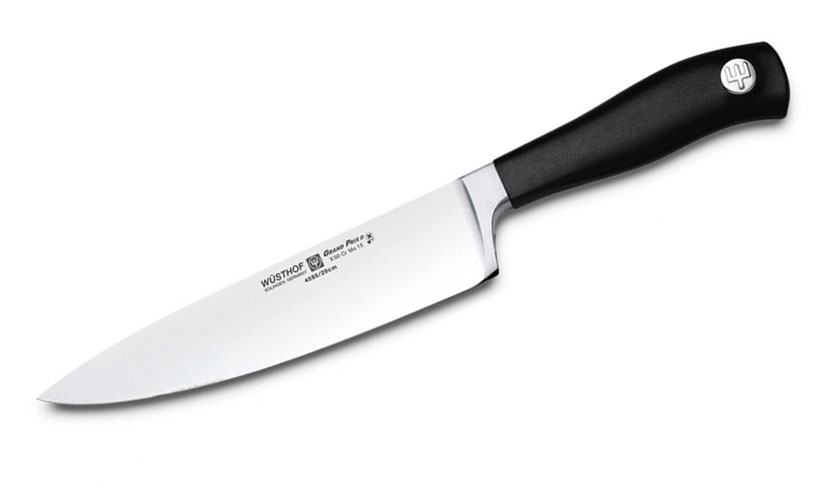
A nice knife, if well maintained, will last you decades and is well worth the money. I’ve had my Shun santoku knife for 15 years and it’s still in great condition. Popular brands I’d recommend are Wusthof, Henckels, Global, and Shun.
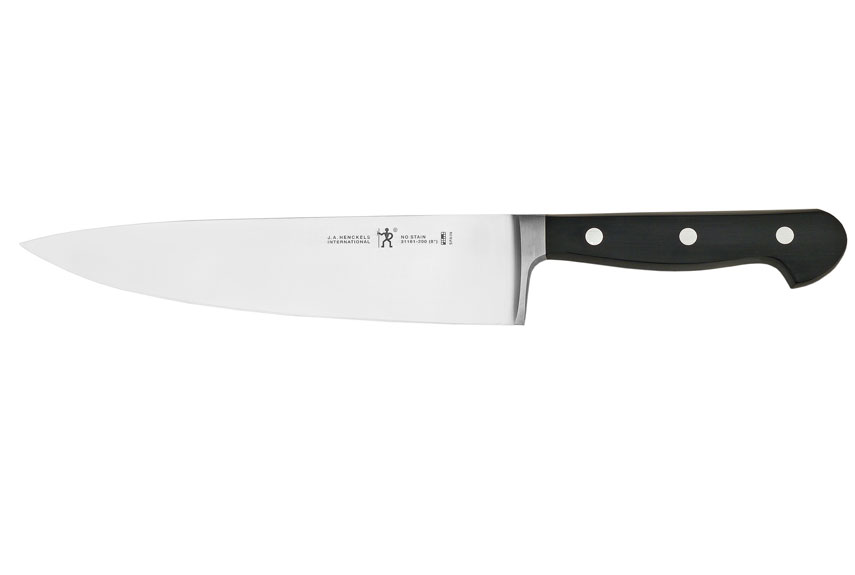
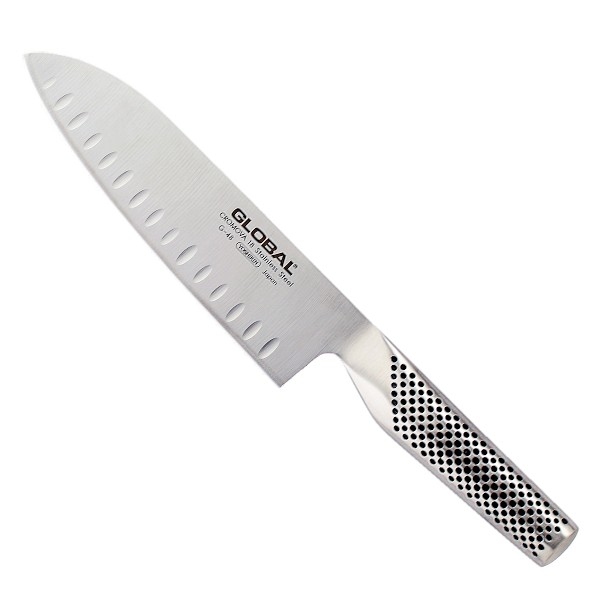
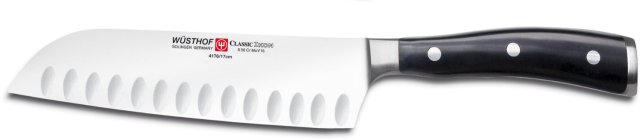
I recommend either a Western-style chef knife or a Japanese-style santoku knife. A Western chef knife is typically heavier, its handle usually has finger grooves, the point of the knife sticks straight out and is not angled down, the curve of the blade is more rounded to allow for a more rocking style of cutting, and the blade is ground evenly on both sides to a V shape. A Japanese knife is typically lighter, its handle is often flat, the point angles down, the blade is less curved for more chopping style of cutting, and the blade is often ground offset and not even. To be able to maintain that thinner edge, Japanese knives are made of a stronger steel and often hold their sharpness a bit longer too.
Here are some chef knives I’d recommend (click through!):


And some santoku knives:


I’ve also found decent knives at Goodwill which just needed to be sharpened, so keep a look out for these brands there if you’re on a budget.
Is your knife sharp?
When a knife is sharp enough, you should be able to cut through a held-up piece of paper with very little pressure or slice through a tomato without squishing the fruit or ripping the skin. A brand new knife will be very sharp — try to remember how sharp that is so you know what your baseline should be and you’ll know when it’s dull. While this sounds counterintuitive, a sharp knife is a safer knife. It doesn’t slip, and if you combine that with good knife skills, you won’t cut yourself while preparing your meal. It also makes prep so much faster, less frustrating, and more satisfying.
Keeping your knife sharp
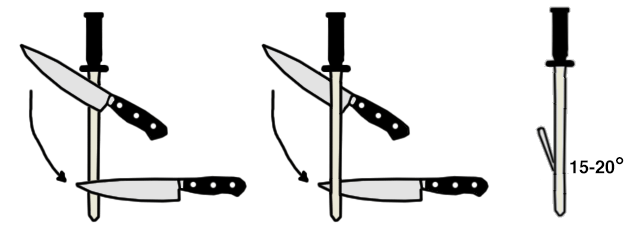
If you have a nice knife, you also absolutely need a decent honing steel. A honing steel doesn’t sharpen your knife, but it trues or straightens the edge of the blade. Often when a knife feels dull the very edge has curled from the pressure of use. Dragging the edge along the steel straightens that edge back up. I use my steel almost every time I cook. To use your steel, either hold it freely in your hand, or place the tip on a cutting board or cloth. Drag the full length of your knife from the base to the tip along the steel at a 15-20 degree angle, away from your hand, or down towards the cutting board. Do each side of the knife, alternating evenly several times. You should hear a high pitched ring if the angle is right.
is this knife play?
Here are some steels I recommend:


If your steel isn’t cutting it anymore it’s time to take your knife to a professional sharpener. Don’t use one of those home sharpening tools that you slide the blade into. A professional sharpener will only charge you a few dollars and it will be much sharper. You should take it in at least once or twice a year, or when your knife feels dull.
Oil the handle
If your knife’s handle is wood, you’ll need to oil the handle every year or so. You can use linseed oil, danish oil, mineral oil, or even vegetable oil. Any oil is better than nothing.
Cleaning and storing your knife
If you’re feeling lazy after you’ve cooked and don’t want to clean up right away, at least clean your knife and put it away. Wash your knife in warm soapy water, dry thoroughly, and put away right after use. I use a magnetic knife strip and love how easy it is to store my knives. If you do use one, make sure your knife is really dry before putting it back so it doesn’t rust.
Do not let your knife soak in the sink, as it will rust the blade and ruin the handle (and create a potentially dangerous situation if you reach into your sink forgetting you left the knife there). Don’t ever put your knife in the dishwasher. If you have to store your knife in the drawer, get a blade protector for it, so it doesn’t get dull banging around in there.
Using your knife
If you want your knife to remain sharp, don’t cut on a dish, plate, pan, glass cutting board, or a stone counter. The only thing you should cut on is a wooden cutting board. I recommend stabilizing your board with a wet towel underneath so it doesn’t slip. Often, slippage of the cutting board is how folks cut themselves with their knives.
Hold your knife by pinching the blade with your thumb and forefinger, and curling your remaining three fingers under the handle, with your middle finger touching the back of the blade.
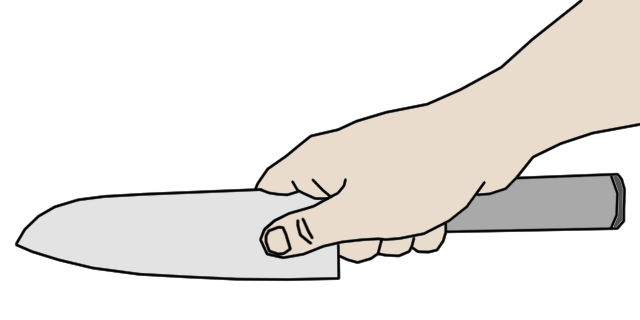
like this yay
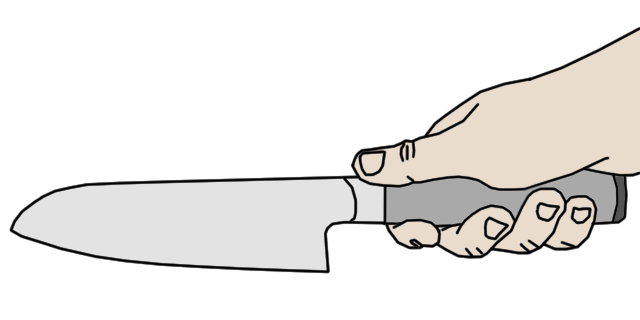
not like this boo
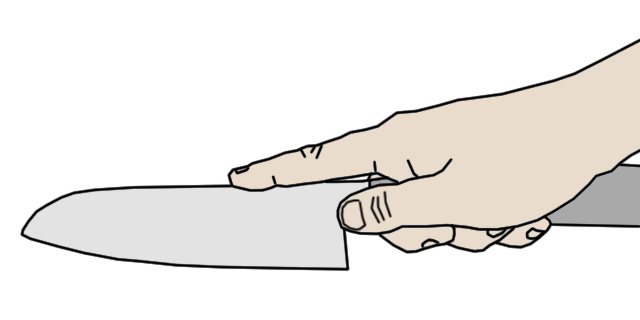
also def not like this
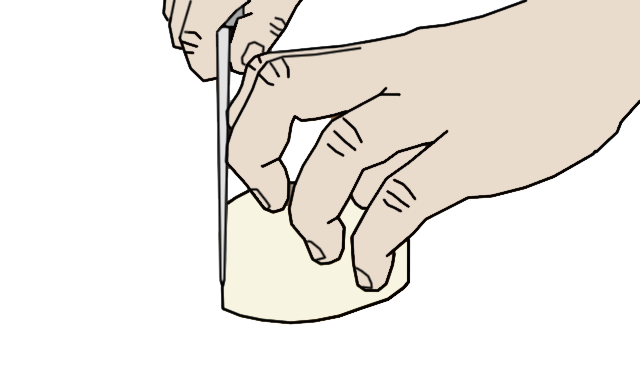
Use your other hand as your guide hand. Hold the food you want to cut with your in the “claw” by placing your thumb behind and curling your fingers under. This keeps your thumb and fingertips out of the way of your blade. Use your knuckles as a guide for the side of your blade. Always make sure what you’re cutting is flat side down and not a wobbly (dangerous) rounded edge. If you’re cutting something round, slice it in half first, and put the freshly cut flat sides down on the board and go from there. It’s much more stable that way, and will greatly reduce accidental slicing of your guide hand.
is *this* knife play?
Homework
Practice holding your knife correctly and using the claw method with your other hand. It takes a lot of time to unlearn other methods, but it’s worth the learning curve. Take it slow until you’re comfortable, then try gradually speeding up like you see cooks doing it. You may find that your dinner prep is a lot faster once you learn this method. And go get your knife sharpened professionally — it’s so worth it.
This is How We Do It: Making Herbal Tinctures
Welcome to This Is How We Do It, a series wherein we’ll be discussing projects both inside the home and out and explaining, you know, how we do it.
This is a gentle reminder that we are not doctors or medical professionals! If you are in need of medical attention you should consult your physician! Because we are not doctors!
A couple of weeks back, Rachel shared a great post on how to dry herbs, so as to preserve them for winter use. You can use your dried (or fresh) herbs to make teas, vinegars, salves, and also medicinal tinctures!

An herbal tincture is simply a liquid plant extract, usually made using water, alcohol, or both (though vinegar and glycerine are also sometimes used). During the process, the herb’s useful constituents dissolve in the liquid, and you are left with a strong extract which can be taken as medicine.
Tinctures are easy to take, either by the spoonful or by mixing into juice or water. They are fast-acting, as their liquid form means they are easily absorbed into the bloodstream. They are also easy to store and last for a long time! So, besides tea (because quite truthfully I don’t feel like a whole complete human being without a cuppa in my hand) tinctures are my favourite way to take herbs as medicine.
Before I go on, I just want to state the obvious. Herbs are potent and should be respected. Many herbs interact with conventional medications, others can affect a pregnancy, still others have different side effects. This tutorial is an overview of how to make herbal tinctures, but in terms of the specific plants you may choose to work with, be sure to do your own research first. I’ve included some resources at the end of this post to help you with that. I’m not a herbalist, this is simply how I make remedies for myself and friends, so if you have a different way of doing this, please add your tips in the comments!
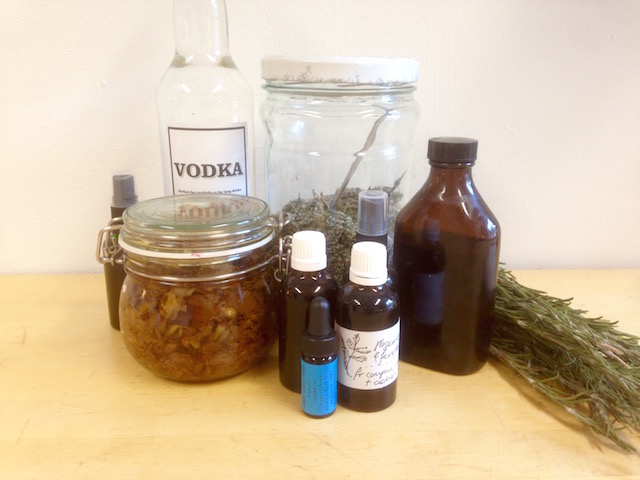
You will need:
Herbs
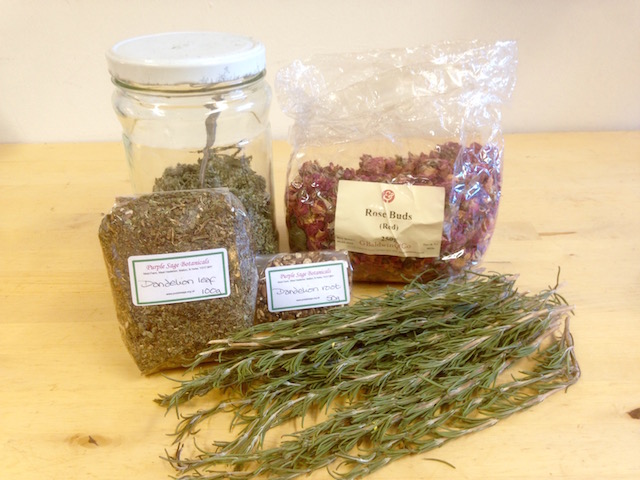
Dried dandelion and rose bought online, dried rosemary, and dried and stripped mugwort flowers gathered last month.
Fresh herbs can be picked from your garden, the hedgerow or wherever they grow, and gently washed. You may be using leaves, flowers, stalks or roots, depending on the kind of tincture you plan to make.
Dried herbs can be bought from a health food store, a herbalist, or online. Or you can dry your own herbs as Rachel explained in her tutorial! Again, you may be using any part of the plant. Rachel mentioned harvesting echinacea root in her article, and I’m using dried dandelion root and leaf together in the tincture I’m about to make.
Vodka (or other spirit)

Perfect for cocktails or long drinks or witchy remedies.
Vodka is used because it doesn’t have a taste/scent of its own, but you may want to experiment with other spirits. For example, I made a lovely winter tonic last year using brandy, which just made it all the more pleasant and warming to take.
Look for stronger spirits, as you’ll get a better plant extract by using higher concentration of alcohol. If possible, use export strength vodka, which will be above 40% abv (I think in the US you would call that 80 proof) – though I make most of mine with regular supermarket spirits.
Jars
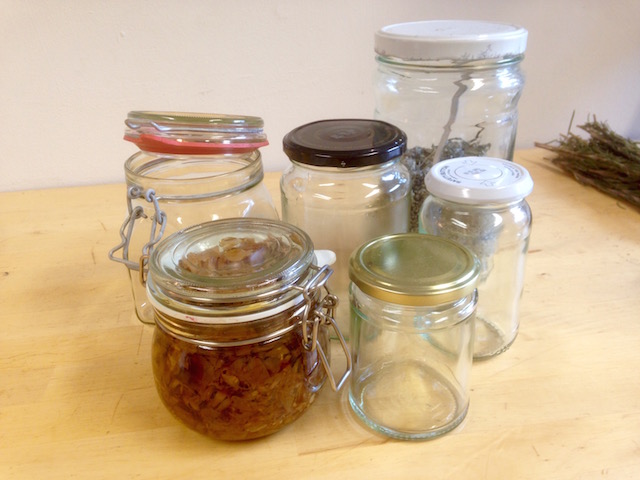
No need to get fancy here; clean old jam jars will do, though it does feel so much more like you’re running your own little apothecary if you use those nice Kilner or mason-style jars. The size of jar you use depends on the amount of herb you have, and/or how much tincture you plan to make.
How to make your tincture:
Prepare your herbs by separating the parts you want to use, and finely chopping them the way you would culinary herbs. You can use a hand blender for this, or just chop them with a knife. Some plants won’t need chopping; for example, for the mugwort flowers I gathered simply brushed off the stems. With dried rosemary on the other hand, the tough, needle-like leaves will drop from the branches easily, but it’s good to chop them up to help the extraction process.
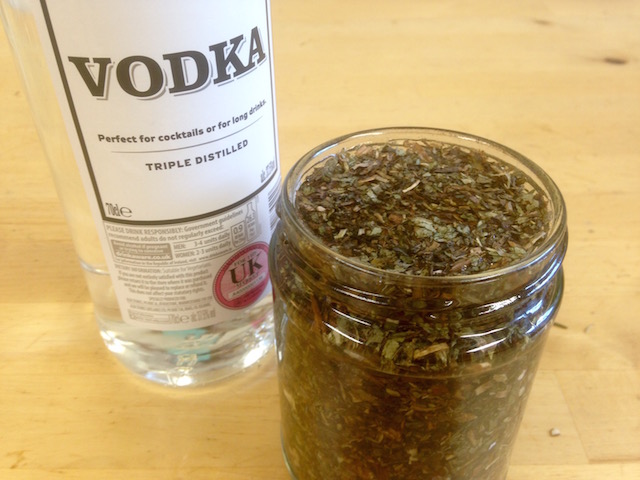
A 50:50 mix of dried dandelion leaf and root.
Fill a jar with your herb, packing it in tightly, then cover with vodka. Be sure to fill right up to the top so there is as little air in your jar as possible. Fasten the lid tightly, give it a shake, and place in a dark place.
Every day, give your jar a little shake!
Your tincture will be ready in 2-4 weeks. I normally leave mine for a full 4 weeks.
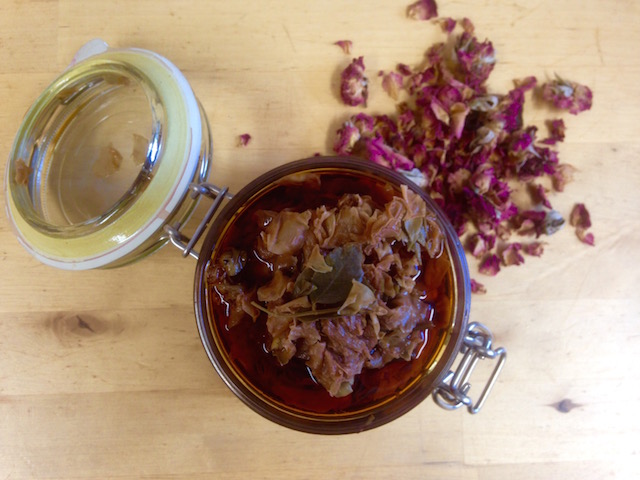
A rose flower tincture made about a month ago.
Once it’s ready, you’ll need to strain off the liquid. The best way is to use a sieve and a piece of muslin, as this way, you’ll be able to squeeze out as much liquid as possible and filter out all the bits. Pouring through a coffee filter is also a good way to get a nice smooth tincture.
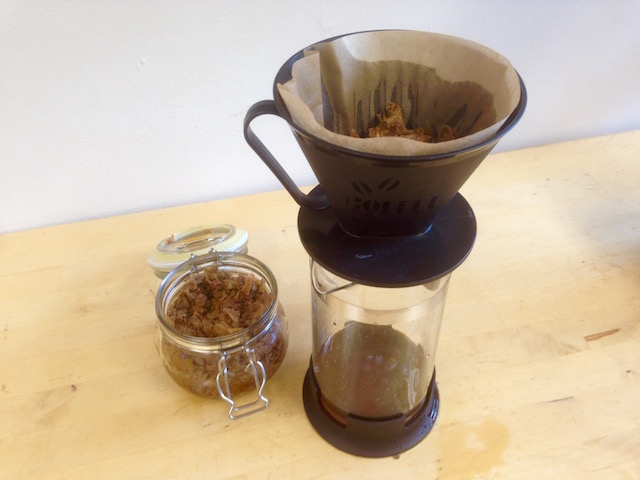
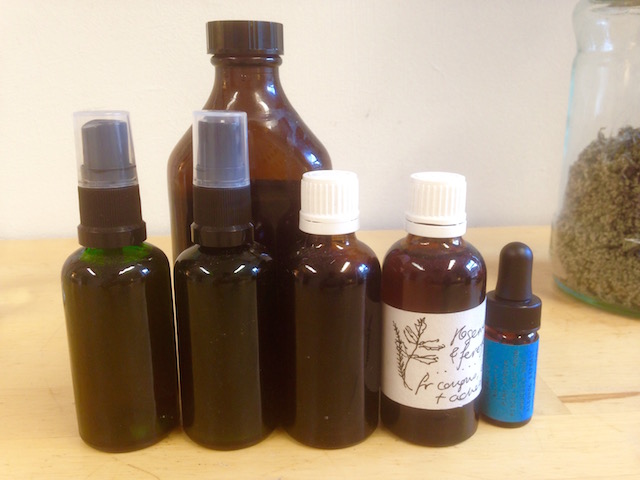
You can bottle up your finished tincture in pretty dropper bottles if you’re feeling fancy or making a gift (I use these from Baldwins in London) or simply return to the jar and store in the fridge or a dark, cool cupboard. Don’t forget to label your tincture with the name and date! Depending on the herbs used and the alcohol content you’ve ended up with (which will differ from herb to herb), your tincture should be good for three years.
Herbal medicine resources:
+ My favourite book is Hedgerow Medicine by Julie Bruton Seal and Matthew Seal. It’s full of accessible information about some of the most common British herbs.
+ Worts + Cunning Apothecary – check out queer herbalist Alexis J Cunningfolk’s wonderful ebook of winter remedies.
+ Susun Weed’s newsletter is full of helpful information about herbal medicine.
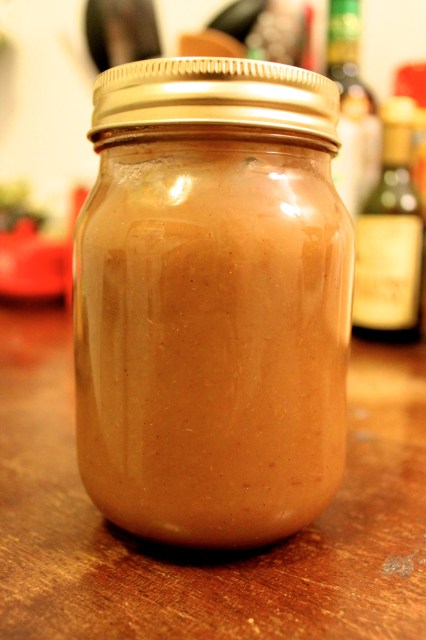
This Is How We Do It: Making and Canning Apple Butter
Welcome to This Is How We Do It, a series wherein we’ll be discussing projects both inside the home and out and explaining, you know, how we do it.
Canning is one of the best and easiest ways to preserve food. Jams and jellies are just the start; you can preserve almost anything using home canning methods, provided you prepare the food properly. Canning also overlaps with other preservation methods. You can add flavor and preserve food by pickling it, then get a much longer shelf life by canning it in the pickle brine. Learning how to can at home is essential, if you want to save some of the bounty of summer to enjoy in the winter. Canning still feels far away and quaint to most people, like a lost art that died out in our grandparents’ generation.
Most of my canning knowledge comes from just a few books. Canning for a New Generation by Liana Krissoff has been a wonderful source of info. If you are at all interested in canning, buy this book. Her recipes are great, and she organizes them by season, which is helpful when you’re trying to integrate canning into a local food lifestyle. She also emphasizes natural ways to make jellies (as opposed to using boxed pectin), which I appreciate. Ball’s Complete Book of Home Preserving is another great resource to have around. The recipes are not quite as good, but there are a ton of them. I mainly use the book as a way to generate ideas. Plus, it never hurts to have the original bible of home canning lying around. If you want to know more about anything I describe in this post, these books are the best place to start.
How to Not Die of Botulism
There are two basic canning methods: boiling water canning and pressure canning. Most people use the boiling water method at home because it’s easier, it requires less equipment, and it usually gets the job done. Pressure canning is useful for processing lower-acid foods, if you don’t want to get botulism. More on that in a second.
Both canning and pickling preserve food by creating environments that don’t suit the bacteria responsible for spoilage and decay. Those bacteria require oxygen, moisture, not too much acid, and moderate temperatures. Of those four variables, canning mainly relies on a lack of oxygen to inhibit bacterial growth. When processing jars, you submerge them in boiling water. As the jars heat up, the contents expand and the air in the top of the jar is forced out through the lid. When you take the jars out, the food cools and retracts, creating negative pressure in the jar. The pressure seals the lid to the top of the jar, which prevents air from getting back in. The end result is a vacuum. Bacteria cannot grow in the anaerobic environment, so your food is safe until you open the lid.
A lack of oxygen takes care of bacteria, but there are still bacteria spores to deal with. Spores are only killed by very high heat, and they thrive in anaerobic environments. Left alive, Clostridium botulinum spores produce the toxin responsible for botulism, a horrible paralytic disease. To prevent botulism, you have to kill the spores with either heat or acid. Unfortunately, boiling water canning cannot get the jars hot enough to kill the spores. So when using the boiling water method, the final mixture has to have a ph level below 4.6, acidic enough to kill botulism spores. Most fruits are already acidic enough, and vegetables can get there when they are pickled with vinegar. Any modern canning recipe that calls for boiling water processing will have already calculated the ph levels. So you only need to worry about ph if you are using an old recipe or untested recipe.
If you want to experiment with recipes or you want to can a low-acid food (like non-pickled veggies), pressure canning is the way to go. It’s the same process as the boiling water method, but you do it under pressure. Water boils at a higher temperature under pressure, so you can reach the 250 degrees Fahrenheit required to kill botulism spores. I don’t own a pressure canner (yet), so the recipes in Preserved will focus on the boiling water method. But if you want to learn more about pressure canning, the National Center for Home Food Preservation has some good info!
How to Can with Boiling Water: Apple Butter Edition
Boiling water canning is easy. All you really need are some jars with two-piece lids, a big pot, tongs, some water, and of course food to put in the jars. If you want to get fancy (and have fewer injuries), I recommend buying a few extra supplies. At the very least, get a jar lifter, which is a pair of funny shaped tongs to help you take jars out of boiling water. After pouring boiling water on my arm a few times with my homemade version (tongs plus rubber bands), a real jar lifter was a revelation. Canning kits are also great, if you want the whole setup. The smaller versions come with a jar funnel, a jar lifter, a magnetic lid lifter, and several other tong-like things I haven’t figured out yet. The larger set includes a gigantic canning pot and a rack for the jars. This stuff is helpful, but not necessary.
To demonstrate the basic canning process, I’m going to use an apple butter recipe based on one from “Canning for a New Generation.” Because it’s so simple to make, apple butter is a perfect way to try out canning for the first time. Try this recipe with local apples; they are still available in most parts of the US right now, and almost any apple will give you a great tasting apple butter. You can enjoy it all winter and spring long, spread on toast or put into oatmeal.
The first step in any canning recipe is to make whatever delicious thing you’re going to put into the jars. To make this apple butter, you will need:
+ 6 pounds of apple, cored and cut into 1-inch chunks
+ 2 cups of either apple cider or water
+ 1 1/2 cups of sugar
+ 1 1/2 teaspoon ground cinnamon
+ 1/2 teaspoon ground cloves
+ 1/2 teaspoon ground allspice
The recipe yields 3 pints of apple butter, so you can cut down the recipe if you need. The difference between apple butter and apple sauce is caramelization, so you the mixture needs to be cooked for a while. Liana Krissoff recommends using a slow cooker, which is by far the easiest method. First, put the apple chunks and the water/cider into a stock pot. Bring to a boil over high heat, stirring occasionally, for 30 to 40 minutes. The apples should break down quickly, and the peels will separate. Then strain the mixture to remove the peels and give it a smooth texture. I used a nylon straining bag, but you can also use a fine seive or strainer. If you want, you can also puree the mixture using an immersion blender to make sure it has a silky texture.
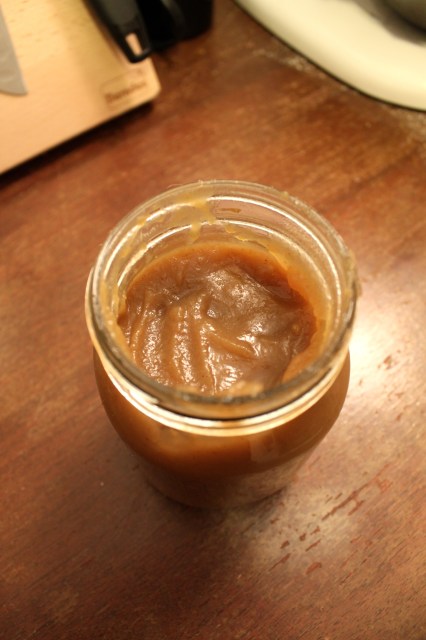
Next, put the puree into a slow cooker. Add the sugar and spices. Set the slow cooker on low, and the let the mixture cook for 9 to 12 hours. Don’t put the lid fully on the pot; you want some liquid to evaporate. Stir every now and then. When it’s done, the mixture will be a dark brown, and it will taste like, well, apple butter.
If you want to make this on the stove, it’s a bit harder. Put the puree back into your stock pot. Add the sugar and spices. Bring it to a boil, then turn down the heat and let it simmer for several hours. You will need to stir this stuff quite often, maybe every 5 to 10 minutes. The bottom will burn very quickly if you aren’t careful. It’s finished when the mixture is dark brown and relatively firm.
Now you need to prep for canning. Fill your canning pot with water, enough to cover the tops of the jars by an inch when they are submerged. Put your clean jars in the water (make sure you have enough jars to hold all your apple butter). Bring to a boil. Keep the lids in a bowl, to the side. When the water is boiling, ladle a little bit into the bowl to sanitize the lids. Pull the jars out with a jar lifter, pour the water back into the pot, and place them on the counter.
Boil the apple butter again (you may need to transfer it back to the stove from the slow cooker). Ladle the hot apple butter into the jars. You need to leave only about a 1/2 inch of airspace at the top. Wipe off any apple butter that got on the rim of the jar. Then place a lid on top, and screw on a ring just until it starts to tighten. If you overtighten the lid, or if you don’t fill the jars enough, then they won’t seal properly!
Once all the jars are full, put them back in the boiling water. Make sure there’s about an inch of water on top of the jars. Boil them for 10 minutes (err on the long side, a few more minutes won’t hurt). Remove the jars, and set them on the counter. Don’t disturb them for at least an hour. As they cool, you may hear the lids pop. After an hour, check the lids by pushing on the center. If you can pop the jar lid up and down, then it didn’t seal. Put that jar in the refrigerator and start using the apple butter. The sealed jars can sit out overnight to cool, and they will be stable in your pantry for the next few months!
This Is How We Do It: Build a Simple Shelf for About $10
Welcome to This Is How We Do It, a series wherein we’ll be discussing projects both inside the home and out and explaining, you know, how we do it.
I wrote you a poem:
shelves are cool
shelves are neat
build them from IKEA
or find them in the street
shelves up high
and shelves down low
when your floor piles
have got to go
shelves can be short
shelves can be tall
here’s how you make
a shelf on the wall
In early August, I moved into a new apartment, which is DELIGHTFUL, but my room’s storage offerings are a bit limited. I decided I needed a shelf above the radiator to put all my old journals for easy reference when I feel the need to tap into some late teens/early twenties emotional strife.
And so I found a board on the street, because you can find great boards on the street, and I placed it atop my radiator, where it sat very nicely. But the thing about a radiator is that once it is no longer muggy Philadelphia summer, the heat will turn on, and the radiator will get very hot. I hear it’s not really recommended to leave a plywood board holding a bunch of notebooks directly atop a very hot piece of cast iron. I needed to get the shelf from the radiator to a secure spot on the wall above it. Maybe you are in a similar situation. Or maybe you are trying to find an alternative storage solution to the very nice piles you have amassed around your bed. Whatever your shelf needs are, this post will help you satisfy them.
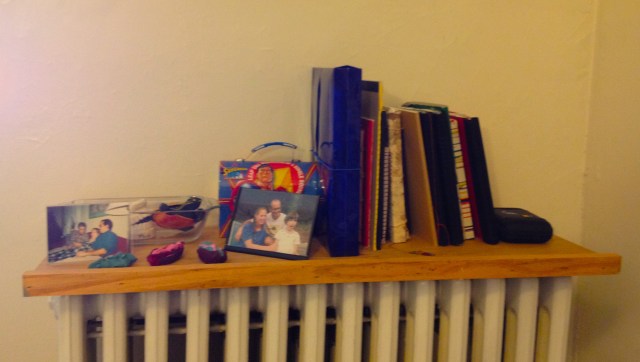
It was a very cute shelf hat for the radiator.
How to build a simple shelf using wall brackets
Time: 1 hour, not including time spent feeling overwhelmed at the hardware store and time spent debating with yourself over whether or not you found a stud
Tools
- drill
- screwdriver
- stud-finder
- level
- pencil
- tape measure
- vice grip (if necessary)
- safety glasses
I borrowed the stud-finder from my neighborhood’s tool library, and I also could have borrowed all the other tools I needed if I didn’t already have them. Does your neighborhood have a tool library? Joining a tool library is a great way to be able to DIY if you can’t afford your own tools or if you don’t have space for them.
Materials
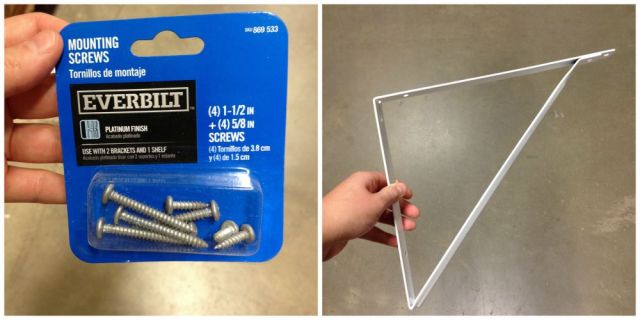
If you buy brackets with the bar that goes across for extra support, I would recommend making sure the holes for the mounting screws are in places you will be able to reach with a screwdriver or a drill. These did not and it made things complicated.
- wooden board
- 2 brackets
- 8 mounting screws (4 long ones, and 4 short ones)
With the board and brackets, there are various options. I happened to come across an excellent sturdy plywood board with a lip, discarded on the curb down the block. It had some paint and spackle dried onto it, so I sanded it down and washed it and it was in great shape. I could have stained it and finished it, but that wasn’t a critical step for this shelf that’s just being used to hold books and trinkets.
That being said, buying a fresh board would have still been pretty cheap. Home Depot will cut their lumber down to the size that you need for free, and I’m sure other places offer similar services.
As for the brackets, it’s important to get ones that are sized properly for the width of the board, and that will support the weight of whatever the shelf will hold. These brackets I bought are built to hold way more than will ever be put on this shelf, unless suddenly I start collecting miniature anvils.
As for the screws, sometimes they come with the brackets. My brackets didn’t include them, but there were a set of mounting screws sold right beside the brackets I bought, specifically made to fit them correctly.
Ok, do you have all your stuff? Was it very cheap? All in all, the materials for this project cost me about $10. Fancier materials for fancier shelves exist, but I’m going for functional over fancy. If you want a fancy shelf, this tutorial should still be helpful. Let’s get started.
Step 1: Find the studs
First things first, where are your studs? Not that kind of stud. The studs that are wooden boards holding up the wall behind the plaster or drywall.
I used a stud-finder from my tool library, which was pretty hard to use, and I’ve been told are “basically useless” on plaster walls anyway. HOWEVER, my roommates and I had surprisingly good success using this! I used the stud finder, then double-checked by using the “knocking” method. I marked the stud with a pencil, then I found another one. Here’s a helpful resource for different ways to find studs without a stud finder.
I drew a level line between the two studs – this was about two inches below where I wanted my shelf to be, so that I could drill my brackets in using screws on the line, because that gave me more accuracy than trying to measure down from where I wanted the shelf.

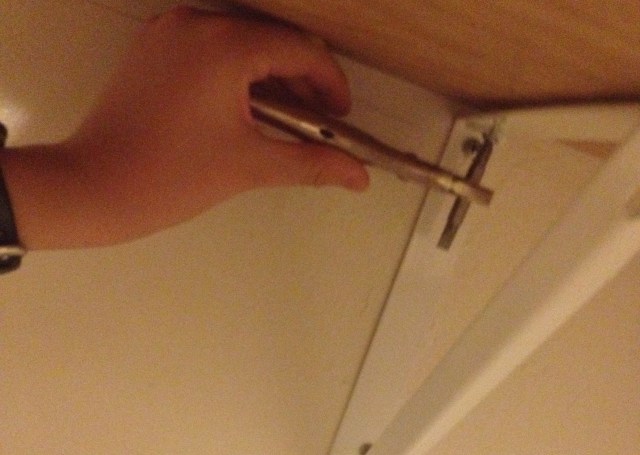
Found a stud! See that sawdust inside the hole?
At Cee’s suggestion, before I started trying to screw things into the wall, I drilled a hole in the wall with my teensiest drill bit to make sure my stud-finding had been accurate. It was!
And as a sidenote, you have other options besides studs. For drywall, you can use anchors, and for plaster walls, you can use bolts to make sure your shelves stay up and hold what you need them to hold. I thought about using bolts, but then I consulted with our construction expert (it’s Cee again) and decided finding studs would be more straightforward, with less potential for disaster. You need to pick one of those options, though; you can’t just indiscriminately screw a thing into the wall without knowing what’s behind it. That’s okay for, like, calendars. With a shelf, if you don’t plan ahead, it will fall down and mess up your wall, and that is not the goal here.
Step 2. Secure the brackets
Once I knew where the stud was, I used my larger bit to make a pilot hole for the screw. It’s important to make your pilot hole as long as the screw, but with a bit that is slightly thinner than the screw, so its thread will still grip into the wood. A lot of packets of screws will advise on how large a bit to use for the pilot hole, but you can also just check by stacking the bit and the screw, side-by-side, and making sure you can see the thread of the screw on either side of the bit.
I got the top screw started, and then before drilling a pilot hole for the bottom screw, I checked to make sure the bracket was level.
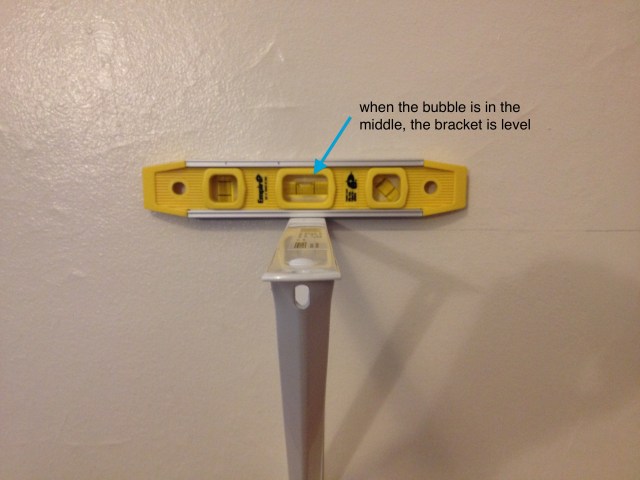
Then I marked where the second screw pilot hole would go and moved the bracket aside to drill it.
This is where the design of these brackets became a huge pain in the ass. The hypotenuse of the bracket triangle made it impossible to use a screwdriver to secure the brackets! I used a vice grip and a Phillips head drill bit to create a right-angle screwdriver. It worked, but it was extremely annoying.

Repeat with the second bracket.

Step 3. Put a Board on It
Once I had my two brackets secured to the wall, I placed the board on top and centered it. I used pencil to mark where the screws would go into the board, and then took it off to drill pilot holes in the wood. Again, I was totally screwed (puns!) by the bar that went across, and had to do some very awkward twisting with the makeshift right-angle screwdriver.
There are different designs for brackets that don’t have the awkward bar. I’d pick one of those instead.
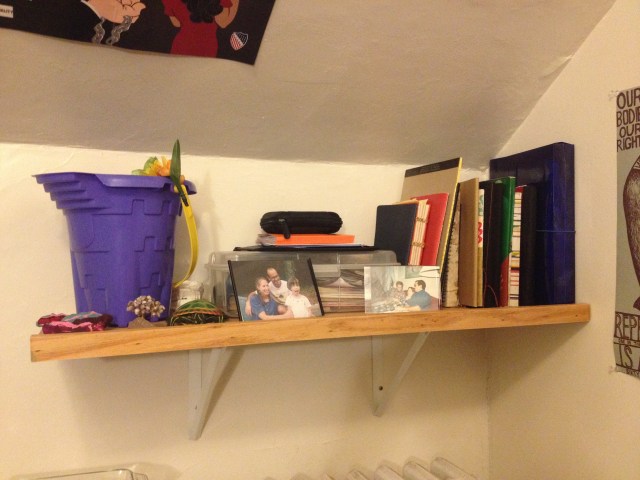
But after a while finagling the screws, I had a brand new sturdy shelf secured to my wall, ready to hold my stuff safely above my radiator.

You probably want to do some measuring to make sure your shelf comes out even and the weight is well distributed across your brackets. I live in an apartment that is a converted attic and literally nothing measures out neatly, so what I did was to place the brackets on first, based on where the studs were. Then I measured the board and centered it on top of the brackets. It fit neatly into the corner of the room.
Good job! You made a shelf!
This Is How We Do It: Drying and Preserving Herbs
Welcome to This Is How We Do It, a series wherein we’ll be discussing projects both inside the home and out and explaining, you know, how we do it.
Summer is a verdant, bountiful time of growth and plenty; a time when for many of us, it’s totally feasible to walk out into your backyard or nearby green area to pluck a few fresh mint leaves for your drink. Unfortunately, as summer draws to a close, so does that possibility; whether you’re gathering fresh herbs from a garden, a window ledge of potted plants, or foraging wild herbs from around your neighborhood, that door is closing with the season. So it’s getting to be time to preserve those lil guys so you can enjoy them all year round. Here are two ways to do that!
I am not a Certified Herb Person, and it’s totally possible that there are ways in which my approach can be improved. If you have tips, please do share them in the comments!
Dry and preserving herbs
Time: Maybe 15-20 minutes
Materials
Herbs of your choosing
Scissors or garden shears
Twine or string (preferably not treated or coated in anything)
Coat hanger(s), wire if possible, and potentially nails to hang it from
A baking pan or wire cooling rack that you can live without for a few weeks
For leafy herbs
1. Gather your herbs
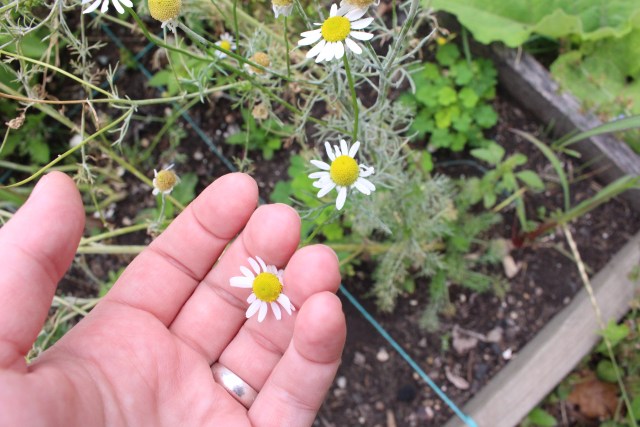
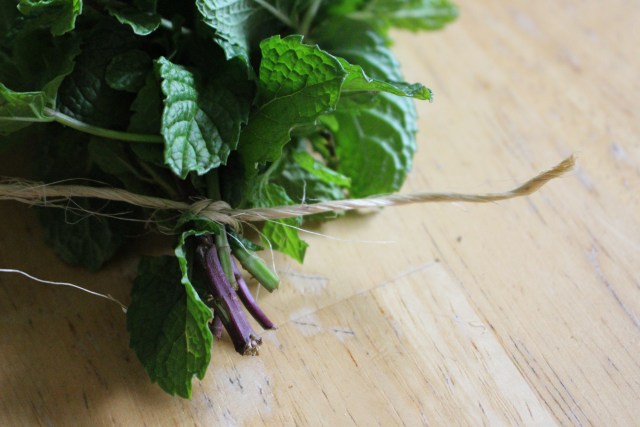
I’m using rosemary, mint and chamomile for this example. In the case of rosemary and mint, the part of the plant we want to use is the leaf, so I’m just harvesting whole stems to keep all the leaves in one place. In the case of chamomile, the part I want is the flower and cone, so I’m just grabbing that off the top of the stem and placing them carefully in a bowl.
2. Gather your other materials
You’ll need a clear workspace, your coat hanger/s, scissors, twine and of course herbs. For this part, you just need any stemmed, leafy herbs you have — like my rosemary and mint or thyme, sage, parsley, etc.
 3. Bundle your herbs and tie them up
First, it’s easiest if the bottom few inches of your stems are clear of leaves because then you can see what you’re doing, so feel free to strip the very ends of your stems. Once you’ve done that, cut a length of twine about eight inches or so; bundle one kind of herb together, as much as will comfortably fit in one bundle without being totally crushed together, and tie it together by the end stems. Full disclosure, my knotwork is not great — my Girl Scout troop unfortunately focused more on arts and crafts than useful skills — and this still works pretty well for me, so don’t stress.
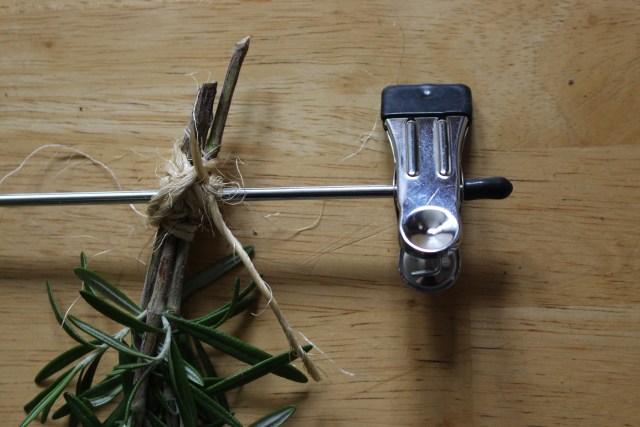
Next, using the same twine that’s already attached to your herbs, tie the end of your little bouquet tightly against the long edge of your coat hanger. By trial and error, I have figured out that the easiest way to do this is to tie the bundle in the middle of your length of twine, leaving two long ends, and then laying your coat hanger over the knot on your herb bundle and using the two long ends of twine to tie more knots over the wire.
Once done, you should have X number of upside down bouquets securely tied to your coat hanger. Don’t crowd these guys together; the whole point is that they need air in order to dry, so get more than one coat hanger if you need to.
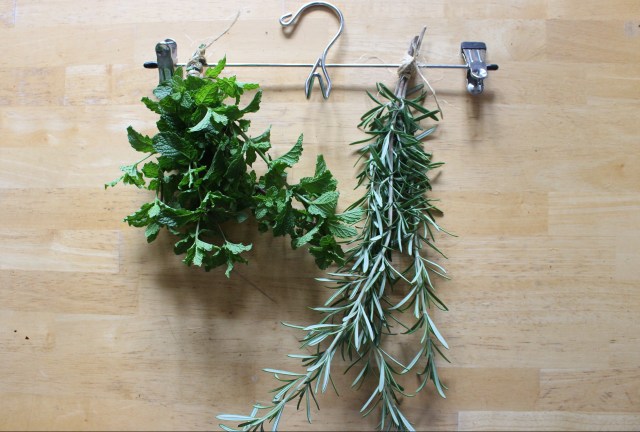
4. Hang them up
They’ll need to be somewhere where they won’t be disturbed for a few weeks, and also preferably somewhere that gets good airflow. I chose this spot on my kitchen wall, because the kitchen probably gets the most fresh air in the house. It would have been nice to find someplace where the herbs were exposed to air on all sides, like a doorframe, but none of the doorframes in my apartment are really viable options.

can you spot the a-camp artifact in this photo
These just have to hang out for several weeks, or until they’re totally dehydrated. You don’t have to actively do anything; just let them chill out. You can test whether they’re done by pulling off a single leaf; if you can bend it at all and the leaf stays whole, give it more time.
Once they’re done, you could just throw them in a container as is, although that’s not very space-efficient. Probably what you’ll want to do is remove the leaves and store them in a jar or bag and toss the stems — you can harvest the leaves pretty quickly by pinching the stem at the far end (the end that would have been closer to the sky than the ground while the herb was growing) and just running your fingers all the way to the other end; the leaves should shuck off pretty easily.
For flowery herbs
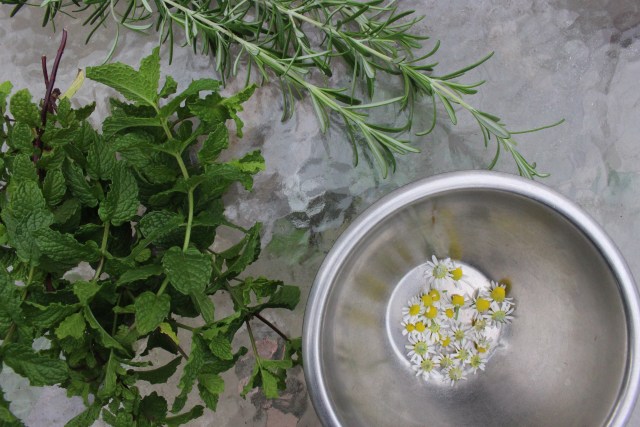
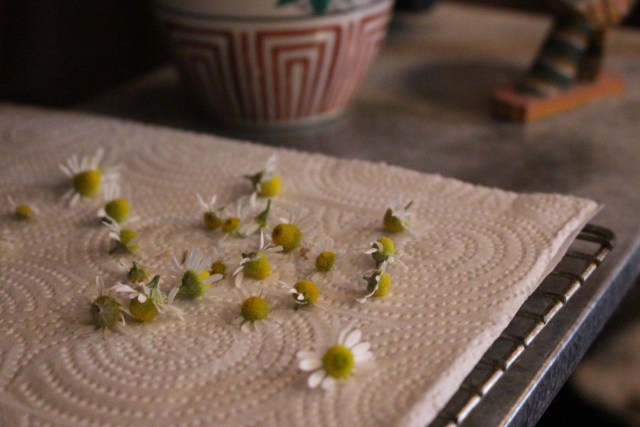
Remember the chamomile flowers I harvested? I’m gonna dry those too, and it’s an even easier process. You can also preserve other herbs and plants like lavender and rose like this.
1. Spread your herb out on a flat, dry surface
I chose this wire cooling rack and put it on a shelf in my office, one of the few surfaces in the apartment that the cats have not demonstrated an interest in jumping onto. I covered it with a paper towel so that the smaller flowers wouldn’t fall through the gaps in the wire, although in retrospect cheesecloth would probably have provided better aeration.
2. Wait for them to dry
That’s it! That’s literally the whole process. This, too, will probably take a few weeks. When the flowers are thoroughly dry, you can move them to a jar or other storage container.
After the drying process, your herbs are ready for use in a number of applications — cooking, making herbal teas, even medicinal uses like tinctures or infused oils. (A note: if you are going to try an infused oil — which is awesome! I recommend it — you need to make extra double sure your herbs are 110% dried, because any water content at all in the oil can cause botulism, for real.)
Join me later in the season when I maybe take a stab at harvesting echinacea root! Or not, we’ll see.
This Is How We Do It: Turn Your Smartphone Into a Hologram Projector
Welcome to This Is How We Do It, a new series wherein we’ll be discussing projects both inside the home and out and explaining, you know, how we do it.
Nobody ever lets me write posts like this, because I’m not crafty and I don’t know how to do anything. Today we’re going to change all that! Today I’m going to teach you to make tiny glowing jellyfish swim around in midair, using the powers of your mind.
Janelle looks nervous.
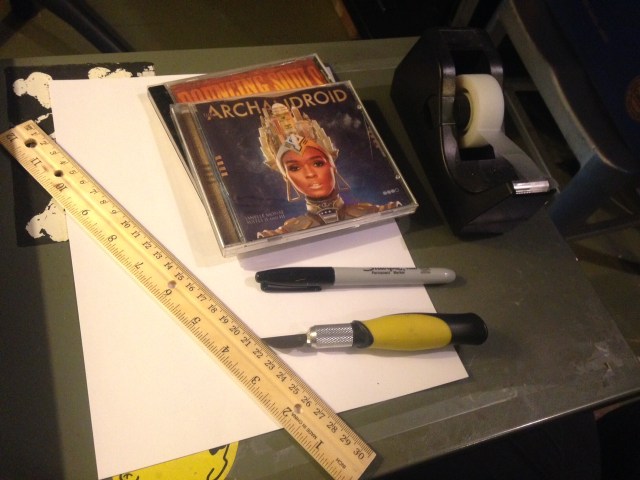
To build the projector, you will need:
- one smartphone (I used an iPhone 5)
- a couple of discarded CD jewel cases
- an X-acto knife or sharp boxcutter
- a metric ruler
- one Sharpie
- tape or glue
- a sheet of paper
- scissors
- some cardboard or something
- a dream
On your sheet of paper, draw a symmetrical trapezoid. The bottom line should be 6cm long, the height is 3.5cm, and the top line is 1cm. Once you’ve drawn your trapezoid, cut it out.
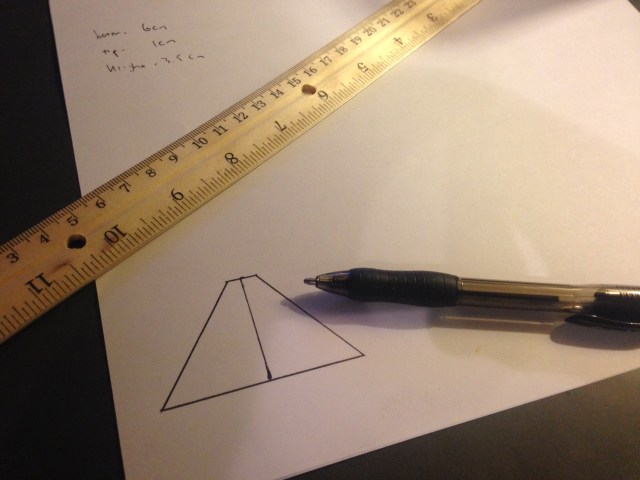
Look! I mathed!
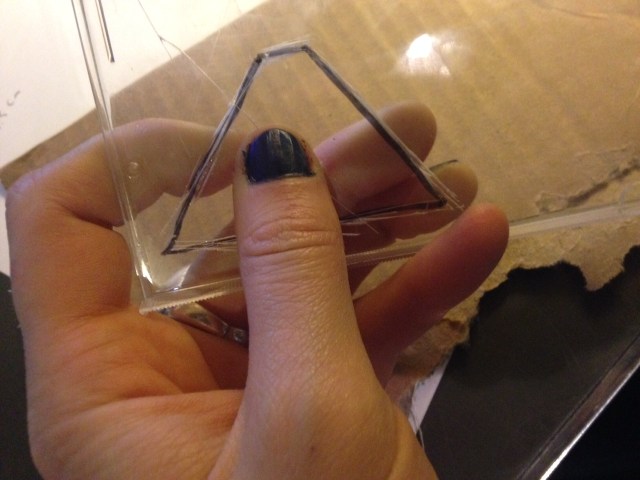
Do you own a CD? I heard you millennials have never bought a CD, or have only ever used streaming services, or sometimes buy ironic cassettes. Buy a CD. Support an independent artist. I got rid of most of my old jewel cases, but I was able to track down an old Bouncing Souls record and a Janelle Monáe CD case that turned out to have a disc of Depeche Mode’s “Some Great Reward” inside. Whatever. Take the liner notes out and hold the empty plastic flat against your work surface. Place your trapezoid against the plastic and trace it with your Sharpie.
Be a lot more careful than I clearly was.
Time to cut — you’re going to want to do this on some sort of surface, so you don’t cut yourself or scratch up your desk. I used a piece of cardboard.

Deep concentration.
Using your X-acto knife or boxcutter, score along the outline of your trapezoid until you can pop the shape out. This will take longer than you thought it would. Maybe put that Depeche Mode record on and mope a little bit while you work. The plastic is a bit thicker than you may have anticipated, and you may wonder why you’re even doing this in the first place, but then you think about Princess Leia and you press on.

After you’ve cut out your trapezoid, guess what?! You have to cut out three more identical shapes. When you’ve got your four pieces, glue or tape them together into a pyramid shape, so the smaller opening on the bottom is flat (basically, so the pyramid can stand upside down on its own). If you tape the pieces together, use small pieces of tape at the top and bottom of the pyramid.

It’s supposed to look more or less like this.
Pull up YouTube or Instagram on your phone and search for “holho.” People have made some deeply creepy videos with singing and dancing anime characters, but this one seems like a neutral, pleasant start. The videos will instruct you to place your little pyramid (smaller side down) in the center of the screen, and then you can turn off your lights, get down to eye level with the projector and watch the magic happen.

LOOK AT THIS HALF-ASSED THING I BUILT! IT WORKS!!
Are your friends impressed? They’d better be. Tell them you thought of this idea all on your own. I won’t be offended.

Your hologram projector probably can’t do this… YET.
Heads up, nerds: you can actually do a Princess Leia hologram if you download this guy’s video.
This Is How We Do It: DIY Liquid Garden Fertilizer
Welcome to This Is How We Do It, a new series wherein we’ll be discussing projects both inside the home and out and explaining, you know, how we do it.
I planted my garden at the beginning of summer, when it was just starting to get hot more than occasionally. Were we ever so young! The yard of my apartment was blessed with a compost container, so I was able to plant my baby vegetables with lots of compost to help them grow strong and healthy. Now that my plants are grown, they need more plant food, and I want to feed it to them without disturbing their root systems by shoveling around in there. The solution: liquid fertilizer! I could buy Miracle-Gro, or I could make some easily (and organically) at home. There’s more than one way to do this, but I made what’s called “compost tea,” or liquid fertilizer derived from compost. It’s just stupid easy, I promise.
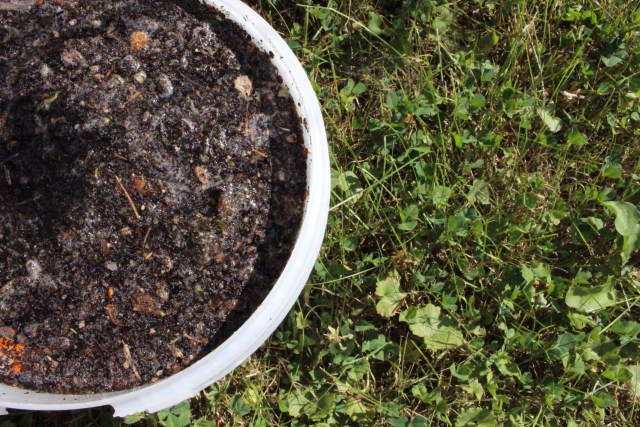
1. Find a bucket or other large container, and fill it halfway or so with compost.
It’s okay if it’s not all totally decomposed/composted or if there are still chunks of vegetable matter, just shovel it all in there.
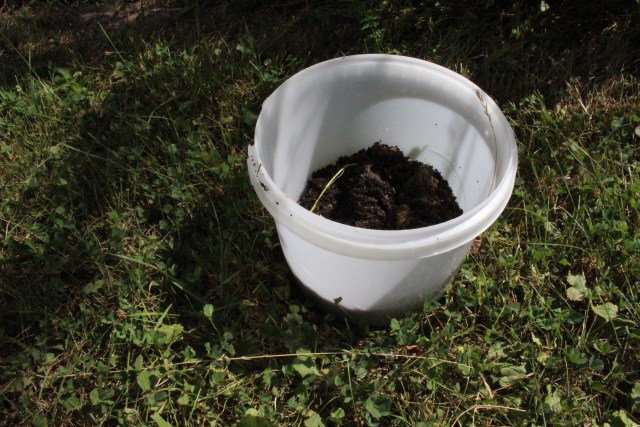
2. Fill the rest of the container with clean water.
You can cover the bucket with a lid at this point if you wish; it’s not a big deal whether you cover it or not, it will just smell a little less like compost if you do.
Delish!
3. Let the “tea” sit for a few weeks, stirring frequently.
Most instructions call for about three weeks, although if your compost is really A+ material and is already very nutritionally rich, you could do less time. It should be stirred frequently, once a day if you can, to introduce oxygen into the mixture, which will help the microbes you need.
4. Dilute and feed to your plants!
The liquid in your container should now be fully functional liquid fertilizer! You can strain the liquid through a mesh or an old t-shirt to separate out the plant matter. Dilute the liquid with water at a ratio of about 1 part fertilizer to 9 parts clean water, and use to water your plants. It should be a light translucent brown, not unlike a glass of iced tea. You can re-use the plant matter with more liquid to create more fertilizer. Your plants will thank you.
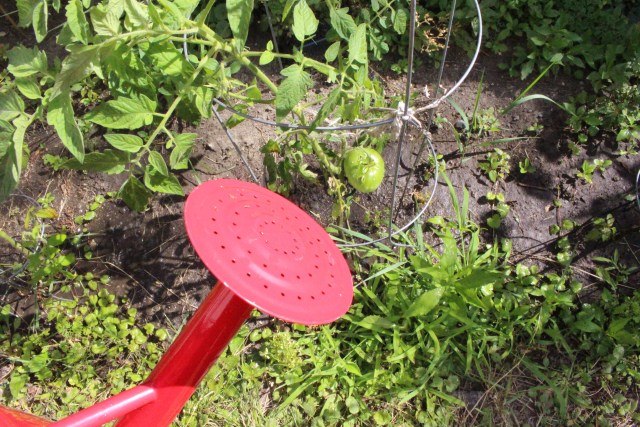
Maybe someday, with enough plant food, this tomato will finally ripen
If you don’t have any compost to work with (here’s an easy way to get started!) you can use grass clippings or leftover vegetable and plant matter instead. While not technically a fertilizer, you can also use Epsom salt as an additive either to the soil or in the form of a spray for tomato and pepper plants; you can dissolve two tablespoons of Epsom salts in one gallon of water and use the resulting liquid as often as once a month.
This Is How We Do It: Refinishing a Table
Welcome to This Is How We Do It, a new series wherein we’ll be discussing projects both inside the home and out and explaining, you know, how we do it.
I bought my first house three years ago, and went from renting a small apartment to owning and then furnishing a whole house. One of my favorite things about finally owning a home is that I feel I can buy “adult furniture” and not have to worry about ruining it by moving over and over again. I slowly started picking up vintage pieces from craigslist and refinishing them, including my dining table.
I set up a craigslist search and waded through hundreds of listings until I found this amazing solid cherry table and chair set for a couple hundred dollars — less than an IKEA set. I went to the seller’s house and was super excited about the quality of the wood and craftsmanship. It was solid wood, all joined, no nails and complete with 8 solid chairs. The only problem was the table’s surface. It was covered in rings from glasses and the finish had worn off in spots and the wood underneath had then become badly stained with dirt. No problem; it was solid wood, I could sand it out. So I brought it home.
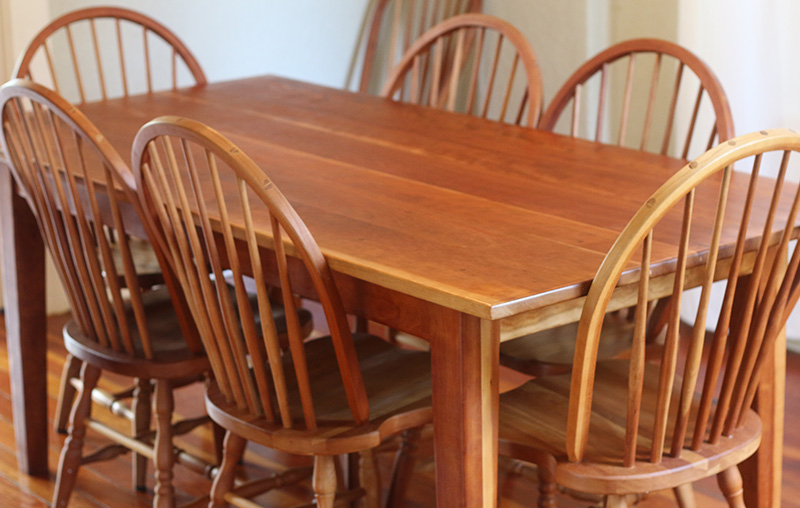
the finished table
How to refinish a table
Time: However long your patience lasts for craigslist plus a few hours for sanding and finishing spread over a couple days.
Materials:
fine steel wool (from a hardware store, not the grocery store)
Murphy’s Oil Soap
an electric orbital sander and sandpaper (80, 150 and 220 grit)
Watco Danish Oil, Natural
Howard Feed-N-Wax
some old t-shirts or lint-free rags to use for the finish which you’re ok tossing into the garbage after
Step 1: Acquire a solid wood table
(Already have a solid wood table? Great, skip this step!)
Craigslist has an “email alert” function which you may want to set up for your search if you don’t find anything right away. You’re going to be looking for a table which is solid wood, not veneer. Veneer is a very thin strip of a nice quality wood glued over the top of a cheaper or harder and more stable wood or wood composite. People have been using veneer for centuries, so buying vintage doesn’t necessarily mean you’re buying solid wood. The veneer layer on top is paper thin, so even if you sand very very very lightly by hand you still might sand through or rip & tear the veneer. It’s really not worth the effort, and solid wood is less fragile anyway.
If you can’t tell if a table is veneer or solid wood, look at the edge of the table. Is there an “end grain” at the end of the table, indicating it’s solid wood? Or is there another type of wood edging the table, or a seam at the very edge? That probably means veneer.
If you do have a veneer table, you can usually get away with chemically stripping the finish and refinishing, without sanding. Or even easier, something like Restor-A-Finish will likely be enough to fix most issues (the stuff is magic).
Step 2: Clean it
The next step is to clean the years of dirt and grime and furniture polish off the table. Use your fine steel wool and a bowl of hot water and Murphy’s Oil Soap to get all the crud off. Keep dumping and refilling your bowl of soapy water and wash the table until the water stays clear. Make sure to run it over with a rag with plain water to rinse it too.
Step 3: Sand it
You really should try to get an electric orbital sander if you can, as it’ll save you lots of time. (Do you have a friend you can borrow one from? is there a tool library in your city? do you have a crafty friendly neighbor?). If you can’t at least get a nice sanding block and decent quality sandpaper — it makes the task a lot faster.
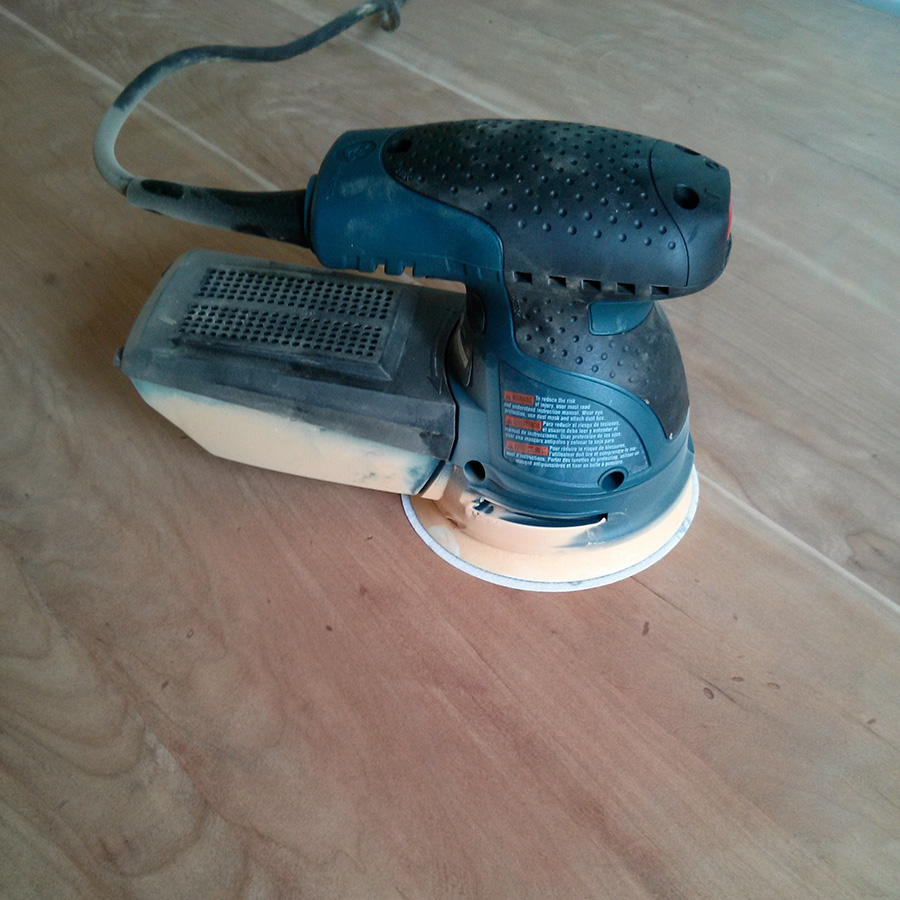
sanding the table
Start with a 80ish grit and sand until all the old stain and finish, marks, rings, scratches and whatever else is off the table top. Once you’re happy you can do another pass with a 150 or so, then finally a 220 or higher grit to make it real smooth. Don’t press too hard with the electric sander or you’ll get little circle marks which are hard to get out. Make sure you sand in the direction of the grain, not across the grain. Be careful about the edges of the table; I recommend doing these by hand.
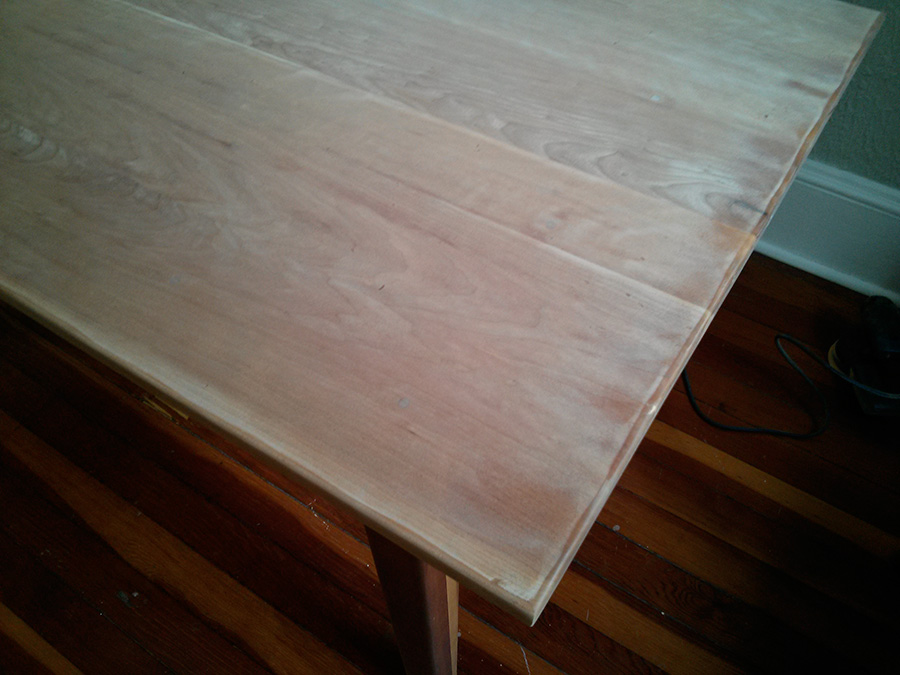
cherry wood turns really light when you sand it
Step 4: Wipe it down
Clean off all the wood dust real well. You can use a wet cloth if you want but you have to wait until the table is totally dry before going on to the next step.
Step 5: Oil it!
I really prefer oiled wood to a varnish or polyurethane — the finished table still feels like wood and not plastic. This is my favorite step because I get so much satisfaction out it. I love to watch the colors of the wood come out when it’s wet with the oil.
Use the lint-free rags or old t-shirts and rub the Danish oil into the wood, and be liberal with it. Allow it to soak into the wood for about 5 or 10 minutes and then wipe off the excess. Allow to completely dry before repeating this process. I did 5 coats on my table.
For one or more of these oil applications you can use fine 400 grit sandpaper or your fine steel wool to wet sand the table. It makes a bit of a slurry of wood dust mixed with oil which fills the tiny pores of the wood, sealing it better from moisture. It’s not a necessary step, but feel free to do it if you want. Wipe off the excess as normal when you’re done sanding.
These oiled rags heat up as they dry, and can be spontaneously combustible. When you are finished, spread them out somewhere to dry that they won’t be in contact with anything flammable and allow them to fully dry before throwing them in the garbage. I lay them in the bathtub or sink and then put them in a sealed container in the garbage when they are dry.
Wait a good 24+ hours before going on to the next step. Make sure the table is totally dry.
Step 6: Wax it
The oil does a really good job at making the wood look beautiful and hardening the surface, but to make it extra waterproof you’ll need to add wax. I really like a product called Feed-N-Wax which is some percentage orange oil and some other percentage beeswax which makes me feel that it’s somewhat safer for me, though that’s probably untrue. At least it smells nice. Apply the Feed-N-Wax liberally and let it soak in, and after 20 mins or so wipe off the excess and you’re good! I take a dry towel and buff the surface to shine it up too, but you can skip that. You should keep doing this every few months or so to refresh the coat. I also did it to my chairs after I cleaned them. It will darken the color of the wood just a bit, so keep that in mind.
Note that you can skip this step and add a layer of water based polyurethane over the top of it all if you don’t want to wax. I don’t find the waxing tedious though, it takes just a few minutes.
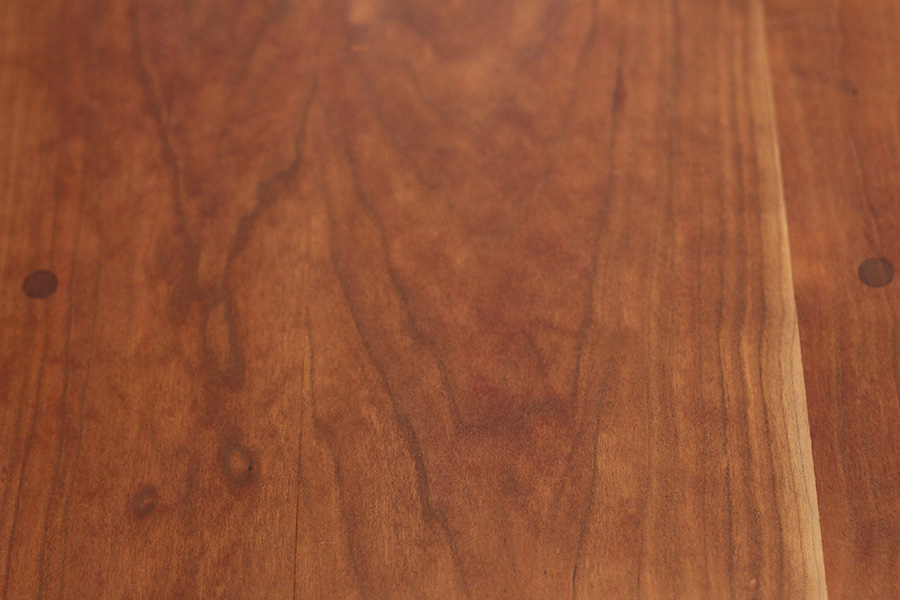
cherry wood is so pretty
Maintenance
I clean my table with plain water or Murphy’s Oil Soap, and don’t use any strong cleaning products on it. I reapply the Feed-N-Wax every few months. I do use trivets on my table for very hot things like soup, and use coasters for drinks, but the finish should hold up if you forget.
Feel free to post questions and photos about your table projects in the comments. I can even help tell you if your table is solid or veneer if you are unsure.