Shibari 101: Single- and Double-Column Ties
Welcome to Shibari 101, your chance to learn the building blocks of Japanese rope bondage! Today we’re doing single and double-column shibari ties. If you missed it, check out the introduction for history, rope basics and safety.
Single- and double-column ties are the foundation for many more complicated shibari ties, but they’re also fun on their own. Whether you plan to use these shibari ties alone or turn them into something else, mastering these two ties is extremely important. Once you’ve worked them out, practice them over and over until you can do them without even thinking.
Single-Column Shibari Tie
A single-column tie is probably the most common shibari tie. A column is a thing you’re tying: a leg, a waist, a chair rung, a bed post. Below, I’ll demonstrate on an arm. Make sure your bottom takes off any wrist jewelry/watches first.
First, find the bight (center) of your rope. Wrap it around the wrist (above the joint) twice, leaving room for a couple fingers to slip between the rope and the wrist. Cross the bight over the working ends (the two ends of rope opposite the bight).
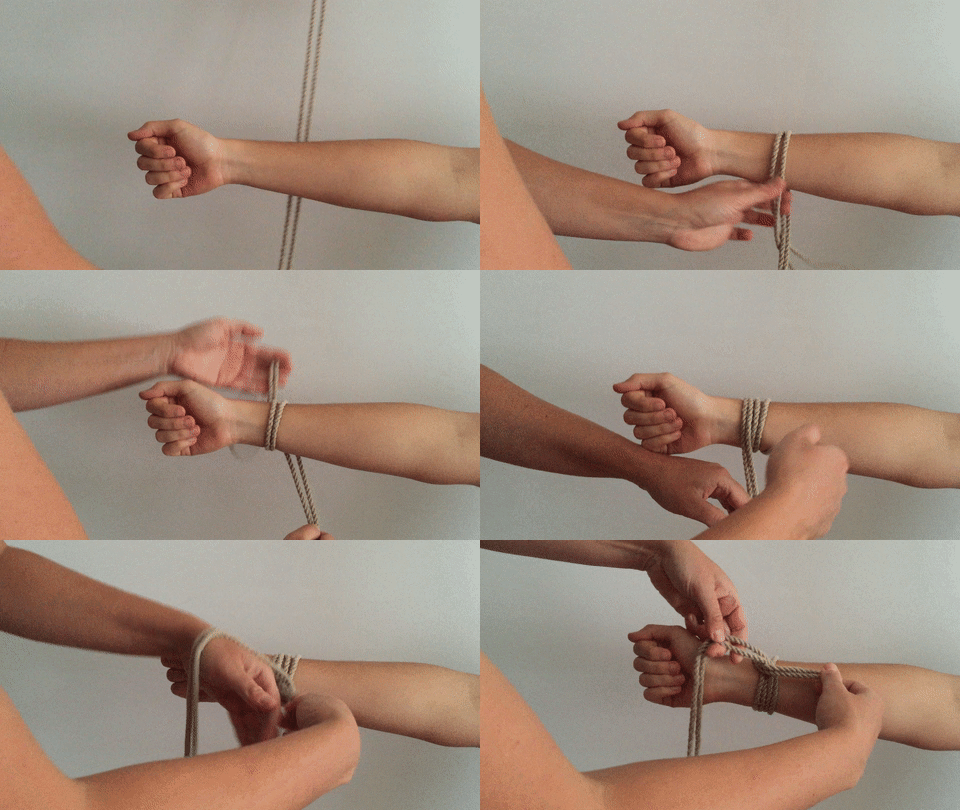
Tuck the bight underneath all the ropes. It’s better to always reach under and pull rope instead of pushing it through because it’ll retain its lay (twist pattern) better and not get out of shape.
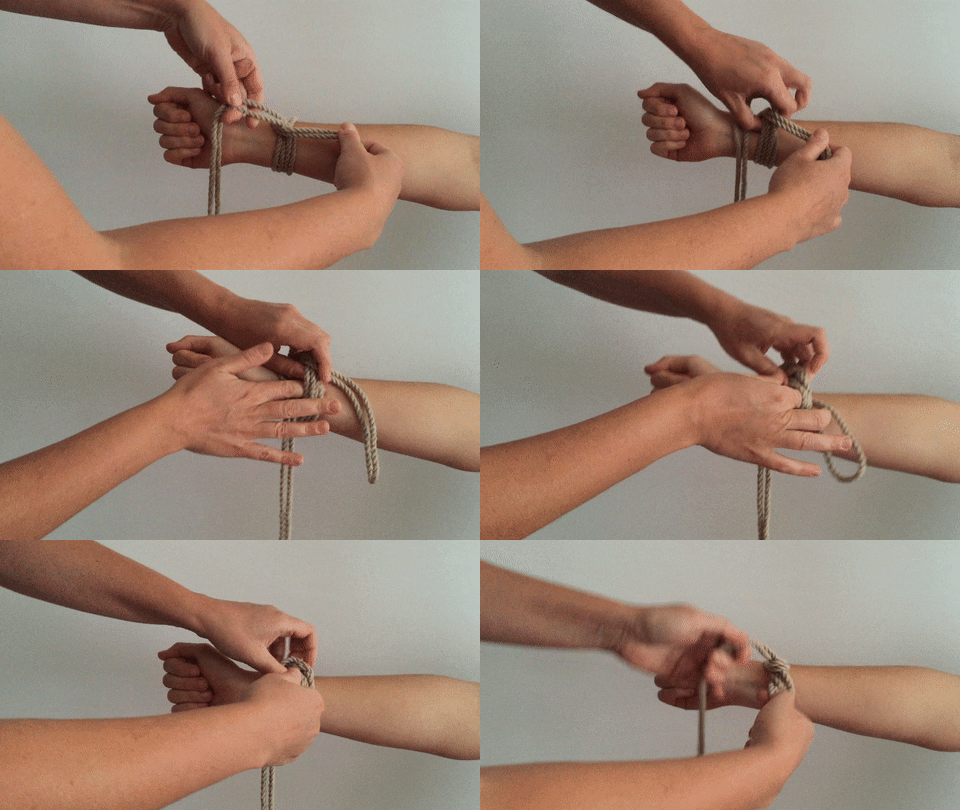
Make a loop with the working end and pull the bight through. If the result does not create a knot and just falls apart, try bringing the bight through the other side.
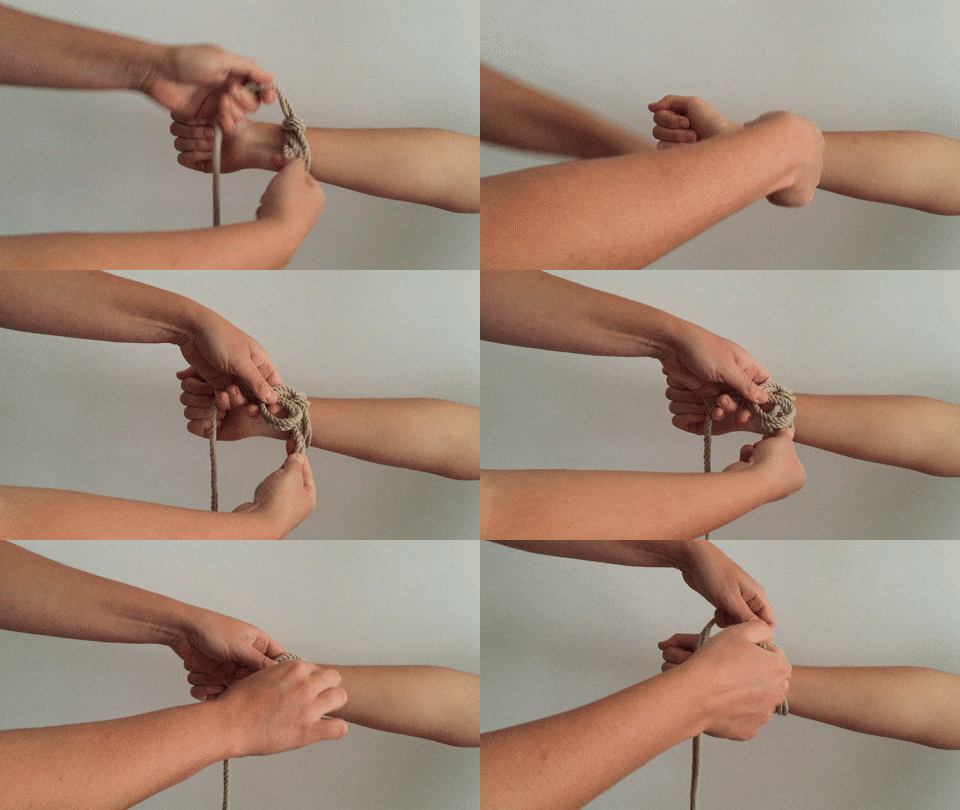
Create yet another loop and bring the bight through again. Pull tight on the knot — it shouldn’t tighten on the wrist at all, and you should still be able to slip a couple of fingers between the ropes and the wrist. That’s it!
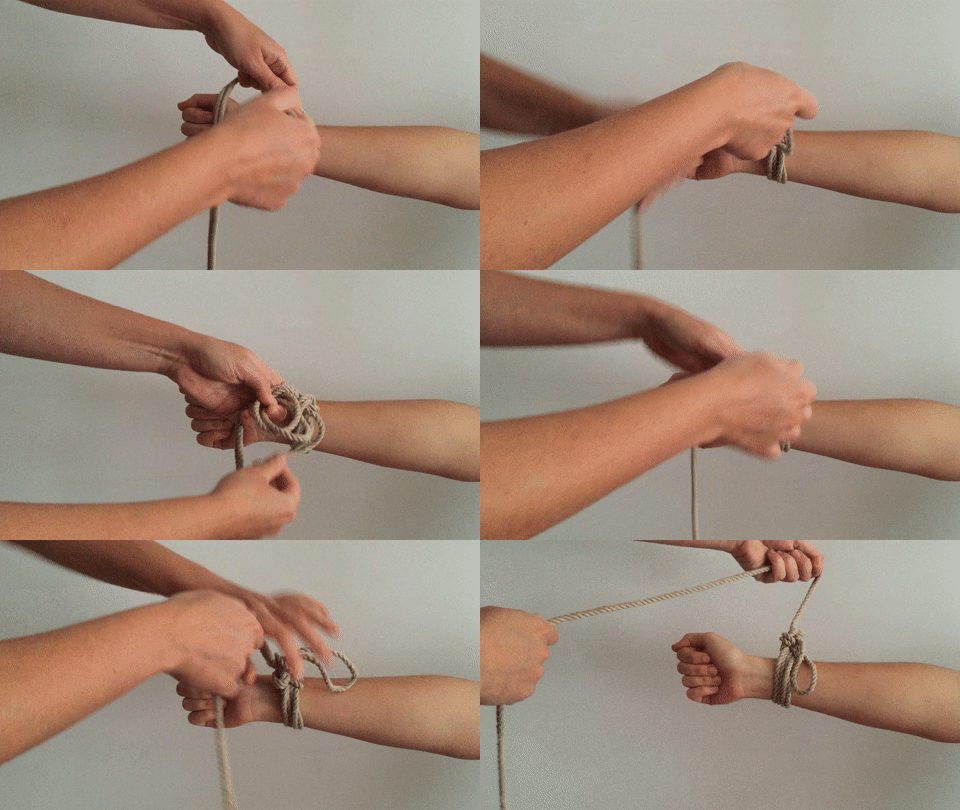
Remember:
- There should be room to move the wrist within the shibari tie, but not enough to slip the hand out of the tie. You should be able to slide a couple fingers underneath the ropes.
- There should still be some length of bight left, to keep the knot from coming undone. It’s better to have a bit too long of a leftover bight loop as a beginner — you can work up to having it look trim and perfect after you master the tie.
- The four ropes along the wrist should not twist or overlap each other, as this would create too much pressure in one spot.
- The tie isn’t at the very end of the wrist but instead is a couple inches up from the hand and the knot is on the outside of the wrist, not on the sensitive inner wrist, to reduce chances of nerve damage.
Using The Bight As A Pulley
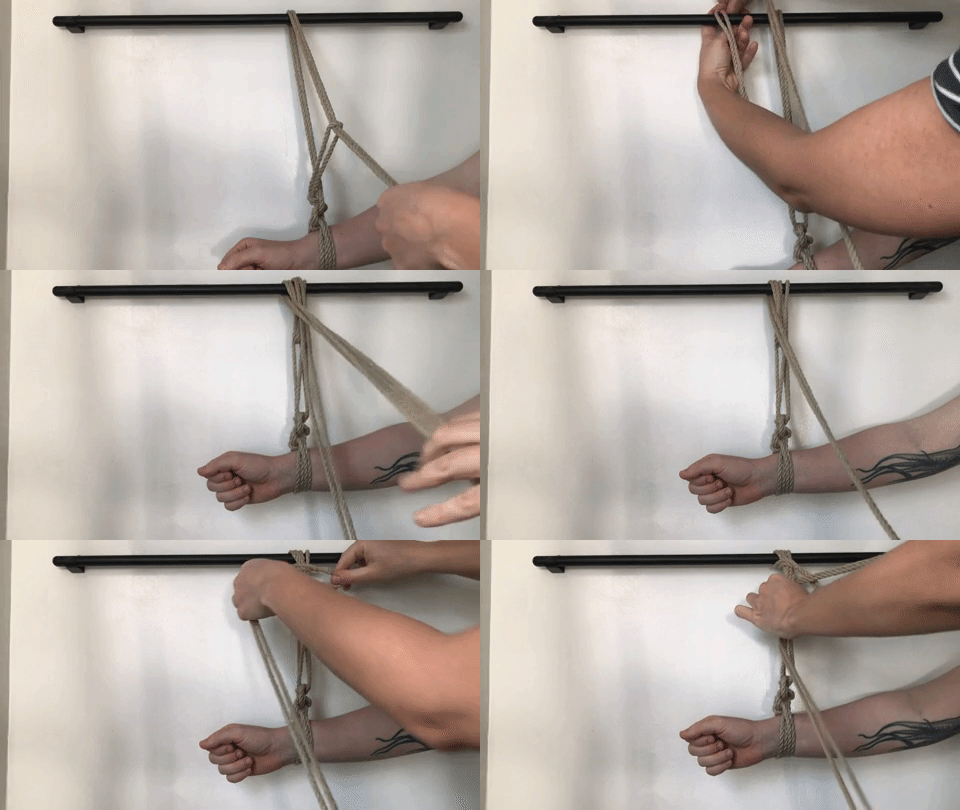
You can also use the bight as a pulley system to secure your bottom to something else in a safe way that doesn’t add any excess pressure on the ropes around the wrist, the knot, or the wrist itself. This is not a safe way to hold weight, so if you do tie overhead, make sure your bottom holds up their own weight and doesn’t hang from their wrists, which could cause serious nerve damage.
To use the bight as a pulley, first wrap the ends of your rope through a hardpoint (typically a hook or loop in the ceiling you can tie to), or around a bed post or whatever else you can think of, and then come back and thread the rope through the bight, then back through or around your point and tie off all the ropes together in a double half hitch.

Double-Column Shibari Tie
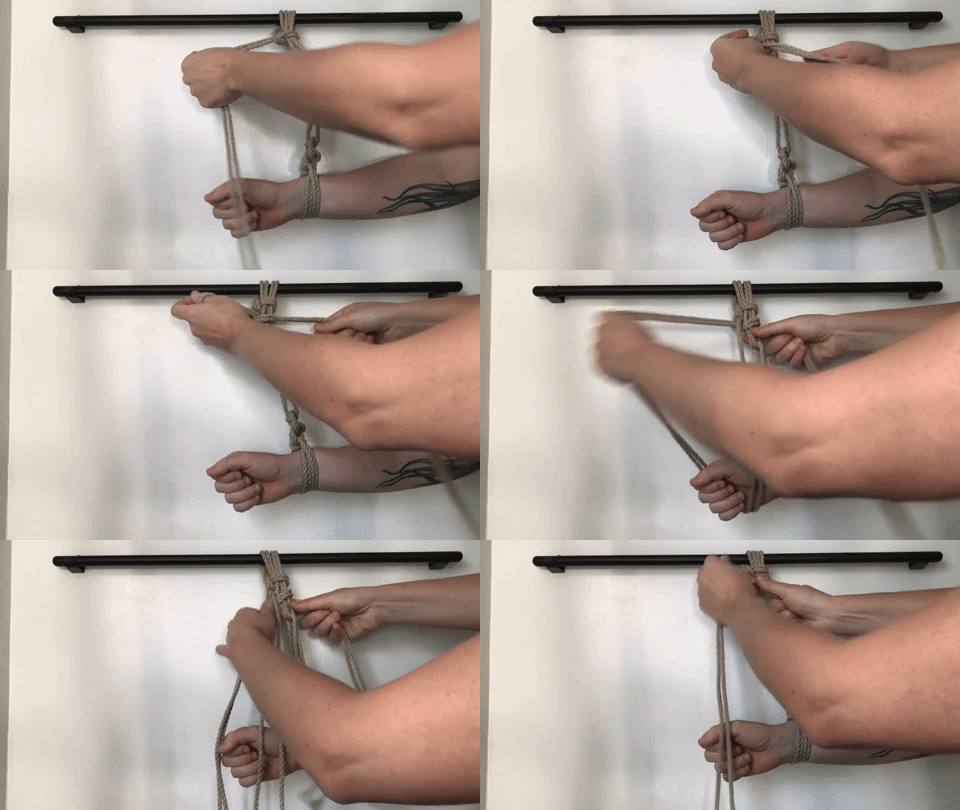
A double column ties two columns together. I’ll demonstrate here on two wrists, but you can tie a wrist to an ankle, an ankle to a chair leg, a wrist to a thigh, a wrist to an upper arm with the arm folded, rendering the arm unable to be used, or an ankle to an upper thigh with the knee bent.
Start by finding the bight or center of your rope. Wrap it around both wrists twice. Make sure to leave a lot more slack on your bight than you did for the single column tie.
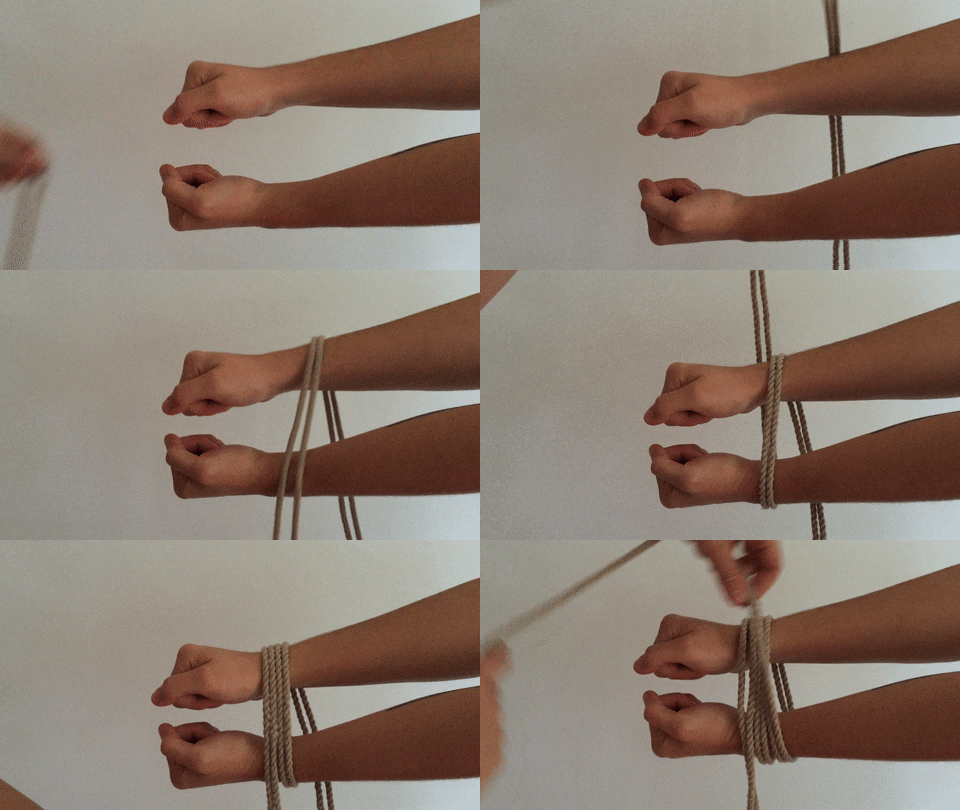
Cross the bight over the working ends at the top and center of the wrists. Pass the rope through the wrists and behind both sets of the ropes and then back to the front. Unlike the single-column tie, which just wraps the bight under the top set of ropes, the double-column tie wraps the bight over both the top and bottom sets of ropes. The rope goes between the two columns, over both sets of ropes, and back up again.
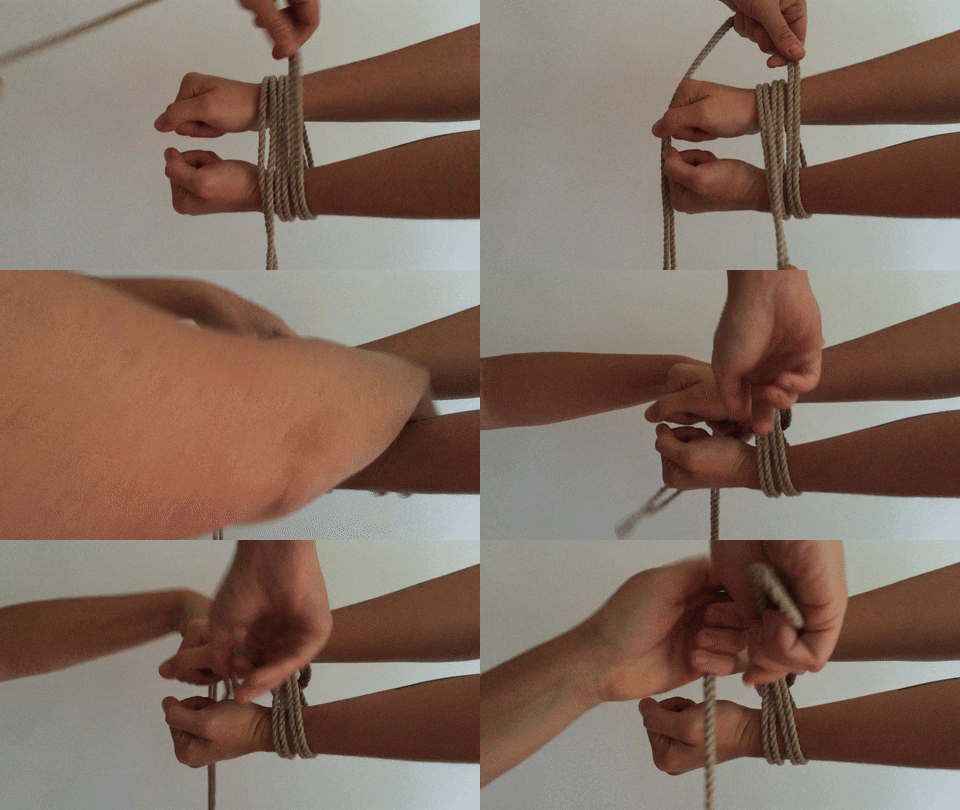
Make a loop with the working end and bring the bight through. If it does not create a knot and just falls apart, try bringing the bight through the other side.
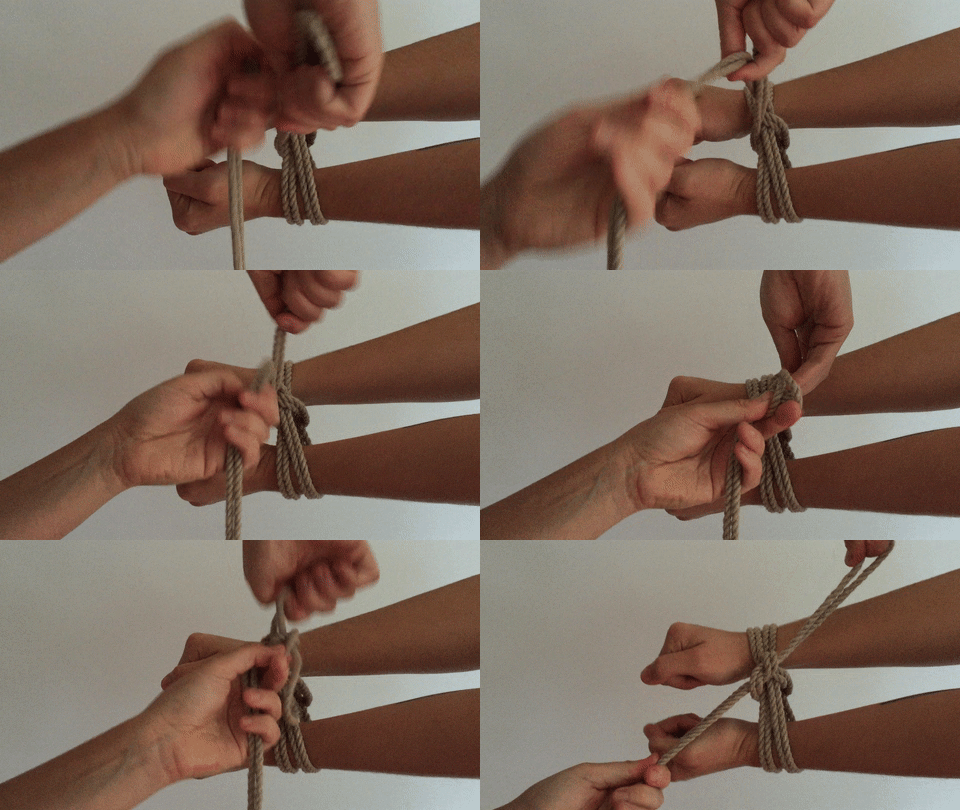
Create yet another loop and bring the bight through again. Pull tight to lock the knots. The knot should not tighten on the wrists at all, and you should still be able to slip a couple fingers between the ropes and the wrists, but not so loose that the hands can slip through.
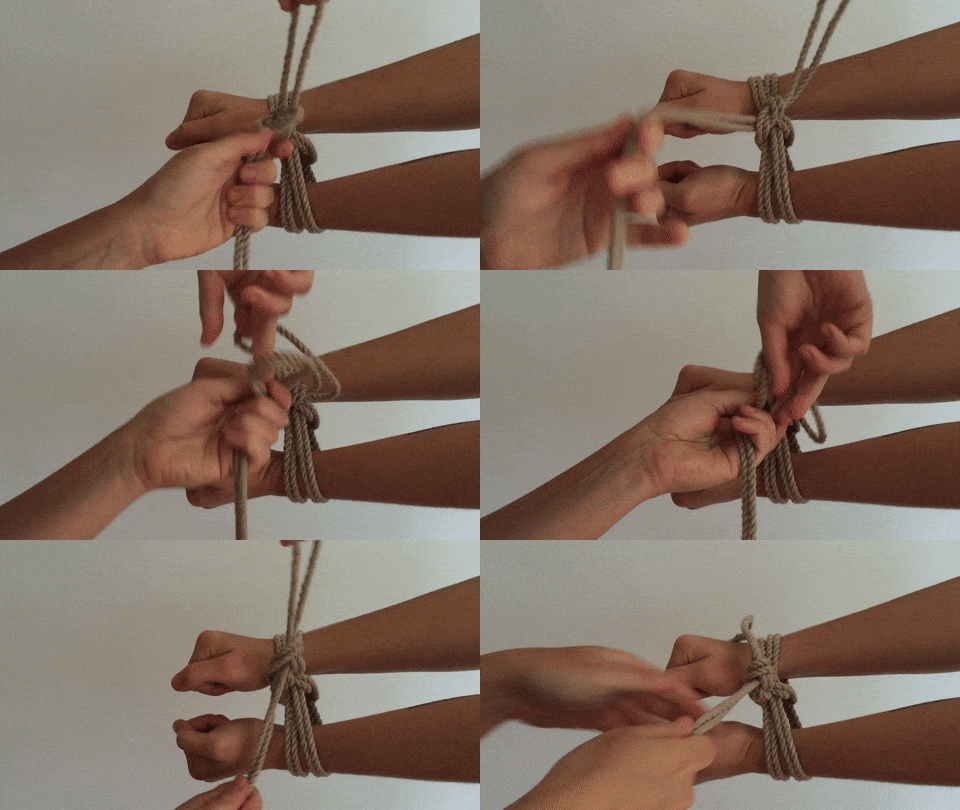
Practice, Practice, Practice!
Practice your single and double column ties over and over again, on chair legs or your ankles, until you no longer think about it and can do it automatically. It’s very important to get good at both of these before moving on to more complicated ties.
Ask The Plant Doctor: You Have Questions About Your Houseplants, Cee Has Answers
Hello!I’m Cee (they/them) and I’ve been the Technical Director (ie: the tech department) for Autostraddle for about 8 years now. In addition to that, I run a queer web development agency based out of Portland called Dapper Digital.
On the side, one of my biggest lifelong interests is plants. I would have been the fifth generation in my family to go into the floral industry if I hadn’t gone into tech. The company my great-great-great aunt started back in the 1800’s was called Crowl Fern Co and it was the official city florist for NYC’s street Christmas decorations. They also were the official florist for some presidential inaugurations but sadly I do not know which ones. ¯\_(ツ)_/¯

I spent a lot of my youth in my grandparents’ fresh flower shop and my dad’s wholesale floral shop learning a lot about flowers. To this day I love flowers and plants, and have been keeping houseplants for 25 years now. I currently have over 100 plants inside my house! I’ve gone through phases of different types of plants I like to collect – from orchids, to cactus and succulents, and now I’m into hoyas and philodendrons, mostly. I often propagate plants and try to grow from cuttings.
I wanted to do this open thread because I realize that a lot of folks are getting into houseplants now and may have some questions about the best way to keep them happy! I’d love to use some of my knowledge to help. Or maybe you just want to talk about your cute plants and show me pics of them. I’m excited either way and I’ll be around all day to talk plants with you.
If you want help diagnosing your sick plant, just upload a pic of the plant close up and tell me what’s wrong. It also helps me a lot if you let me know where you live and how much light the plant gets (how far from the window, and ideally which direction the window faces). I can also talk houseplant pests too if that’s a problem for you (it’s been a huge problem for me this year).
Show me your plants! Tell me which is your favorite one and why.
I’d also love cute selfies of you with your plants! SEND ME PLANT SELFIES!
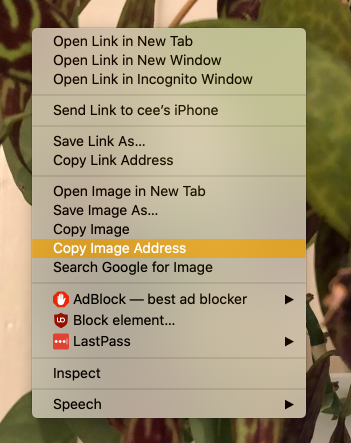
How To Post A Photo In The Comments:Find a photo on the web, right click (or on a Mac, control+click), and select “Copy Image Address”. Then put that image address into the code below:
<img src="http://www.image-link-goes-here.jpg">If you’re using imgur to upload a photo, you’ll need to right click on the image after it’s uploaded and select the image address like this:
We Need Help: We’re Hiring a WordPress Developer and a Systems Administrator
We have a fabulous opportunity for one or two people with formidable engineering prowess to use their tech mastery for good! Help us build and maintain this gay-ass website for lesbians, queer women and nonbinary people. Check out both job descriptions, because you may be able to do both, or you may just want to do one. Either way, fantastic! Apply by Friday February, 7 in the forms below.
Cee, who is currently acting as both our WordPress Developer and Systems Administrator, is looking for a replacement and they know all about what these jobs entail. If you have questions about the positions, please leave a comment. If you seem like a good fit, Cee will get in touch!
WordPress Developer:
We are looking for a senior level WordPress person to join our team! You must be extremely comfortable with custom WordPress themes and plugins, know how to handle websites with lots of traffic, and are comfortable taking the lead, managing yourself, and you take pride in your work. You’ll be the SOLE person developing, maintaining, and supporting all the code for this website once you’ve been trained by Cee.
You’ll also be in charge of handling all tech support and maintenance of the website, logins, the A+ system and tech support for our writers. Ideally we’re looking for someone for the long-haul, so please don’t apply if you’re thinking this will tie you over for a bit. You’ll also be on call at all hours and need to be available online if things break.
Requirements:
- 5+ years of web development experience (or if not, you think you’re at the level to do this!)
- Lots and lots of WordPress experience
- You’ve used and are comfortable with Gutenberg
- Super comfortable with CSS, responsive breakpoints, what works in what browsers, how to make things work in all devices, etc.
- Super comfortable with HTML
- Good at PHP and making sure you write PHP that doesn’t bring down our database
- Know how and why to minimize DB calls
- You understand how to code for websites with a lot of traffic
- Know when it’s appropriate to use certain image formats (svg/png/gif/jpg)
- Can keep the page size and render time to a reasonable level
- Can communicate well and explain technical things to non-technical people
- Can find ways to make the writer’s jobs easier, install functionality that would improve processes and do it all with minimal supervision
- Can vet plugins and make sure they’re coded well and won’t break our site or slow down things to an unusable level
- Comfortable interacting with our friendly users when they have issues with their accounts via our ticketing system
This job is PART TIME and is about 40 hours a month. Some weeks will have very little work, some weeks will have a lot, so flexible work hours are ideal. United States based applicants only please. Send your resume, hourly rate, and a WordPress custom-coded theme example and why you’d like to work for us via the form below. Feel free to reach out to Cee with any questions about this job: cee at this domain dot com! THANKS!
If you’re also a sys-admin please view our other listing – this job could be combined for the right person.
Systems Administrator:
We are looking for a systems administrator to join our team! Our server is custom built and you’ll be the one maintaining it. Ideally we’re looking for someone for the long-haul, so please only apply if you’re committed to sticking around.
Requirements:
- Fully comfortable with Linux/Unix and using the command line
- Know how to keep an apt-based server up to date (Ubuntu)
- Has set up and maintained a web server before, preferably NGINX, and can tweak it for speed for a large-scale website
- Can configure and maintain PHP-FPM, and can tweak it for speed for a large-scale website. Also would be great to have some experience with server side caching like Batcache/Varnish.
- Understands MySQL database configuration and basic maintenance
- Can support the web developer person by helping them with code check ins/deployment and basic DevOps/code backups, maintaining a development server, etc
- Is a fan of computer security and understands how to keep servers secure.
- Has experience or understanding of how WordPress works
- Cool with custom DNS setups and can manage DNS
- Can do tech support for our writers (mostly relating to email config)
This job PART TIME and is about 10 hours a month. Some weeks will have no work when things are running smoothly, some weeks will have a lot of work when things break, so flexible work hours are ideal. You’ll need to be on call at all hours and available online if things break, which they rarely do these days, thankfully!
United States-based applicants only please. Send your resume, hourly rate and why you want to work via the form below. Please consider applying even if you don’t have all of these requirements, but you’re keen on self-learning! Feel free to reach out to Cee with any questions about this job: cee at this domain dot com!
If you’re also a senior level WordPress developer, please view our other listing — this job could be combined for the right person.
Impact Play 101: How to Successfully Spank and Slap With Your Very Own Hands
Your hands are your first and best lesbian sex toy, and one thing you can do with them is spank someone! Spanking is maybe the most common entry point for impact play in the bedroom for people interested in trying it out. It can be fun and playful, hot n’ heavy, or part of a more involved kink dynamic or a full negotiated scene. It can also be a gateway sex act to other kinds of impact play, whether that’s other kinds of open-handed slapping or playing with toys like paddles, floggers, and more! What a cornucopia of delights. Regardless of where you end up, however, in your journey, it has to start with knowing how to use your hands to hit someone in a way that’s safe and sexy (or finding someone who is competent at doing this for you). To that end, let’s talk about how to spank someone!
What is spanking?
In a literal sense, spanking is a slapping gesture specifically on the ass, or sometimes back of the thighs. It falls under the larger umbrella of impact play, striking part of another person’s body with your hands or another implement — I personally often use spanking as a warm up on the ass for more intense impact play (paddles, canes, etc). Spanking can represent a range of things for the person administering a spanking and receiving it. On a basic level, it’s sensation play — to give someone pain, or intense sensation on and in their body during, before or completely outside of sex. When our bodies are pumped full of the intense chemicals associated with sexual arousal, sensations that might normally feel unpleasant or too intense can feel really good, and spanking or striking can be one of them. One friend I spoke to explained why the sensation of spanking works for them: “I’m partial to thuddy feelings, and there’s nothing quite like when a well-aimed hit lands on that place where your thigh meets your ass in a really sexy crease… you know where I mean. I’m getting hot thinking about it.” Spanking is maybe the most well-known form of impact play, but it’s not the only kind — I might also slap the inner or top of the thigh, or even slap the chest during sex as an extra sensation to turn up the intensity of the whole experience of receiving pleasure.
Spanking can obviously also function in D/s contexts as a form of “punishment” for whatever reason you decide, and has a role in kink dynamics. People might enjoy giving or receiving spankings for either of these reasons; many people like both. I sometimes use spanking on its own, as an over the knee punishment session, which sometimes also includes hitting with a a folded belt or paddle. Bottom and spankee extraordinaire Chingy describes the mental and emotional experience of being spanked as really fulfilling in a kinky context: “…it’s very psychological. Being bent over, with my ass exposed and beaten with hands/paddles/hair brushes/spoons/boots makes me feel small, embarrassed, and wet in ways little else does.”
Of course, spanking and slapping in this context I’m describing above is consensual! I’ve asked my partners prior to doing it, and we’ve had conversations about what feels good and what doesn’t. A lot of people find spanking to be really fun! It feels good, releases endorphins, can be a great introduction to playing with S/M, since it requires no purchased or brought with you items; you can just use your hands.
If you’d like to hear more from someone who’s really into spanking about why they like it, I recommend the “Why Are People Into That?” podcast by Tina Horn, and this episode which interviews Jillian Keenan about her spanking fetish.
Asking for it
You know this, but: before hitting someone you need to talk to them! Do not just smack someone and see how they react. Whether you’re interested in being a spanker, a spankee, or both, you’re going to need to talk all this out before you do anything, and make sure everyone’s on board with everything before you begin. Ask your partner what they’re looking for, what their boundaries are, and what they want and don’t want out of this experience.
If you’re a bottom or person who wants to be spanked or are curious about this, and are unsure how to get what you want, I recommend simply talking to your partner. Tell them you find spanking sexy, or you’re curious about trying it — maybe spanking sounds hot but you’re not sure and would like to give it a try. It may sound really hard to do; talking really directly about the sex you want is hard at first, but it does get easier as you practice it, and it really is the best way to get what you want. It might be easier and more productive to bring it up for the first time outside of a sexual context, laying the groundwork and broaching the subject before mentioning it in the bedroom. It’s good to also make sure, if they’re new to spanking too, that they understand how to do it safely — you can send them this article!
Remember, there’s nothing wrong with wanting someone to spank you, and there’s nothing wrong with wanting to spank your partner as long as both of you are 100% on board. For what it’s worth, you’re far from alone — in our 2015 Lesbian Sex Survey results, a full 50% of respondents included spanking as an answer to the question “Which of these activities has been a regular part of your sex life within the last year?” Specifically, “among survey-takers who indicated being interested in kink, 58% enjoy spanking their partner and 62% enjoy getting spanked.” You’re in good company! Although it’s totally possible that any individual sex partner might not be into it, there are lots of others who are.
You don’t want to actually hurt someone mentally (like by crossing their boundaries) or physically (like by hitting their tailbone) so learn and practice clear discussion of your wants, needs and boundaries as well as safety skills. Also, sobriety is recommended by me for impact play and kink in general. Be safe, friends!
Literally how to hit with your hands
So you’ve both worked out what you want, and you’re ready to go! First, you need to figure out literally how to do it. If you’ve never spanked someone before, I’d start with learning how a hit feels on your own body with the different options and ways one can hit — experiment with hitting your own thighs or inner arms with different levels of strength and hand positioning. For example, you can hit with your fingers together or apart, and your hand flat or more cupped. Personally, I prefer my fingers together and a bit of a cupped palm, as it makes a more satisfying noise upon impact, and delivers a deeper blow. If you hold your hand on the spot you just hit for a second or two after a spank instead of taking it away immediately, it’ll have a different sensation. Try playing around with these different options on your own thigh to test the differences and find your preferences — keeping in mind of course that everything feels different to each body, and so once you have a sense of your own strength and sensations you still need to talk to anyone you’re playing with about how it feels to them. Even for the same person, on different days or in different situations a stroke that normally feels like a 2 could sometimes feel like a 6, and so on; pay attention and listen to their verbal and nonverbal cues about how intense things are feeling.
To the degree that any kind of impact play is about sensation, keep in mind that there are a range of different types of feeling associated with being struck, and it’s productive to think about how different feelings can be produced and talk with your play partner about what they like. For instance, Chingy says that “stingier, sharper pain turns me on from a place of fear and feels like a jolt of energy flying through my nervous system, but when thuddy pain connects it feels like a wave of endorphins washing over me from the bottom up (pun fully intended).” Experiment with trying to give yourself different kinds of sensation on your thigh or inner arm and controlling the type of sensation consistently. How does it feel different if you connect with your fingers first as opposed to the heel of your hand? Do you know what your play partner likes, and in what contexts? Talk about it! It’s hot!
Ok, so where and how?
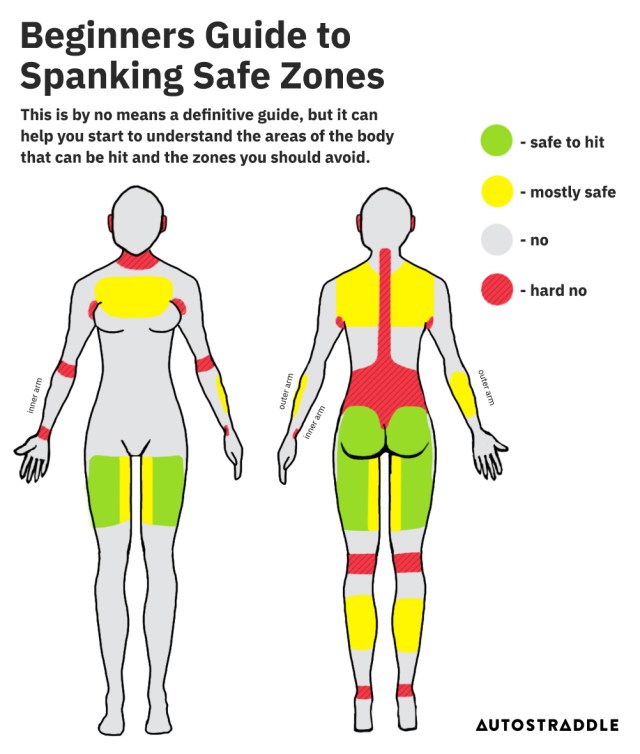
The next most important step is to learn some safety. You can safely hit a variety of places on the body, mostly the ones that are padded with lots of muscle and fat — the most common is, of course, the butt, but you don’t have to limit yourself there! The back of the thighs are great (just make sure you don’t go too low and hit the back of the knees). The inner thighs are extremely sensitive and my favorite place to slap (but I wouldn’t use an intense impact toy there). The chest on the pectoral muscles is a great spot too — I find folks really like a thuddier deeper hit there if they have enough flesh to shield their ribs, but again, if you don’t know what you’re doing, stick to your hands in this area.
Never hit someone on the abdomen, especially the lower and mid back below the rib cage — although this area doesn’t feel delicate, this is where your kidneys and other important organs are, and they aren’t protected by the ribcage. If you’re hitting someone’s butt (recommended!), be very careful to not hit their tailbone, and generally just make sure to stay away from their lower back altogether. I often place my other hand over their tailbone when hitting, to make sure if my aim is off I end up hitting my own hand instead — it’s pretty easy to break or bruise those tiny little bones there, so be careful.. Keeping your hand there also helps if the spankee is being wiggly and isn’t holding still, so you don’t screw up your aim. Stay away from the head and neck — unless you’re curious about face slapping, which is covered further down this article.
To recap! When in doubt, aim for more fleshy areas where there’s a large muscle mass, and steer clear of areas near joints or where skin is close to bones.
Get in position
Like other sex acts, spanking is versatile; you can do it in most places and positions where there’s enough room to access your partner’s ass and have some space for your arm’s range of motion — in a box, with a fox, in the rain, on a train. You can give a spanking with your partner lying down on a bed or sofa, especially if they’re bent over the edge of a mattress or sofa arm; kneeling on their hands and knees in an all-fours position; having them bent over while standing, probably supporting themselves with their arms on a wall or piece of furniture; or my favorite position, “over the knee.”
OTK is when you, the spanker, are seated (on a chair or edge of the bed or sofa or wherever!); the spankee then lays on top of your lap to receive their spanking. This position can feel really submissive for the person getting spanked, and can really add a level of power dynamics and/or humiliation to the spanking session. As Chingy shares, the psychological import of an OTK spanking can do a lot of work in a scene before anything has even gotten started: “I’ve pushed my pain tolerance further and further over the years and love taking whips, needles, and tasers when bottoming, but a well-executed OTK spanking will always make my knees buckle.” (Also, logistically, when someone’s hips are bent, their ass is more exposed, and the muscles are pulled tighter. This makes the spanks hurt more.) I’ll often add smaller, close-range hitting implements when doing OTK after my bottom has warmed up, such as a folded-over belt, the back of a hairbrush, a ruler, spatula or wooden paddle.
Anatomy of a good spanking
So you’re ready to start! The first step I recommend is a warm up. A good warm up will let the spankee’s body and mind adjust as you go,allow the receiver to endure a deeper and longer session, and relax them into it too. Let’s start with the butt since that’s often a really pleasurable place to get spanked, and an easy spot to start with.
Start spanking the bare butt at the lower end of your partner’s pain threshold (ask them to rank each beginning spank on a scale of 1-10, and start around a 2-3). Hit repeatedly at that level, or alternate a little less and a little more. As you spank, blood will start flowing to the area in response to the pain, the area you spank will noticeably warm to the touch, and endorphins will start releasing too. Once the endorphins start, you’ll find your partner can take a longer and deeper spanking, as the endorphins increase tolerance to pain.
A warmup might take five to ten minutes or longer, so be patient. If your hand gets sore, you can switch hands, or try curling your fingers into a fist and punching the thicker parts of the butt. This creates a deeper, thuddy sensation which is a nice offset to the stingier slap. You can also switch to an impact toy if you have one, or root around in your kitchen drawer for something useful like a spatula — just be real careful of that tailbone.
Once your bottom has been warmed up, and their butt is hot to the touch, you can start to hit harder. You can ask them to continue to rate each slap on a 1-10 scale — as they’re warmed up and endorphins are flowing, the spankee’s own sense of sensation and pain will shift — so you have an idea of how hard you’re hitting. It’s possible to hit someone at a “10″ several times in a row, but you’re probably going to wear out your partner real quick. Instead you might want to try switching up the intensity. A few 7’s followed by some 3’s and 5’s might be better, but it’s really up to you both. Pay attention to your bottom’s body language and make sure they communicate with you too. You can keep the hits even on each butt cheek or not!
Extra credit activities
Getting skin wet before a spanking makes the hit way more stingy and powerful. Try it on yourself! Also cooling off the previously warmed up area with something cold will make it more painful if you want to be meaner. A great way to combine these two is to use an ice cube on the butt after a real good spanking. It’ll melt real fast because the skin is warmed, leaving cold and wet skin. You can then end a session with a few good whacks and it’ll be much more intense!
A butt plug inserted or a vibrator held in place by the bottom while the session is happening can be really fun to play with too!
Blindfolds can add a nice unknown or element of surprise for the spankee — one person mentioned how for them, suspense adds to the power dynamic they enjoy about spanking: “I enjoy feeling like the person I’m playing with or having sex with is in charge and I don’t quite know exactly what’s going to happen next, just that they get to decide and I don’t.”
Your body is an (impact play) wonderland
As the helpful diagram above shows, oranges the butt is not the only fruit when it comes to impact play. Here are a few other parts of the body you might enjoy hitting/having hit! As previously discussed, this is a good thing to talk to your partner about; especially if some kind of impact play has been explored previously or already been established, you can say “I think it would feel good to get slapped here/are you into being slapped here too?”
Legs/thighs
The heavy muscles of the thigh area make it great for any kind of impact play. That can mean extending the area of spanking to the back of the thighs if a partner is bent over something or your knees; it can also include the fleshy and sensitive inner thighs, which can be really satisfying to slap/have slapped. Obviously this can be a great fit for positions where somebody is already in front of you with their legs spread! Have fun out there.
Chest
The ribcage means that internal organs are protected from impacts here, and the pectoral muscles and/or breasts if your partner has them also offer some protective muscle and fat, and depending on the position you’re in relative to your partner can be easy and fun to hit. Ask your partner whether a more superficial, stingy slap feels better in this area or a deeper, thuddier impact that resonates throughout the torso.
Face slapping
Finally, I’d like to cover another type of hitting with hands: the face! Face slapping can be really intense and vulnerable and is often a thing people really like; as with spanking, there’s an element of sensation play here but can also be a strong element of humiliation, punishment or other specific power dynamics. Chingy says that “…I can’t think of one other thing that puts me in subspace faster. I’m generally well-behaved for my Dominant, but I’ve been known to be occasionally bratty, or sometimes my Sagittarius mouth will blurt out something snarky when it shouldn’t, and generally it’s a slap or two (or eight) to the face that’ll break down that brat and remind me of my place.”
Face slapping also can go wrong fast, so if you have terrible aim it may not be the best for you. When you slap someone’s face, aim for the center of their cheek, and use your fingers to do the impact, not the palm of your hand. You can try this out on your own cheek to feel how it works; a controlled, centered slap where the impact comes from the breadth of your fingers feels really different from connecting with the palm or heel of your hand into the jawbone. While a “thuddier” sensation can feel great on other parts of the body, it’s something you want to avoid with the face. Practice on yourself until you feel comfortable consistently getting the kind of controlled sensation you want; it can be helpful to keep your hand and fingers a little looser and more relaxed than you maybe would when spanking someone’s ass.
Do not hit the nose or eyes, and BE REALLY CAREFUL OF THE EARS. If you slap someone across the ear, you run a high risk of rupturing their eardrum with the force of the air. I know more than one person who has had this happen after a badly aimed face slap, so please be careful. And if you’re a person who is getting your face slapped, don’t turn your head away at the last minute, or your ear might get hit instead! To reduce risk, I often hold the person’s other cheek or grab their hair with my other hand to absorb the force (less whiplash-type stress on their neck), and to make sure they can’t turn away so I don’t hit their ear.
Aftercare
Some folks will want aftercare after a spanking, and others won’t. Make sure to talk with each other about what feels good to both of you beforehand so both your needs are met, and be flexible if you are unsure what your partner’s needs might be if they’re inexperienced. Aftercare can look like cuddling after, or words of affirmation, or thanking the partner for the experience, or having an ice cream together. If you’re not sure, see how you feel after and try to communicate that to your partner. For some people, spanking or other kinds of impact play are routine; for others, they’re intense emotional and sexual experiences that take time and space to process (and it’s possible to walk into an experience thinking it will be the former and finding it the latter). Make space for both you and your partner to be honest about what you both feel and need afterward! You may not need anything, and that’s totally okay too! Just make sure you take care of each other, and try to meet both of your needs.
How To Take Proper Care of Your Leather Strap-On Harness
Recently, an Autostraddle reader wrote into us with this request:
“I need advice on caring for leather items. Like for example the leather strap-on harness I bought over a decade ago which has mostly been sitting around in a drawer. How do I make it supple? How do I keep it from getting dry and cracked? What is up with the squeaky noise it makes? I am confident that at least one of Autostraddle’s fine writers can take this on. Because I can’t be the only one who needs to know.”
I’m not much of a Leather Daddy, so I’m not a total expert in this, but I do like to keep my leather nice and happy, and have a routine to take care of it.
Leather is skin, and just like your skin, it needs to be cleaned when it’s dirty. And even more importantly, unlike your skin, it’s not continually making it’s own oils anymore and no longer-self moisturizes. Every time you wash it, or even just use it, it loses a little or a lot of it’s moisture and oils. So you need to add it back with a leather conditioner.
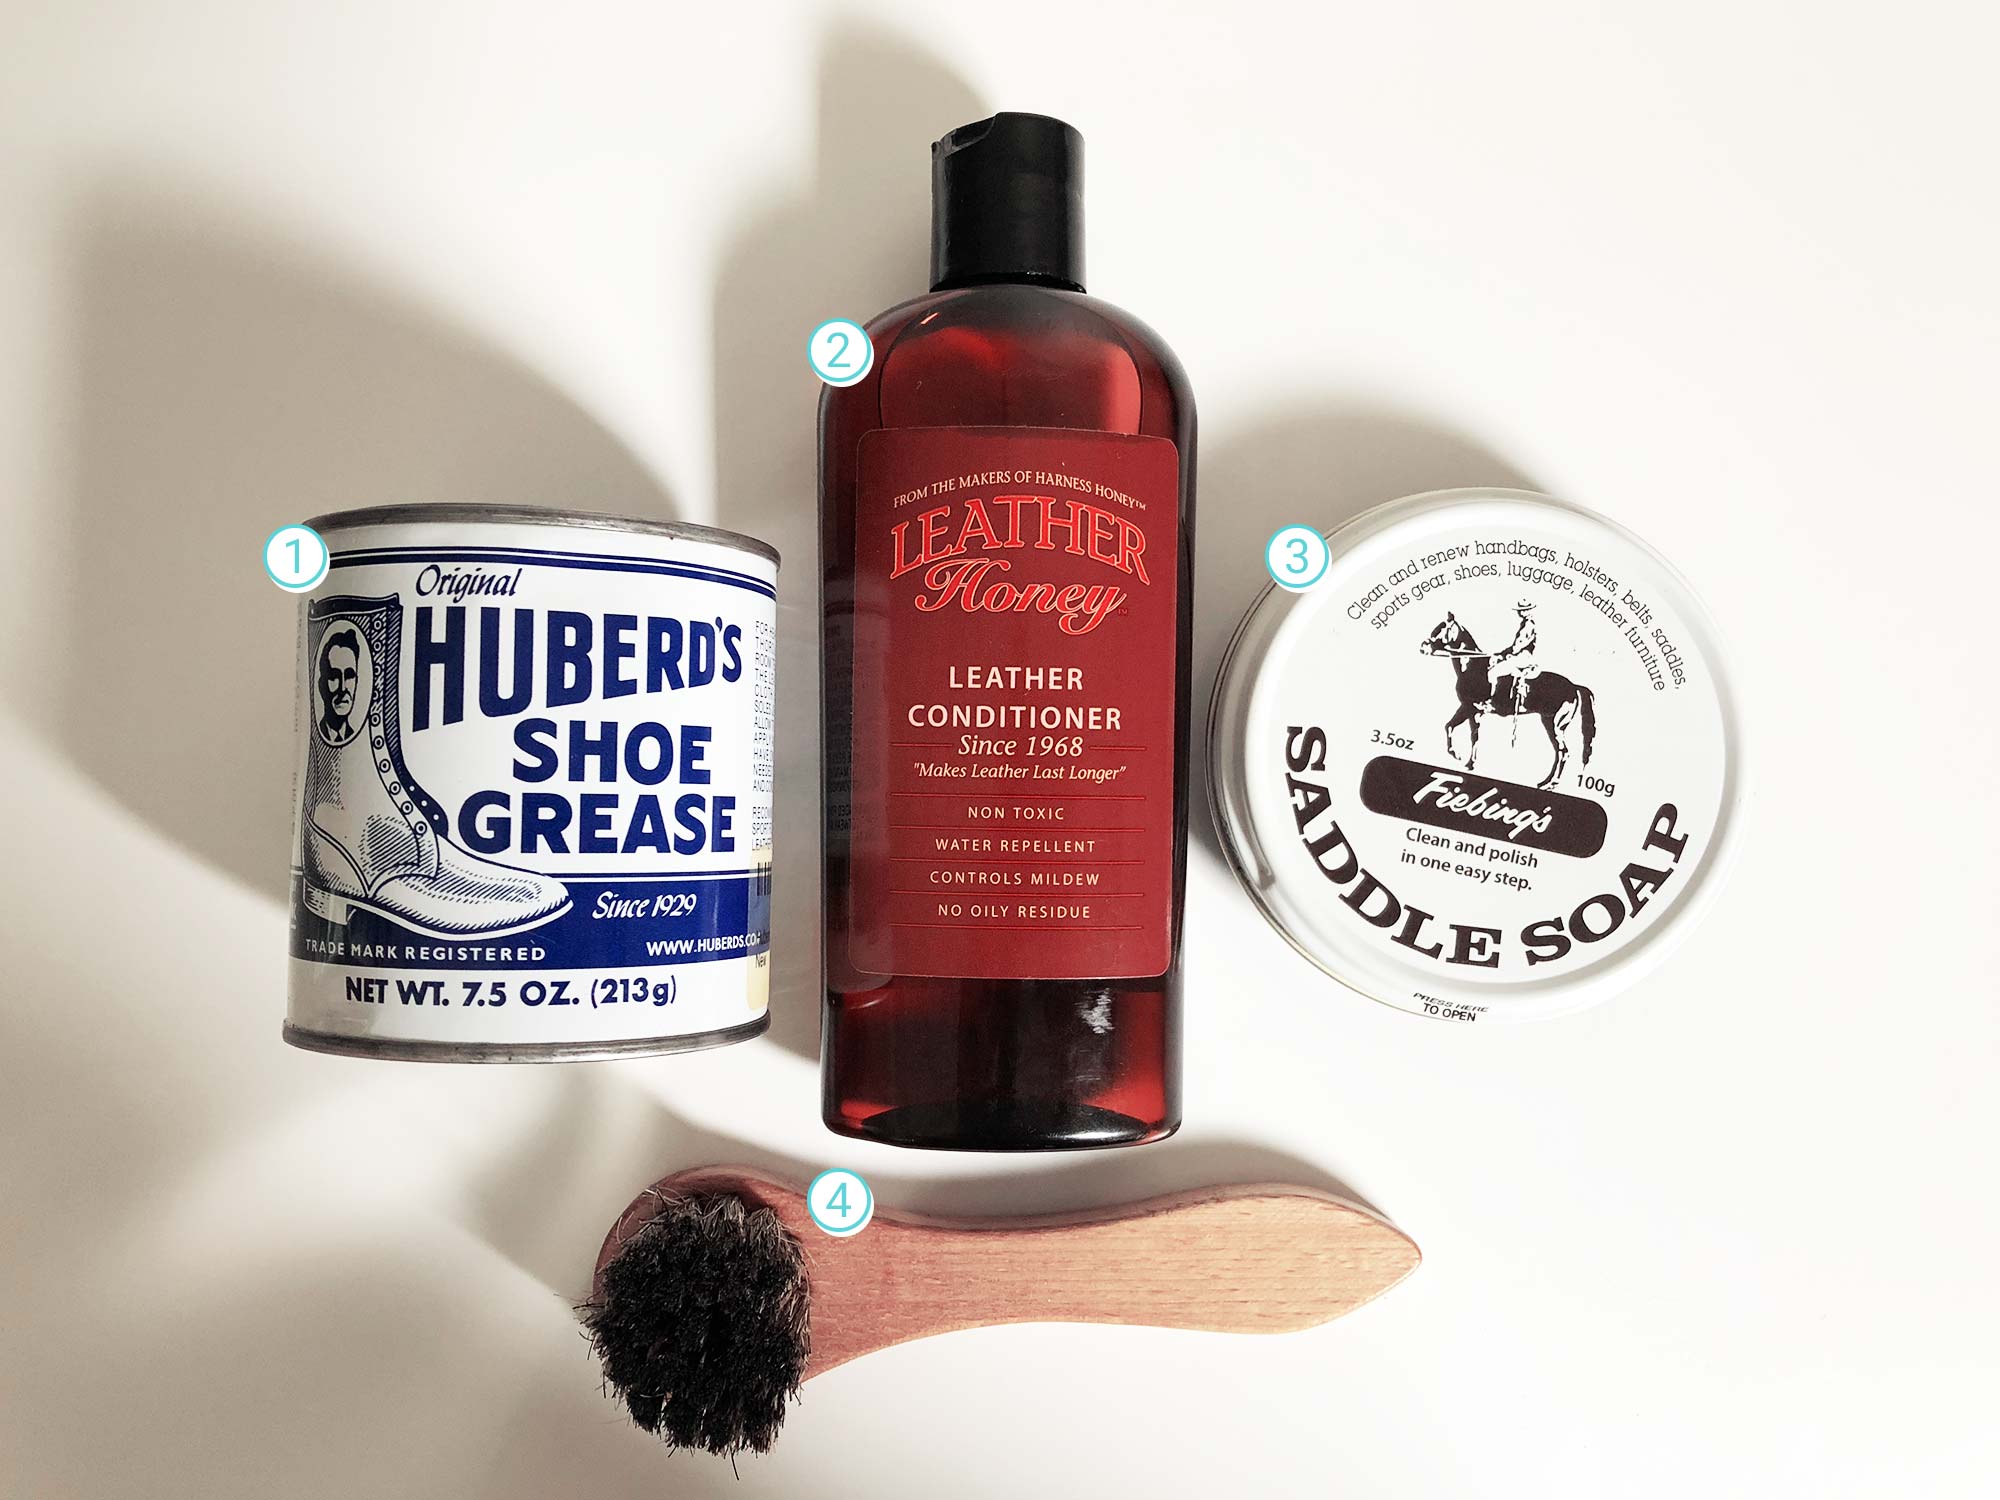
1 / Huberd’s Shoe Grease
2 / Leather Honey
3 / Fiebing’s White Saddle Soap
4 / Kiwi Horsehair Polish Applicator
I recommend cleaning your harness with saddle soap, and not harsher dish or hand soap. I use Fiebing’s white saddle soap and a wooden brush to clean all my leather (my shoes too!). I try not to use a ton of water, and I use a wet cotton cloth to wipe off the soap after I lather it.
Then, once dry, I moisturize it with a leather conditioner like Leather Honey or Huberd’s Shoe Grease or Huberd’s Shoe Oil. I don’t personally recommend using anything made with animal fats (like mink oil) as the oils can get rancid smelling. I prefer a beeswax base usually. I also don’t recommend any shoe polish products, look for something specifically labeled ‘leather conditioner’.
Most conditioners will darken your leather, so if you care, be sure to test it first on a small area you don’t really see. Note the Huberd’s WILL darken leather, but I think it smells great and outdoorsy, and I don’t mind and use it anyway. You might not like this smokey pine smell as much as I do, so you may want to smell it before buying.
Don’t be afraid to apply liberally, you can always wipe off what doesn’t soak in. Since I’m assuming this hasn’t been done in the course of the 10 years you’ve had this harness as you mention dry, cracked, and squeaky leather, you may need to add a few applications until it feels supple again. You can use an additional brush to put this on, or just use a cloth or your hands. I normally use my hands and massage it in, and then use a paper towel to wipe up the excess after I’ve let it sit for 15 mins or so. Note, this is not recommended for suede or nubuck leather.
Also note that I don’t think there’s a way to sterilize a leather harness. While washing it is great, I don’t think it’s totally safe to use with multiple partners within a short period of time if you and your partner(s) are people who care about these things. You can use a combo of anti-bacterial soap and rubbing alcohol, but leather is very porous, so I do not trust that to be clean enough to kill everything. For that reason, I use the Spare Parts Joque with multiple partners.
Any kinky bootblacks reading this want to add any additional leather care knowledge in the comments?
Shibari 101: Hogtie
Welcome to Shibari 101, your chance to learn the building blocks of Japanese rope bondage! If you missed them, check out shibari’s history, rope basics and safety, and brush up on the foundational single- and double-column ties, basic chest harness, and a leg tie.
Today, we’re going to take two ties we’ve learned before and combine them into a hogtie. A hogtie places your bottom on the floor, face down, in either a chest harness (which we learned already) or a box tie which includes the wrists. Then, the ankles are secured to the chest ties and pulled in tightly. This tie is safer than tying the ankles to the wrists in a more Western-style hogtie as the weight of the legs is distributed across the chest instead of putting pressure on the sensitive wrists. You can either do a simple double-column tie on the ankles, or get more decorative with tying both legs into the leg tie we learned earlier.
Start by tying a chest harness on your bottom. Be sure when you extend rope for this tie that you don’t have any knots right in the sternum or areas on the chest that might hurt once your bottom lies chest-down. Lay your bottom down on their belly. If you’d like to incorporate their arms, either use a new rope or the ends of the leftover rope from the chest harness and tie a single column tie around the wrists. Make sure the inside of their wrists are touching to keep the sensitive inner wrists protected. Then, tie a double column tie on their ankles.
Next, take the ends of the ankle ropes and pass them through the center column (spine) of the chest harness. Go over and do not include the ropes used to tie the wrists (if tied), so that pressure isn’t being applied to the wrist tie.
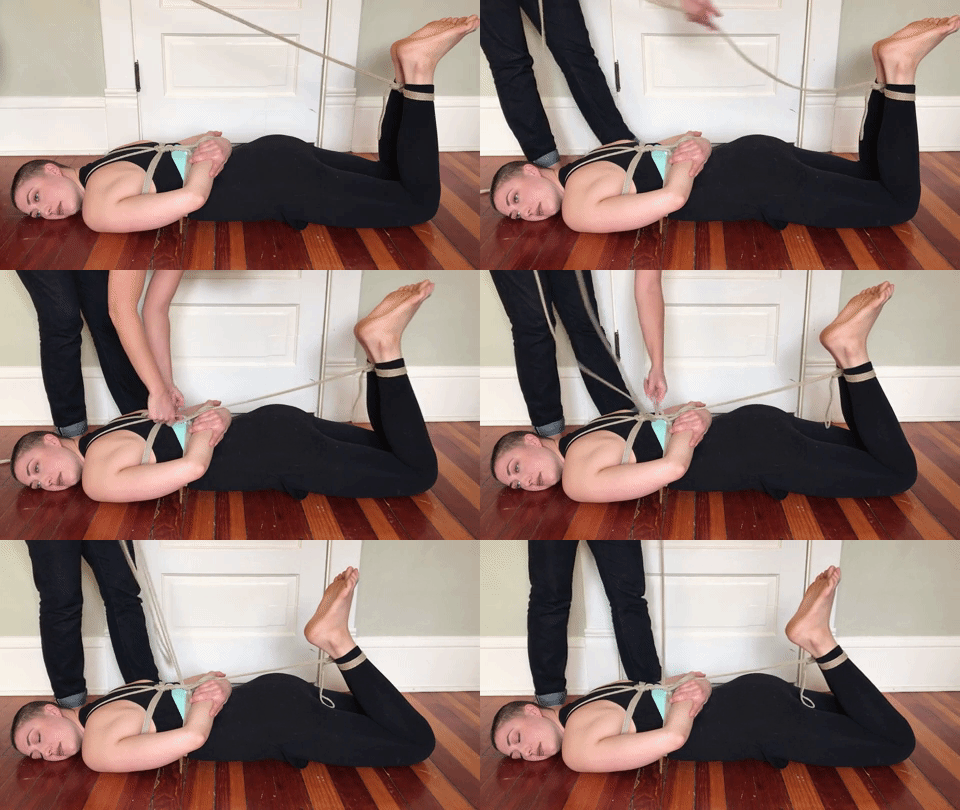
Then go back and loop the rope through the bight at the ankle, and around back through the center column/spine again.
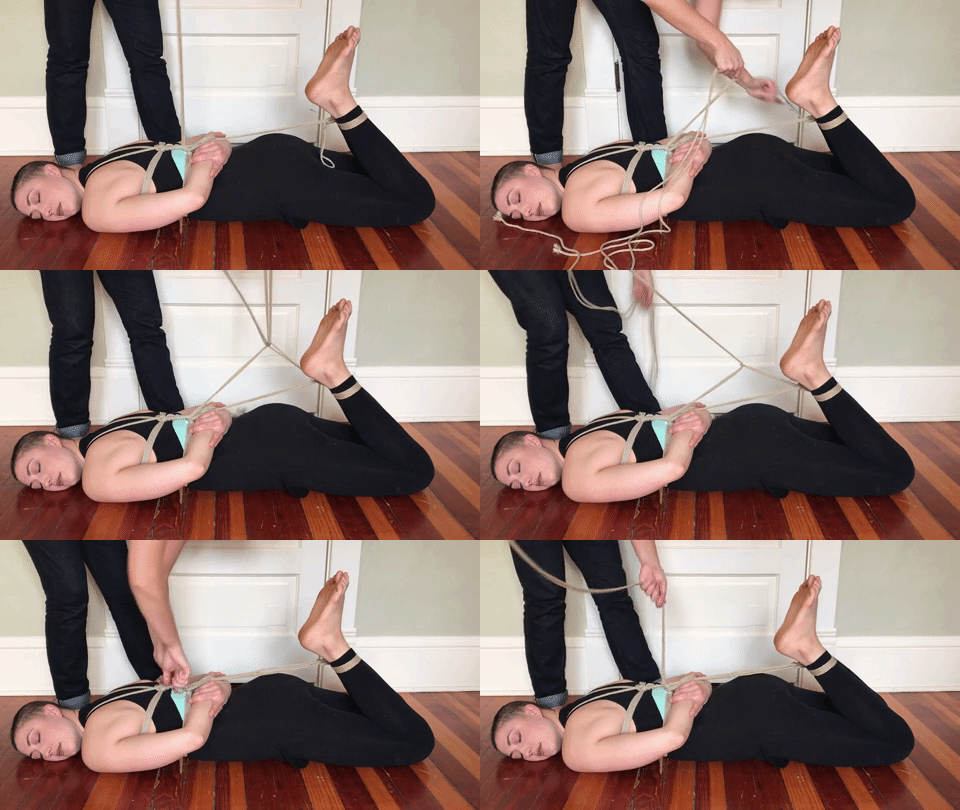
Tighten the tie until snug, but don’t make sure your bottom isn’t overextended and super uncomfortable. Tie off with a half hitch.
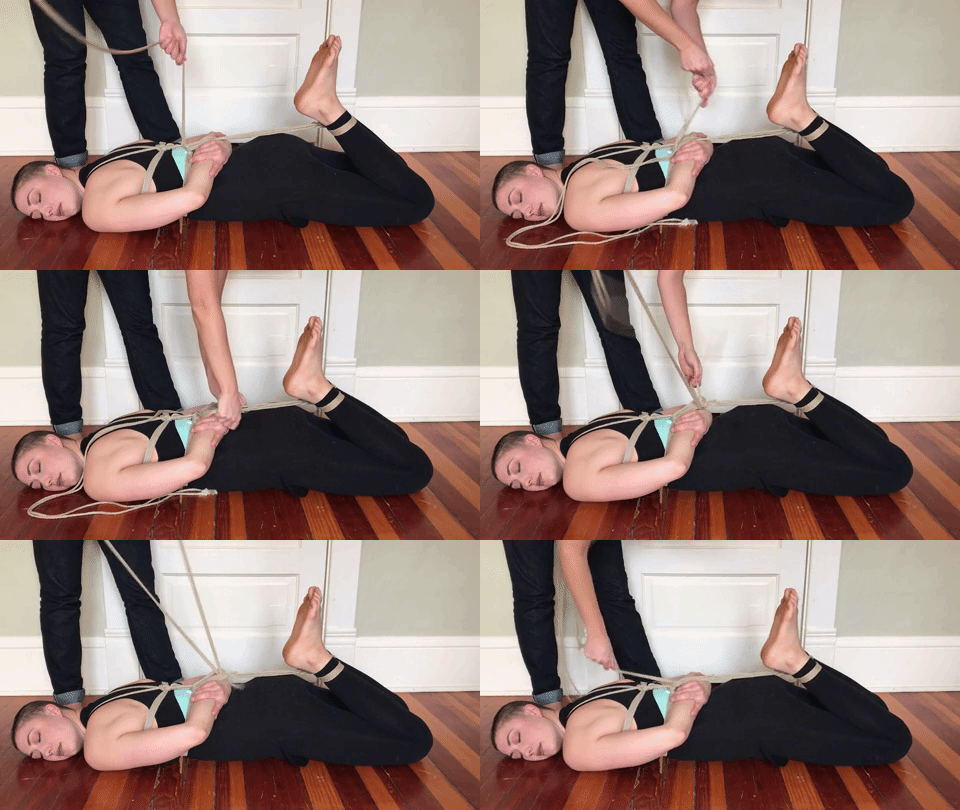
And secure with another half hitch.
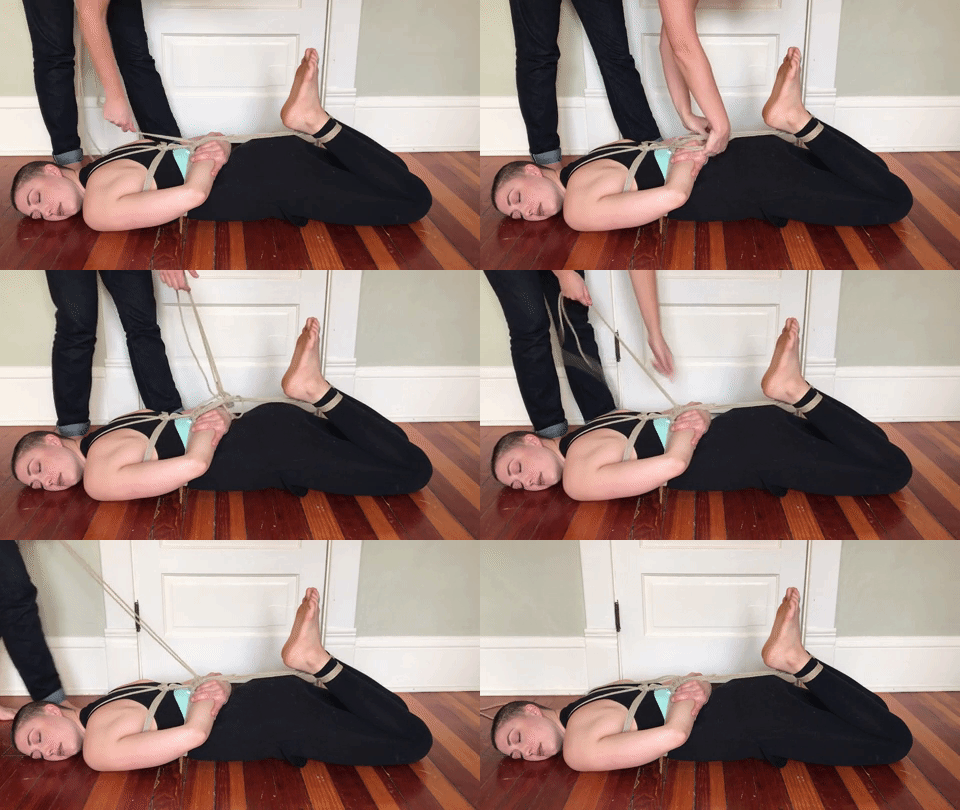
If you find the rope places too much pressure on the wrists, you can try tying it around the top of the chest harness instead. Pass the ropes behind both shoulder ropes, right above the top knot, and tie off the same way.
If you want to be more decorative and use the leg ties instead of the double column tie, you’ll need a new rope to do a single column tie around both ankle ropes to the chest harness. Use that new rope to tie to the chest harness with the same pulley system as the tie above. You can even use two different ropes and tie the ankles apart so the legs aren’t tied together.
Resources & Continuing Education
If you want to learn more, check out these books and resources:
Miumi-U Teaches Japanese Shibari. Miumi-U is a Japanese shibari rope artist who trained extensively in Tokyo. Her book is beautiful and she’s clearly a very skilled artist. This book is more advanced.
Essence of Shibari: Kinbaku and Japanese Rope Bondage. Shin Nawakiri was also extensively trained in Tokyo. His book is excellent and more advanced.
Shibari You Can Use and More Shibari You Can Use. Lee Harrington is trans guy and the books are very gender-inclusive and easy to understand.
The Beauty of Kinbaku. This book dives deep into history, theory, etc, and is light on instruction.
Midori is a Japanese-American sex educator who has been teaching Japanese bondage since the 1990s. She does traveling workshops; check the schedule over at ropedojo.com. She also has a book, The Seductive Art of Japanese Bondage.
Hitchin’ Bitches is a female and trans/genderqueer (all genders but cis men) rope top monthly workshop held all over the world. Cis men are allowed only as bottoms and only if they understand it’s not a space for them. Find your local chapter on FetLife. It’s also a great way to meet local rope folks in your city.
Shibari 101: Leg Tie
Welcome to Shibari 101, your chance to learn the building blocks of Japanese rope bondage! If you missed them, check out shibari’s history, rope basics and safety, and brush up on the foundational single- and double-column ties and basic chest harness.
Start a leg tie, which will immobilize one leg, by tying a single column tie on the ankle. It looks cleaner if you start the single column tie by spiraling the bight down the ankle, instead of up, so the working ends are on top. Once you’ve tied the single column, push the bottom’s shin to bring the ankle as close to the lower thigh as you can. (Note that, because it leaves most of your body and your arms free, this is a really fun tie to practice on yourself.) The muscles of the leg will relax as the bottom sits in this tie, and often the ropes will get slacky and loose if you do not do this step.
Next, spiral the working ends up the leg, making sure the first wrap is low on the thigh. Depending on the size of your bottom’s leg you can do anywhere between two to four wraps here (you can also extend rope and do as many as you want!). You can try with three as shown, and if you find you have run out of rope before the tie is done, back up and try with two, etc., or if you have too much left over rope, back up and try with four.

Pass the final rope of your spiral over itself on the inside of the knee. Bring your finger through the triangle you just created, and grab the rope and pull underneath. Use your other hand to pinch where the ropes cross so they don’t slide. Take the working ends and bring them over the top rope, and then under the left rope.

Repeat this knot on each rope working down the spiral, including the bottom rope. Pass the working ends through the leg and around to the other side.
On the outside of the leg now, pull the working ends to cinch tight. You’re going to repeat this knot again on the outside of the leg, but this time backwards, as your working ends are now running up the leg instead of down. Bring the working ends up over the bottom rope, back down on the right, then over the bottom rope, and back up under the left.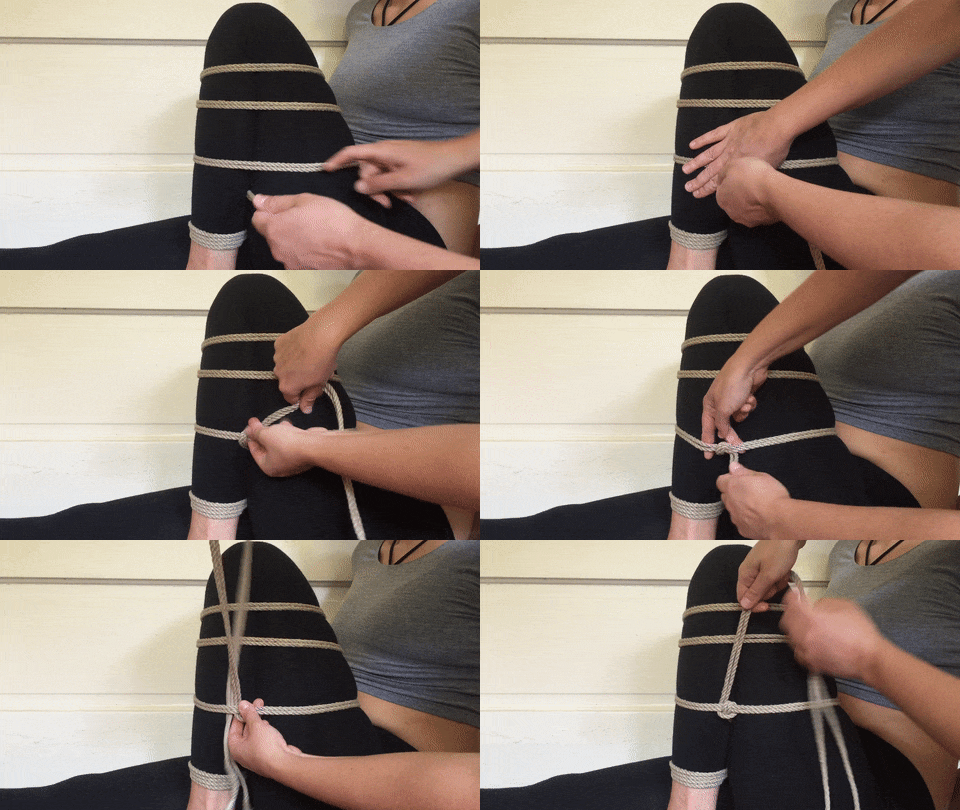
Repeat this step on each rope of the spiral until you get to the top.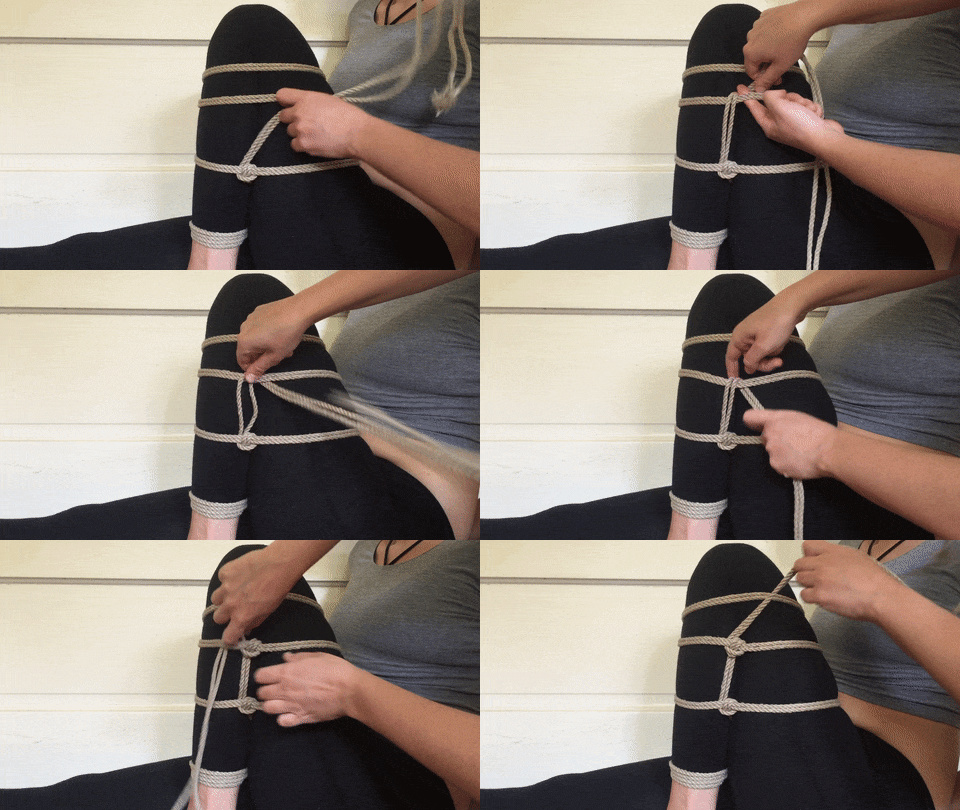
On the top rope’s knot, finish it off by bringing the working ends through the loop, so they reverse direction and go back down the leg again.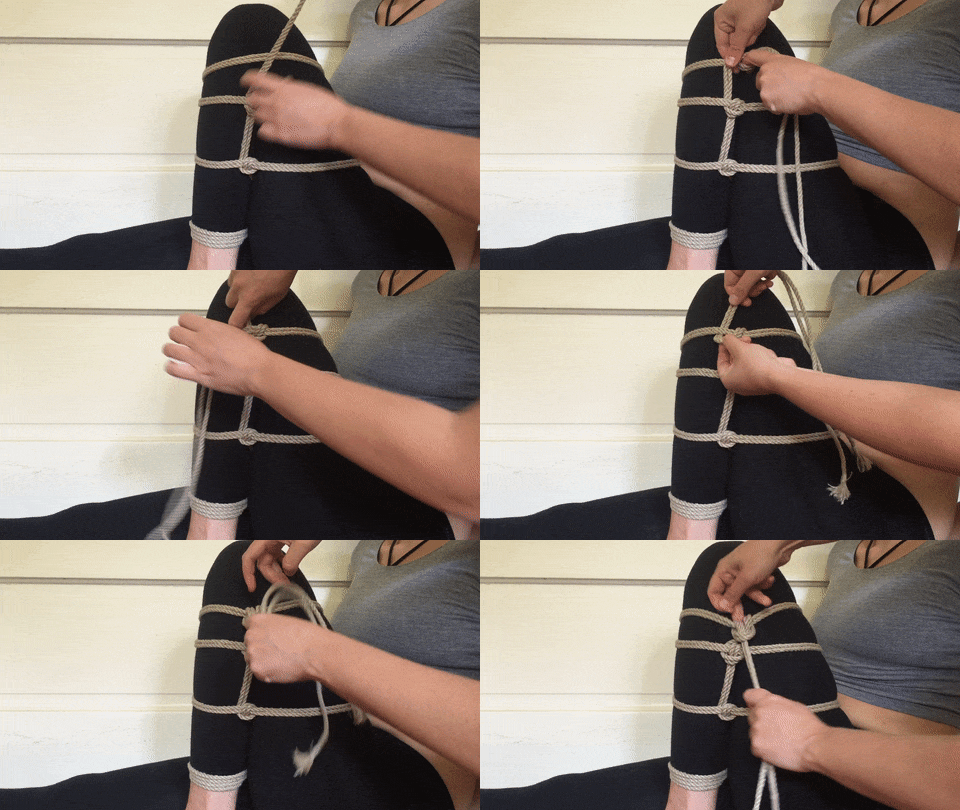
If you have leftover rope, you can twist it around the stem. Tie it off with a hitch and tuck the ropes around the stem or between the leg.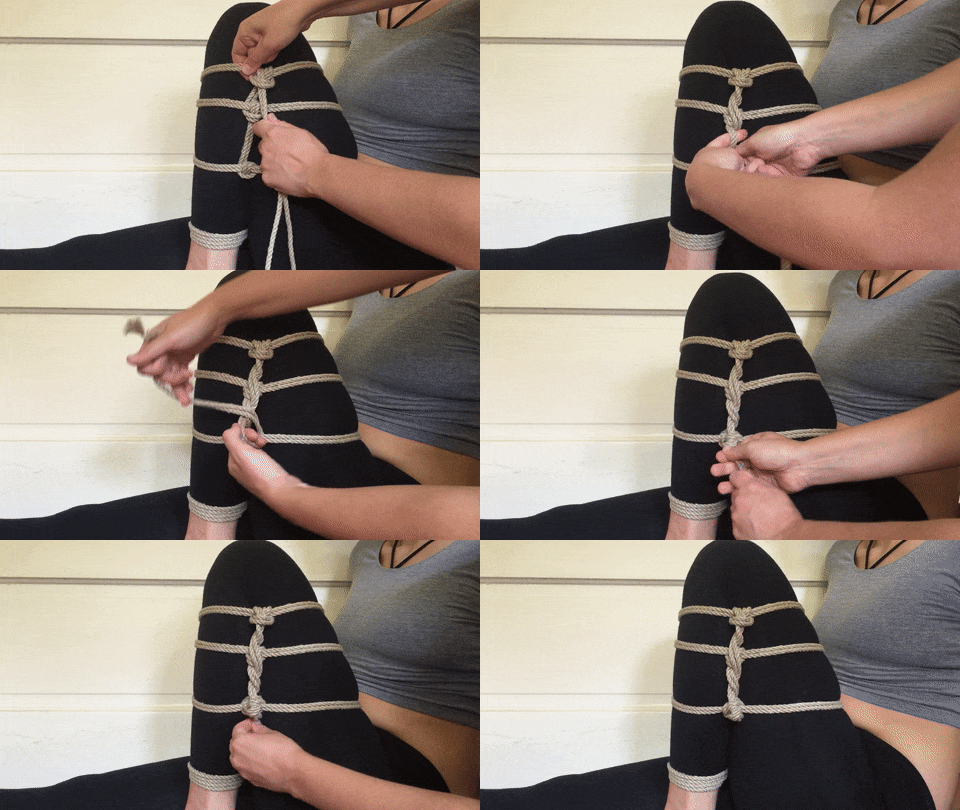
You’re done! Next week, you’ll learn how to combine a few different shibari ties together.
Shibari 101: Basic Chest Harness
Welcome to Shibari 101, your chance to learn the building blocks of Japanese rope bondage! If you missed them, check out shibari’s history, rope basics and safety, and brush up on the foundational single- and double-column ties. Today we’re doing a shibari chest harness tutorial.
In shibari, a chest harness can stand alone or act as a base to secure other ties. This version is simple, but you can get more complicated and decorative with it once you learn it.
Shibari Chest Harness Tutorial
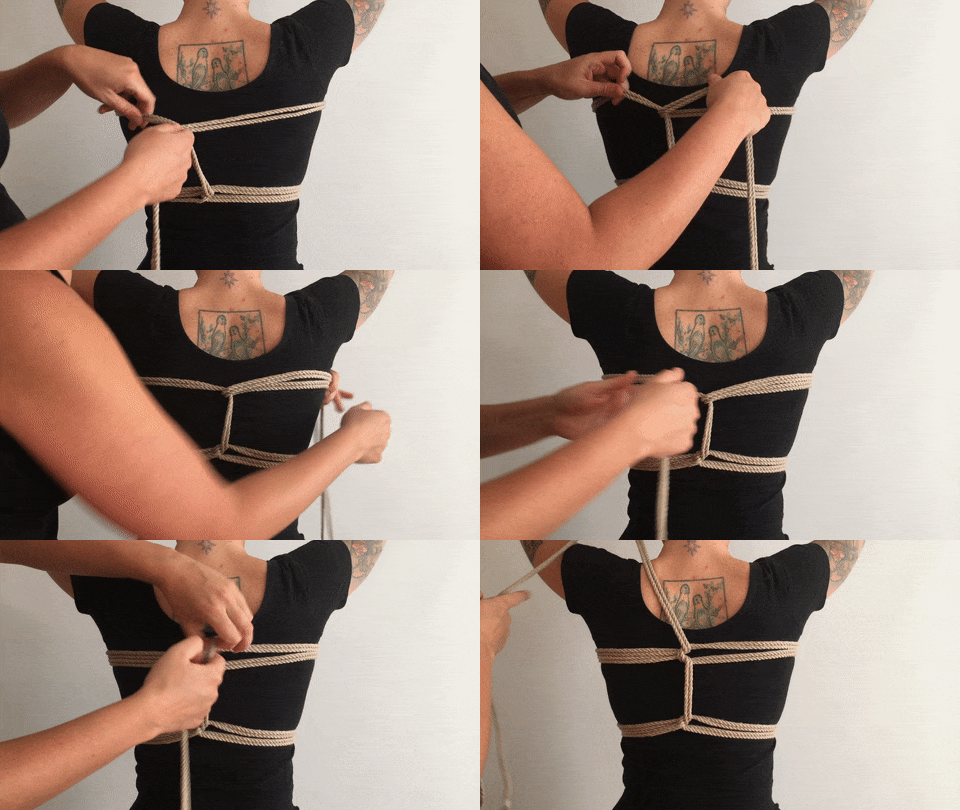
First, position the bight at the center of your bottom’s back, and wrap the rope once around your bottom below the chest and draw the working ends through the bight. Make sure the part that crosses over is in the middle of the back on their spine. The ropes should be snug, but not so snug your bottom can’t breathe.

Bring the working ends back around the front of their body again, going in the opposite direction. If you don’t switch directions the rope won’t stay tight and will fall off the body. When you get back to the center of the back again, pull the working ends up through the loop you just created on the opposite side of where you pulled the rope from — the side with the doubled-over rope. Make sure the ropes are not crossed and line up neatly.

Reverse direction again and bring the working ends around the body one more time, this time above the chest. Wrap the working ends underneath the rope stem (in this case, the section of rope that goes vertical along the spine).

Reverse direction around the body one last time, making sure your ropes are above the previous wrap of ropes and lay flat and neat. Bring the working ends through the loop created by reversing direction — the side with the doubled-over rope.
Take the working ends and bring them over the shoulder to the front of your bottom, and bring them over the top ropes in front then under the bottom ropes. Pinch the bottom ropes together so they don’t lose their shape while you reverse direction with the working ends. Bring them back up and under the second top ropes. You’ll probably need to extend the rope at some point here (see the bottom of the page.) Make sure the knot is in a comfortable place for the bottom. You can move the knot a bit down the first rope if not.

Bring the working ends over the other shoulder and around to the back of your bottom. Pass them over the top right ropes, and up diagonally between the top left ropes and the left shoulder rope, as shown.
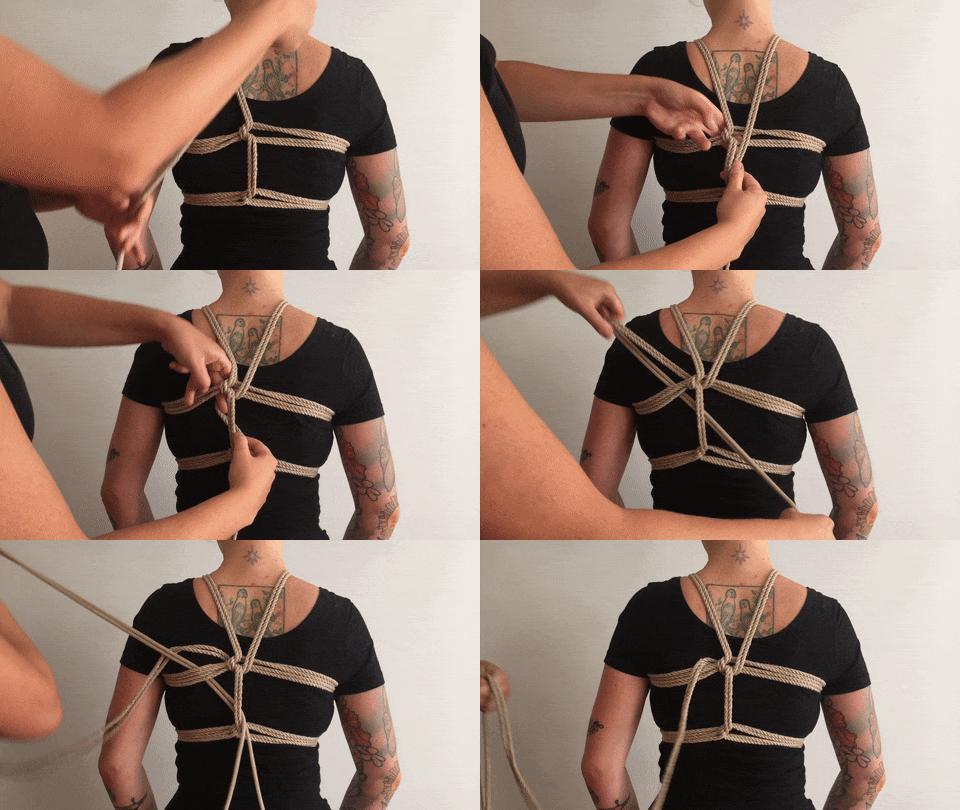
Bring the working ends over both shoulder ropes, and under the right top ropes.

Make a half hitch on the stem. A half hitch is made by making a loop in the working ends, bringing the ropes over the stem, behind the stem, and back through the loop. Pull to tighten. You can wrap your excess rope around the stem, and/or weave it up the shoulder ropes in a figure-eight weave, or leave the rope length to tie to an additional arm or leg tie, or tie it to a hardpoint (not for suspension).

Congratulations, you’ve made a basic shibari chest harness!
Extending Shibari Rope
You’ll need to extend rope when you run out. This is one of several ways to do this.
With your second rope, make a loop with your hand by putting your hand inside the bight, grasping the ropes, and pulling the bight over your hand. You’ll have a loop, which is called a lark’s head knot.

Put the first rope’s ends into the lark’s head and tighten. If your ropes have knots at the end, you can bring the lark’s head knot down to the knots and stop here. If you have whipped ends, or you feel like it, continue to the next step.
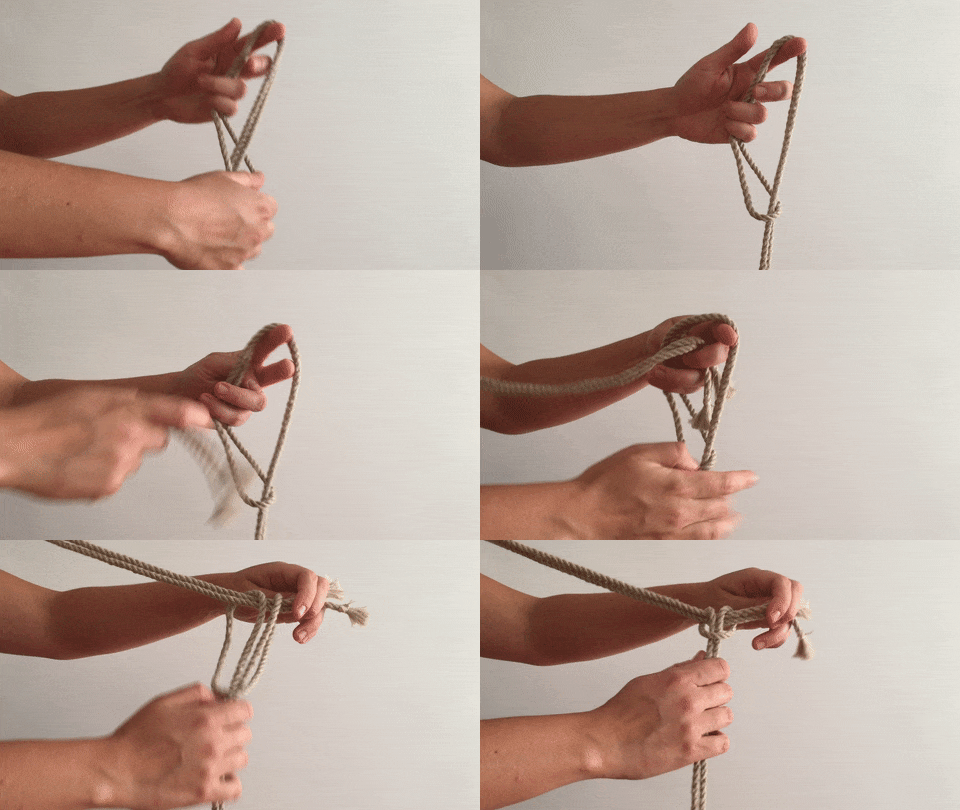
Make sure the lark’s head is not at the very end of your first rope, and there’s about 5″/12cm of ends left. Bring both sides of the first rope together and roll the knot up.
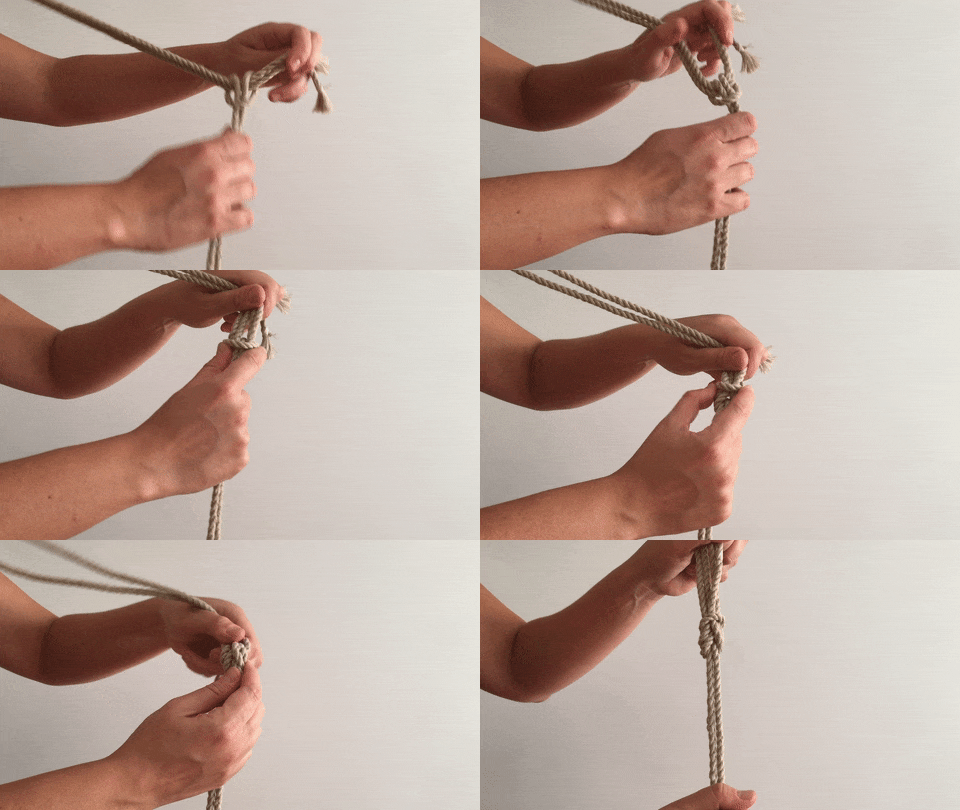
That’s it!
Shibari 101: Let’s Talk About Japanese Rope Bondage
Welcome to Shibari 101, your chance to learn the building blocks of Japanese rope bondage! Today, you’ll learn history, basics and safety.
For me, the methodical repetition and precise structure of rope bondage is calming. As a rope top, no matter what else is going on in my life, I have to be present to focus on the ties, the bottom I’m tying up, and the tone of the encounter. I get off on the bottom both giving up control and having fun.
For a bottom, being restrained can also feel very calming. A lot of bottoms feel relaxed and blissed out while in rope. One told me: “I like giving over control to the top, letting them do whatever they want to me and feeling their power as they tie. I also really like the sensation; the pain and restriction feel exquisite.” Another said: “As someone who gets off on giving up power/control, I really enjoy the psychological sensation of being restrained, as well as the challenge of persevering through discomfort. That feeling of someone else/the rope controlling how my body is able to move is freeing to me; I don’t have to make decisions, I don’t have to be in control, but in a safe context. It’s soothing, and makes me feel focused and light and able to be very present.”
Playing with rope bondage is usually an emotionally intimate space to share. It can be rough and sexual, soft and non-sexual, or anywhere in between.
What Is Shibari?
Shibari (also often referred to as kinbaku) is a form of Japanese rope bondage. It differs from Western rope bondage a few ways: it uses non-stretchy natural fiber rope, either jute or hemp, instead of softer cotton, silk or polyester rope; it focuses on friction and wraps instead of knots; it uses the rope doubled over at the middle, a point called the bight, and works down toward the ends; and it has a deep focus on the aesthetic of the ties.
Shibari uses building blocks and repeated patterns that fit together to create ties. Once you learn these blocks and patterns and some basic safety, you can often figure out how to repeat a tie you see elsewhere. (You’ll learn several of these building blocks in the rest of this series.)
Shibari is derived from Hojojutsu, a martial art used in the Edo period (1600 to the mid-1800s) by the Samurai to arrest and restrain prisoners with rope. Often prisoners were publicly shamed by being displayed tied in ropes, which usually conveyed their class and crime, before execution or imprisonment. Hojojutsu died away at the end of the Edo period when the shogunate were overthrown.
People in Japan started to use the Hojojutsu ties for BDSM, and to play with the physical restraint and emotional shame of being tied. This art of tight and often painful sexual or sensual tying became known as shibari (decorative tying) or kinbaku (tight binding).
More recently, shibari has started to become popular in BDSM communities worldwide. While those who are not Japanese won’t be able to fully understand or experience the shame aspect of being tied, the complexity, efficiency and attractiveness of the ties themselves have earned appreciation for this style of rope bondage. Some of the most popular Japanese performers and rope tops even travel worldwide to perform on stage or to teach classes and workshops.
Unfortunately, with the worldwide growth of shibari, there has been some questionable copying or exoticising of the cultural aesthetic of the Japanese performances and photographs — non-Japanese people wearing kimono, or rope tops only tying small Asian women as rope bottoms, for example. Instead, practice the ties, be knowledgeable about and respectful of where they come from, and make the encounter be about you and your experience.
What About The Rope?
Jute and hemp are the most popular materials used in shibari. The rope is often seven to eight meters long, four to six millimeters thick, and usually consists of three smaller strands twisted together. Natural fiber ropes have more grip, a necessary quality here — shibari doesn’t use many knots, and its wrapping techniques require the rope have grip — and so are better than silk or synthetic ropes, which don’t hold friction well and can also lead to faster rope burn. In my opinion, natural fiber ropes also look better and the unyielding tension feels better for the bottom.
Jute and hemp rope must be treated before use by being boiled to soften, dried under tension to keep the correct shape, singed with flame to remove the fuzzies, and oiled so it’s not dry. You can buy raw rope and do this yourself, or you can buy pretreated rope. I recommend buying pretreated rope at first, but it can be fun to buy raw rope and condition it yourself in the future.
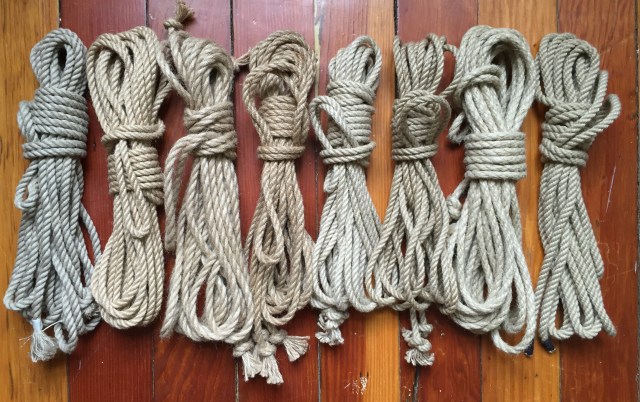
Some shibari rope. All these hanks are 8m long and 6mm thick. From left to right: linen hemp (raw, but does not need to be washed/singed/oiled), jute (raw, very stiff and needs treatment), jute (washed, but not yet singed or oiled), jute (washed, singed and oiled), jute, a tighter lay of rope (washed and singed), jute, same tighter lay (washed, singed and oiled), hemp (raw, very stiff and rough, needs treatment), and synthetic.
Where Do You Buy Rope?
- Esinem Rope (This is my favorite place to buy rope and the only place which carries linen hemp, which I love.)
- Jade Rope
- Twisted Monk
- Erin Houdini
- Kankinawa.com
- My Nawashi (Etsy)
How Do You Care For Natural Fiber Bondage Rope?
Rope often arrives with a single overhand knot at the ends to stop it from fraying. You can leave those knots as they are (and retie them when they come undone), whip the ends with some waxed thread, or make a more complicated knot. I whipped some of mine with a Sailmaker’s Whipping and used waxed sail thread, which has held up well with a lot of use. Store rope wrapped in bundles (hanks) so it doesn’t get tangled and twisted.
Cleaning your rope is not recommended, as you need to wash, dry, singe and oil it every time. Each time you repeat this process it weakens the rope’s fibers, which is very dangerous as it makes play unpredictable, and makes the rope unfit for suspensions. The best way to have clean rope is to not get it dirty. If you want to do crotch ties, I recommend setting aside a specific rope for that person for that purpose, or using synthetic rope that can go in the washing machine.
If your rope gets dry, oil it with jojoba oil. Just rub a few drops in the your palm and run the rope through your hands; don’t overdo it.
How to Tie a Figure Eight Hank
To tie rope in a figure eight hank for storage, first run your hands gently down the length of the rope to straighten it and pull out any knots, kinks or overwound tightness.
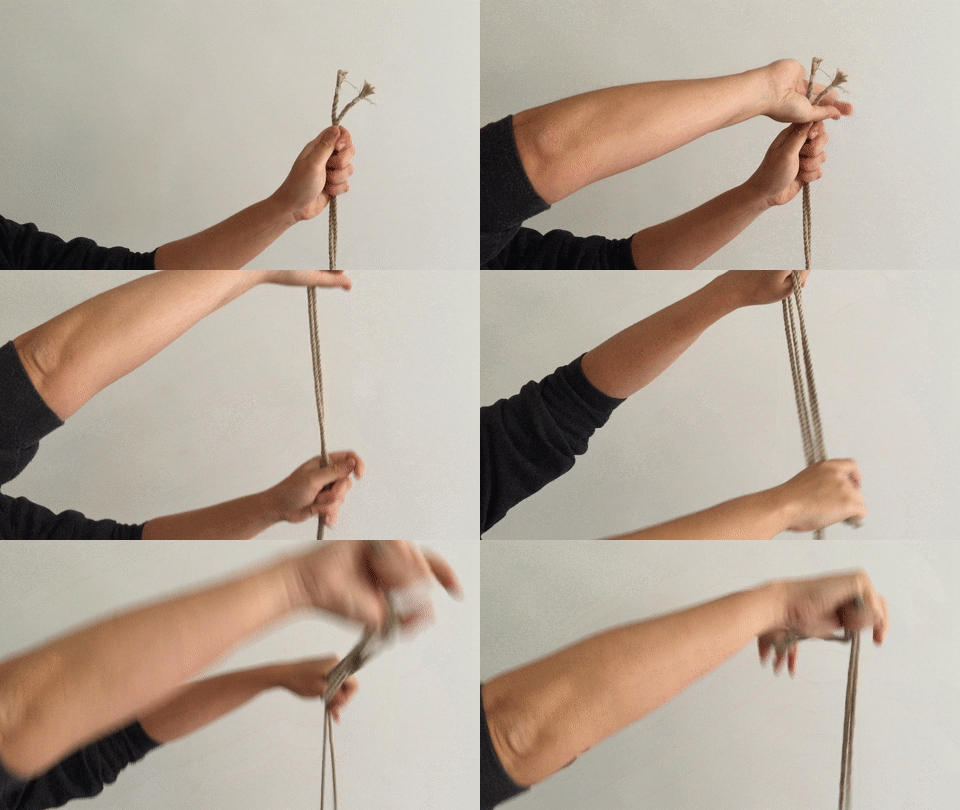
Then grasp the two ends with your right hand. Run your left hand about 10″/25cm down the rope and create a loop with your thumb. Bring your left hand up and create another loop with your right thumb the same distance down the rope. Alternate this motion until you have about 20″/50cm of rope remaining.
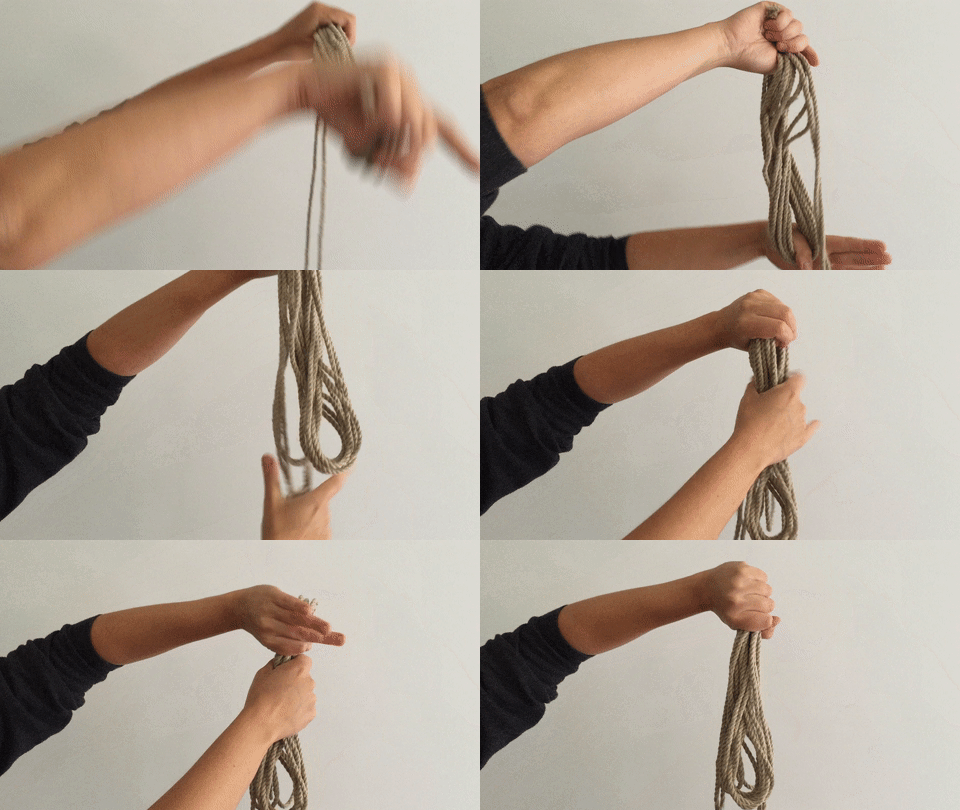
When you have about 20″/50cm remaining, tightly grasp the top of your rope bundle with your left hand.
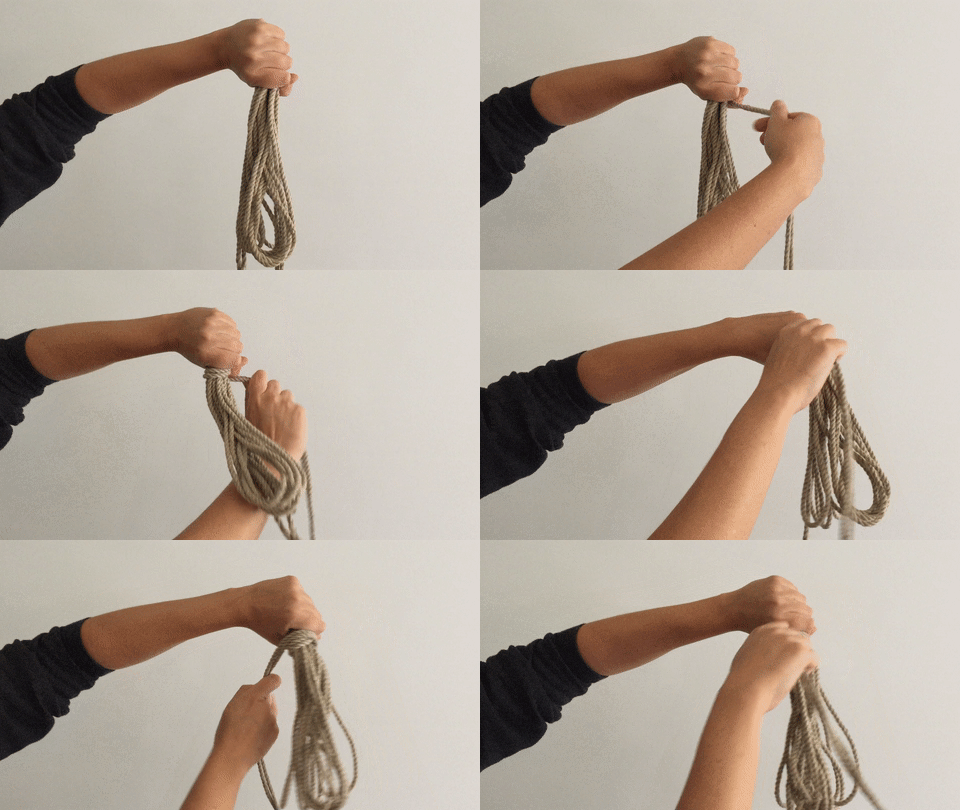
Take the end of your rope and wrap it tightly around the bundle once. Wrap it one more time above the first wrap, to lock it in place so it doesn’t slip. Then continue wrapping a few more times below the top wraps, keeping the rope very tight.
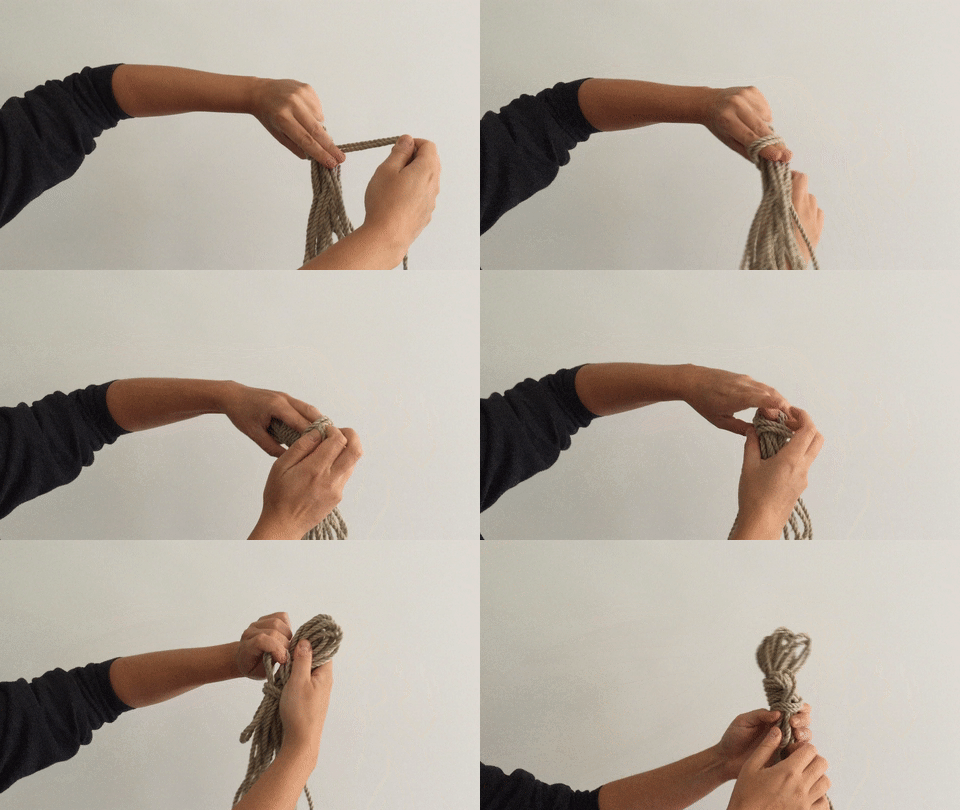
On your final wrap, place your index and middle fingers over the wraps facing downwards. Wrap the final wrap over your fingers, and then bring it around and grasp the rope between those two fingers, and then pull it through. Either bring it all the way through, or stop half way to create a slip knot (shown).

Untying a hank is very fast and your rope stays nice and neat and untangled, and there’s no need to figure out where the bight is, as it’s the part you pull to untie the hank.
Safety for Both Partners
- Communication is important! Know and communicate your limits, experience and ability.
- Make sure you trust and are really comfortable with your rope partner.
- Make sure you are both sober.
- Always check in before the first time you play with someone — don’t assume they know what they’re doing or how to be safe. Make sure you both feel comfortable with each others abilities, and have hashed out what exactly you’re going to do before the rope comes out. Figure out and discuss ahead of time what your plan is, and what your boundaries are.
- Know and communicate your aftercare needs (cuddles, comfort, snacks, space, etc.) before you play.
- Have safety shears on hand just in case.
Safety for Bottoms (Tops, Read This Too!)
- Check in with yourself to make sure you don’t think you will be claustrophobic or panicky in rope, and are in a good mental state.
- Let your top know about any past or current physical injuries or conditions that might affect flexibility or cause pain.
- When you play, pay attention to any tingling, numbness, coldness or burning in your limbs, especially your hands and fingers, and notify your top ASAP. You are not being a good bottom by keeping quiet. You can do serious and potentially permanent nerve damage if you let that go for awhile.
- It’s okay to need out of rope — don’t be ashamed or embarrassed. Tell your top ASAP.
Safety for Tops (Bottoms, Read This Too!)
- Ask whether your bottom has any physical injuries or conditions that might affect the ties.
- Ask whether your bottom has any body parts they don’t want tied up, don’t want touched, have dysphoria with, or don’t want to accentuate. Ask if they have body parts they do want to accentuate.
- Before you tie someone up, look at and feel their hands to see the baseline color and temperature so you can notice later if they change color or get cold. If you notice color or temperature change, loosen a tie or do something else. Leaving a tie that cuts off circulation can lead to or mask nerve damage.
- Check in often with your bottom, especially if you’re new to playing together like this. Simply ask how they’re doing, or work out a way to check in without breaking the mood, such as grasping their hand and having them squeeze if they’re okay.
- Watch your bottom and make sure they’re communicating with you. If your bottom can’t speak (e.g., because they’re gagged), find another way for them to communicate.
- Don’t leave your bottom alone for more than a minute or two, and never be too far you can’t hear them.
- If your bottom experiences tingling or numbness, remain calm and supportive. Ask them to rotate their wrists or open and close their hands or wiggle their toes to get the blood moving, and if the area is still tingly, calmly and quickly untie them. Cutting the rope off is not unreasonable if numbness happens — especially if it happens quickly and in a localized area (like one or two fingers).
- Do tie rope over large muscle groups — upper arms, thighs, chest, hips.
- Do not tie under armpits, or put knots in the back of knee, inner wrists or inner thigh. Beginners should stay away from neck ties. Watch where you put knots because of the possibility of nerve damage.
- It’s your responsibility to learn some basic anatomy — where muscle groups are, where nerve bundles are, etc. — in order to tie safely.
- Hands are often the first thing to go numb/lose circulation so you may want to consider tying the wrists last.
- If your bottom needs out of rope ASAP, remove the ties as quickly and calmly as possible. Speak to them evenly and reassure them that they are safe. It may be helpful to give them something to do, such as counting backwards from 100 and focusing on deep belly breaths (not short chest breaths). If you can’t untie them fast enough, cut them out! Rope is replaceable. Once they are untied and calm, reassure them that it’s completely okay to want out before a scene is naturally over, and you’re not upset with them! It builds trust to communicate limits, and if your bottom wants to try playing with rope again, your support will make them more comfortable for next time.
Next week, you’ll learn the two ties that are the foundation of many others!
Button-Up Shirts 101: Terminology, Fit Facts, and More
Are you looking to get into menswear? Or have you been wearing it for some time, but would like to dive a little deeper? Then pull up a chair, because I’m going to explain a little about shirt terminology, what kind of shirt to wear when, how to find the right shirt fit, and beyond.
First, a little vocabulary.
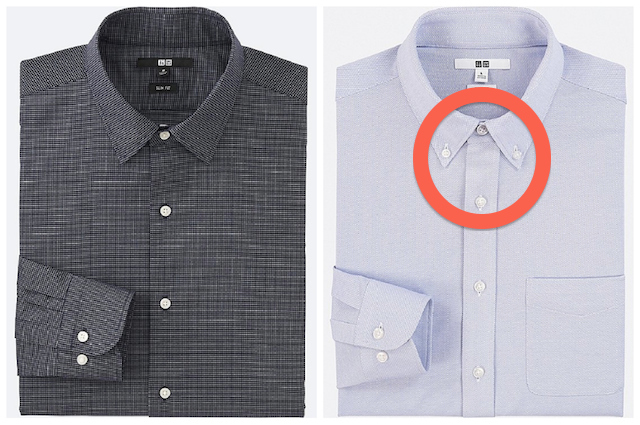
Button-up (L) vs. button-down (R) / via Uniqlo
Kinda like how all squares are rectangles but not all rectangles are squares, all button-down shirts are button-ups, but not all button-ups are button-downs. A button-up shirt is any shirt that you close with a row of buttons in the front, while a button-down shirt is a button-up specifically with buttons at the end of the collar points that fasten the collar to the body of the shirt. This was designed originally by polo players in England back in the 19th century so that their shirt collars wouldn’t flip up while playing. Because of their origin in sports, button-down shirts are considered informal.
What different kinds of shirts are there, and when is each appropriate?
Below, I’ve ranked four common shirt types from least to most formal. Informal shirts can be worn while hanging out with friends, going to a dance party, cute coffee dates, etc. Formal shirts should be worn to weddings, fancy events, or for more traditional business settings. For the sake of brevity, this guide does not include even more formal options like tuxedo shirts.
The informal work or utility shirt
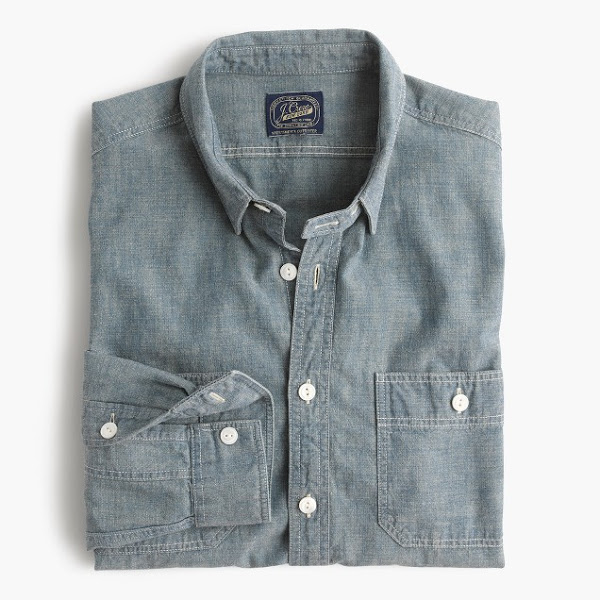
Via J. Crew
This is the type of shirt I wear most often. It typically has two pockets (often with their own buttons), and is made from thicker, less structured cotton, chambray, denim, or flannel. The collar is soft, not stiff. Sometimes the collar points include buttons, and sometimes the shirt features a chin strap (extra bit of fabric and an extra button at the top of the button placket). This shirt is extremely casual; wear with jeans, cords, shorts, etc. If you want to dress it up with a tie you can, but make sure it’s cotton or linen, as silk should be reserved for formal shirts. You can wear a handkerchief around your neck with one of these shirts, too, leaving the top button unbuttoned.
Examples of this type of shirt: Levi’s Jackson Worker Shirt; Lee Long Sleeve Texture Western Shirt; H&M Flannel Shirt; J. Crew Japanese chambray utility shirt
The classic button-down shirt
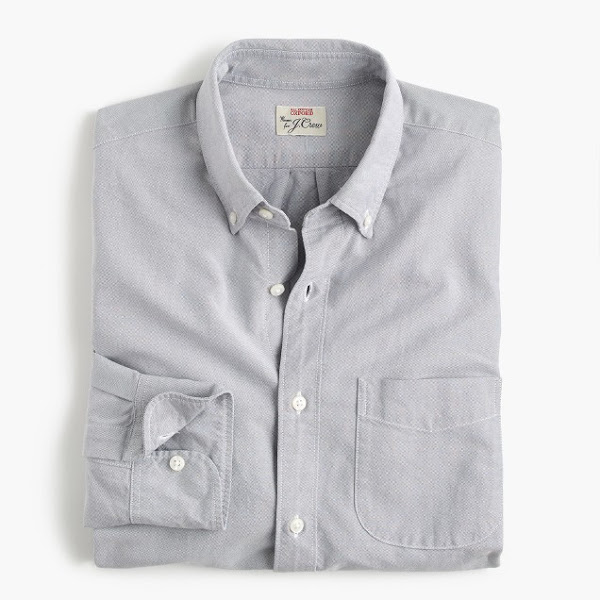
Via J. Crew
I wear this kind of shirt often as well. Usually they have a single pocket on the left with no button, and they commonly have a box pleat in the back. Their collars are soft and unstructured, and the collar tips have holes to be buttoned down to the shirt (keep these buttoned). These shirts are often made from a thicker type of cotton with a weave called Oxford cloth, hence some of these shirts being referred to as “Oxfords.” Wear with jeans, chinos, cords, or shorts; a cotton or wool sweater; or a casual sport jacket or blazer. Don’t wear a button-down like this to anything actually formal, but if you want to, you can dress it up for everyday wear with a cotton or linen tie.
Examples of this type of shirt: J. Crew Secret Wash Shirt; H&M Poplin Shirt; GAP Pattern Oxford Shirt; Uniqlo Slim Fit Oxford Long Sleeve Shirt
The business shirt

Via J. Crew
Business shirts usually do not have a button-down collar, and it’s collar and cuffs are stiffer. They’re usually made from a thinner soft cotton twill or poplin weave, and are often found in blue tones in solid colors or with a subtle pattern. Wear them with dress slacks and a jacket, or dress down a little with chinos. This shirt is medium formality, and can be worn in business settings, or at less formal events. If you’d like to add a tie, silk is a good choice.
Examples of this type of shirt: J. Crew Ludlow Slim-Fit shirt; GAP Zero-Wrinkle Shirt; H&M Premium Cotten Shirt; Uniqlo Easy Care Striped Stretch Slim-Fit Shirt
The dress shirt
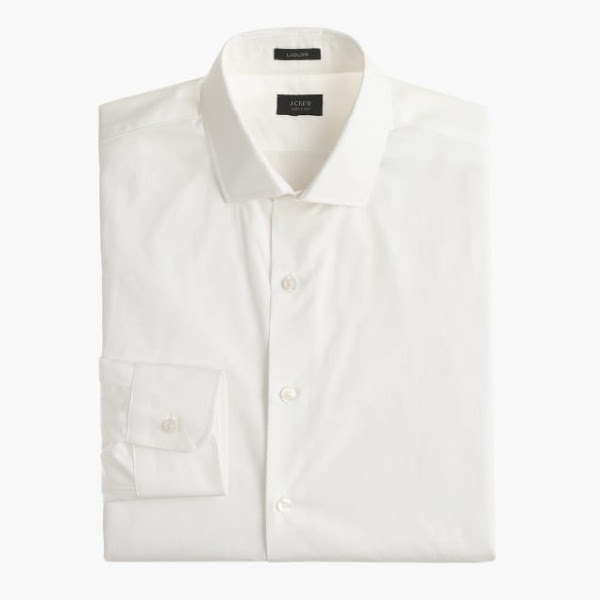
Via J. Crew
Dress shirts are the thinnest of the shirts shown here, as they’re made to be worn under a suit jacket. They usually don’t have pockets, and their collars are stiff and sometimes spread wide like the example above, though often dress shirts have a slightly less formal point collar. They may have collar stays, which are plastic or metal pieces inserted into small pockets under each collar point to keep them stiff (remove collar stays while washing and ironing). The cuffs are either buttoned, or have button holes for cufflinks.
This is the most formal shirt listed here, and should be worn with a suit and silk tie to weddings or formal business meetings. If you’re wearing a spread collar, a thicker knot like a Half or Full Windsor fills the space better than a Four in Hand knot (see the differences here).
Examples of this type of shirt: J. Crew Tall Ludlow Spread-Collar Shirt; Brooks Brothers Box Check Non-Iron Dress Shirt; Uniqlo No-Iron Slim-Fit Long-Sleeve Shirt
I can’t remember all that!
It’s cool; just save the below image to your phone, and refer back to it when you go shopping.

How is each kind of shirt styled?
Casual shirts with flat hems are made to be worn untucked, while U-shaped hems should be tucked into your waistband (line up your shirt seam line, and your belt buckle if applicable, with your pants fly). If you’re wearing your shirt unbuttoned over a tee or tank top, leave it untucked; if you’re wearing a blazer, sweater, or vest over your shirt, tuck your shirt in.
If your tie is tied, make sure your top button is also buttoned (you can always loosen your tie and unbutton the top button when it’s time to relax or if you’re out dancing). To roll up your sleeves, unbutton all of your arm buttons and fold each sleeve three times; then, if you want to, you can push the roll up past your elbow. When you’re done, don’t forget to button all the buttons back up again.
As with any rules, feel free to break them once you know them.
What about fit?
A good fit is hard to find! A shirt fits correctly when:
- The shoulder seam lines up with the edge of your shoulders
- The cuff ends at the base of your thumb where your palm begins (so it completely covers your wrist)
- You can fit two fingers between your neck and the collar
- There’s enough room to move around in the body while being snug and not baggy
If you’re a smaller person and men’s small sizes are still too big, try the kids’ section — I’ve helped a few friends find really well fitting shirts in boys size 12, 14, or 16, and (bonus!) they are usually priced a lot lower. Unfortunately for more curvy folks, I think “women’s” shirts often have a better fit around the hips and chest, but it’s hard to find them without darts, pleats, or frills.
I’ve had good luck finding more masculine shirts in the women’s section of J. Crew, and GAP’s “boyfriend” type shirts can be good too. For more formal shirts, Brooks Brothers has great women’s options, some of which are more masculine cut. If you’re looking for a good quality shirt on a budget, check out J. Crew’s sales (and sign up for their email list), or go straight to J. Crew Factory. I usually get my shirts in the $20 to $25 range there.
How do I care for my shirts?
Certain shirts are easier to care for than others. I tend to stick to cotton, since I’m not a fan of the feel of synthetic materials and most “no iron” shirts feel funny to me. I usually wash my Oxford/button-down/work shirts on cold, then hang them to dry (I would not recommend putting any of these types of shirts in a dryer, though I know a lot of folks do). I don’t often iron my shirts because I’m lazy and they’re generally casual enough that it doesn’t really matter, but you should absolutely iron a dress shirt.
If you don’t know how to iron a shirt, check out this video:
Any button-up shirt questions? Post them in the comments!
Cee and Eli Do Lesbians Who Tech (for the First Time in Four Years!)
This is a co-by both Cee and Eli, who both attended this year’s 4th Annual Lesbians Who Tech Summit last weekend in San Francisco. We also both attended the first summit, so this was our second time going.
This year there were over 2,200 people in attendance, which is MUCH bigger than the first time we went. The topics included: Technology + The Resistance, Cybersecurity, Cloud, Data, Hardware, Machine Learning, A.I., Healing + Community, Virtual Reality, Engineering and Entrepreneurship. This year’s summit focus shifted after the election. To quote LWT, “After the election we regrouped and approached the Summit with a fresh point of view to take the Summit beyond technology. We reached out to leaders who are rising up and using tech to lead the fight on issues of reproductive rights, LGBTQ rights, systemic racism and sexism, and more issues at the intersection of power and freedom.”

Nikki Ritcher Photography
Keynotes
The keynotes this year covered a wide range of topics, some about technology, but most about LGBTQ issues and social justice. The best part of the keynotes was how many of them felt actionable as an audience member. There was a legitimate and diverse range of queer and trans women and non-binary folks on stage, and Lesbians Who Tech made and upheld a commitment to have 50% non-white speakers, and the range of content noticeably reflected this diversity.
Eli: Some highlights of the keynote speeches included Patrisse Cullors, co-founder of #BlackLivesMatter, who spoke on “Fighting Systemic Racism While Simultaneously Healing” and I don’t really need to write any more than that. She is dynamic, motivational, and nothing short of heroic. She spoke about the origins of #BlackLivesMatter, and what it means to really show up for each other as minorities living in treacherous times. During this talk, I felt the potential for Lesbians Who Tech to exist as part of a larger, intersectional movement for social justice. I’m not convinced that potential is realized yet, but it’s getting there.
Many keynotes also firmly drove home the “resistance” summit theme, and more importantly, drove it home in a way that offered the audience actions and takeaways beyond the summit weekend. In particular, Debra Cleaver’s “For the Love of God, Please Stop Ignoring Elections” gave tangible numbers on elections at every level of government, why the progressive movement is losing, and what we can do about it. In a similar vein, Del Harvey, (VP at Twitter), spoke about Cybersecurity and protecting our data, while Jamie Chung (Software Engineer at Dropbox) reminded us to take care of ourselves and each other to help prevent burnout. All of these talks gave me things that I could go home and do that would help the resistance, and in a time when it’s too easy to feel powerless, that really means something.

Nikki Ritcher Photography
I was generally impressed with the range of content presented, including panels from the Prop 8 plaintiffs, a screening and discussion of Her Story with Angelica Ross and Jen Richards, and a talk on the future of Planned Parenthood. However, headliners and notable tech power lesbians Megan Smith and Kara Swisher have just been on stage at Lesbians Who Tech so many times before, and the talk didn’t feel as inspiring or fresh as many of the other keynotes. I would be excited next year to see the conference go one step further and lift up more and newer voices on the big stage, in particular more trans folks; as far as I am aware no trans women gave keynote speeches (except as panel members) this year, and to create a space that elevates and celebrates trans women, this is a necessary next step. Nonetheless, on the whole, the keynotes for me were the most memorable part of the weekend.
Breakout Panels
Eli: In between keynotes, there were breakout sessions organized loosely around certain themes (ie “Entrepreneurship, Education + Career Growth” or “Cybersecurity, Cloud + Data”), usually in panel format. Like the keynotes, there was an enormous range of topics and speakers (including Autostraddle’s own Alex Vega!), and I was sad to only be attend one at a time, when there were five or six going in parallel.
Friday morning, I attended the sessions themed around “Hardware, Machine Learning + AI”, hoping to hear some interesting technical content. Unfortunately, the venue was absolutely packed, and when I eventually got in, I found it difficult to see and hear the speakers. The talks were interesting, and inspirational from the perspective of “here is a queer woman engineer talking about her work” and the importance of this visibility cannot be overstated. However, I would have loved to hear some really technical content that goes beyond “here is this person who does this cool job in tech” to “here is this person explaining a really deep technical problem in their job and how they solved it” and this person happens to be queer/trans/non-binary/etc etc. Another attendee agreed that they “wanted more technical talks…more hands on workshops to learn new skills, less inspirational talks.”
Thankfully, I had better luck with the panels held in the main theater (plenty of space!). The idea pitches were spectacular (reimagined breast pumps, public bus availability, getting queer people into medical studies, and a repository of government regulations were just some of the issues the contestants proposed solving), and the Coding Bootcamp Showcase offered practical advice for folks considering bootcamps to learn to code. On the whole, I learned about a random and wide range of topics, sometimes with only a loose connection to technology. On one hand, Lesbians who Tech provided an opportunity to hear ideas that I might not otherwise have exposure to, but on the other, I found little content that would help me learn and grow in my career as a engineer.
Socializing and Networking

Nikki Ritcher Photography
Cee: For me, socializing, networking and generally meeting other queers in tech is the main draw for attending a conference like this. There are so few of us, and it’s great to have so much in common with someone. I chatted with several friends during the weekend and everyone agreed that we’d all love more time for socializing and networking. The programming seems very rushed and there’s no downtime between panels, and so many people in attendance with very few opportunities to meet people if you’re shy or overwhelmed by the size. Maybe something like breakout sessions, or networking sessions, or facilitated discussion groups, and more general meet-ups would be great. I want to get to know new people, and find others to work with on projects. One friend said, “I’d like to see more facilitated discussion. Everyone in attendance has a lot to offer, and I’d like to hear more of that. Some of the talks spawned conversations. We have all this brain power in a room, let’s break out into groups and talk through stuff.”
Venue
Cee: LWT is held at the Castro Theatre—a beautiful historic landmark building, right in the heart of the gay district in San Francisco. The main stage is held there, and the breakout sessions are held at bars and venues all within a block or two of the theatre. I understand why it makes sense to have LWT in the Castro—it’s nice to be in the gay neighborhood and to support gay owned businesses. However, I think the summit has outgrown the theatre, as there were some major accessibility issues, and often the venues for the smaller sessions were overpacked and at capacity and we were unable to attend. Also holding events at bars might not be ideal for sober folks.
Inclusivity
LWT has had some issues in the past with inclusivity and intersectionality, but it feels they’ve grown and are working on getting better.
We spoke to a couple trans women friends and they both feel it’s gotten better, but it still needs a little work. One friend who has been to several summits said, “I still feel like the number of trans women who attend is small, but haven’t felt tokenized in general. I didn’t run into any instances of exclusion or microaggressions this year, and generally felt like I was cool to be there. I’d love to see more trans women on the main stage, talking about technical stuff, and not always about our trans experiences. I’d also love a trans social or some kinda trans-lady led event.”
Cee: I felt like the language regarding trans folks kinda missed the mark. I think they are trying MUCH harder than the first LWT, but it’s not quite there yet. As a NB/GQ person I also cringe when being addressed in a room as “ladies.” Another GQ friend said they did feel included, and “as someone who uses gender neutral pronouns, this year was much better than last year. Lots of public shout outs to respect pronouns. Next year, let’s have everyone’s pronouns nicely legible on the nametags. I think LWT is doing much better with being more queer inclusive with the rebranding and the new tagline.”
Eli: I feel that some of the speakers still needed some trans 101 or trans 102 training. It’s hard when you go into a space expecting it to be really great on these issues, and then still hear “Ladies and Gentlemen!”; it doesn’t give me pause at other types of events but LWT can do better. The first conference they didn’t have any pronouns on nametags or really any trans awareness, so I do want to note how far they’ve come and the fact that they do seem to be trying and open to feedback.
Cee: On the first page of the agenda pamphlet it says “We are committed to making this event accessible to people with disabilities… All presentation venues have ADA-compliant wheelchair accessible entrances and restrooms.” That’s great, and a good step, however, the venues were unfortunately not totally accessible for folks with limited mobility. The historic Castro Theater does not have an elevator, so the upstairs space was not available for everyone. And the language of some of the talks could have been a lot better. “Stand if you’re able if you’ve experienced x” is way better than “Stand if you’ve experienced x,” as it alienates those who can’t.
And finally, why was the career fair open to cis men? One of the things I really love about going to a space like LWT, or A-Camp, is that it’s a queer-normative space. You can look across the room and see a sea of queers, and it’s delightful. I was pretty shocked when I went into the career fair and saw that it was open to anyone. I totally get and very much respect having a career fair for all people who feel marginalized, but having it inside this queer-normative space felt invasive. Perhaps putting it in a different building would make more sense, if a queer-normative space is something that LWT would like to preserve.
Overall we feel that LWT has improved dramatically since the last time we went four years ago. The variety of programming is interesting and there’s a ton of content. If you’re interested in being in a queer tech normative space, give it a try next year, or check out one of the local LWT meet-ups or events in your city, or start one yourself if there isn’t one yet.

So You’re Allergic To Cats?
I don’t want to play into stereotypes here, but a lot of us have cats. And some of us are allergic to cats. And some of us still have cats anyway (ahem).
I was one of those sickly kids who had really bad allergies and asthma. I was also one of those kids who REALLY LOVED ANIMALS. I had a nebulizer asthma machine which I had to use for 20 minutes twice a day, and an allergist who I was on first name basis with. I had a “scratch test” done on my back when I was about 8, and every single needle prick raised up, meaning I was allergic to everything. My allergist thought maybe I was overly sensitive so he gave me another test, and, nope, I was actually allergic to everything. He suggested I move to Mars, but that I may be allergic to that too. Thankfully my allergies have gotten a lot better as I’ve gotten older, but unfortunately the cat allergy remains pretty bad.

My allergy panel results from two years ago. This is considered to be a “high” level cat allergy, or RAST level 3.
So you’re allergic, and you want a cat, or you’re dating someone who has a cat and you want to continue dating this person. Or everyone you know and/or want to date or hang out with has cats, because we all do, right? What do you do? Here are some things I’ve learned over the years to allow me to have cats in my life.
First of all, you’re not allergic to the hair like most people think, but instead a protein (Fel d 1) which comes from the oil on the skin and the saliva, so long-haired cats aren’t inherently worse than short-haired cats. This protein is sticky — it sticks to the dander, the fur, you, your clothes, and your living space. Some cat breeds, in theory, have less of this protein. I’ve heard Siberians and Maine Coons are better than the typical Domestic Shorthair, but I’m not sure if this has ever been scientifically proven.
Another thing a lot of people don’t realize is long-term exposure to a specific cat will allow you to build up a tolerance to that cat, so your allergies will be reduced if you live with this cat. It takes several months, and it doesn’t ever go away completely, but it will reduce significantly.
Medication
I’m not a doctor, anything I talk about in terms of treating allergies or asthma is just about my own experiences with my own allergies and asthma, not a health recommendation for others. You should talk to your actual doctor about your own allergies or asthma.
If your allergies are bad, you will probably need to be on an antihistamine. There’s a wide variety of them to try, so if one doesn’t work for you, or if you have side effects, give another one a try.
First Generation Antihistamines
Benadryl (Diphenhydramine) was the first option for allergy sufferers, appearing in 1946. While very effective, unfortunately drowsiness is a huge side effect for most people. I never take it for allergies, but sometimes I take it to sleep, but it does make me groggy and slow the next day. It’s so good at making people sleepy that it’s the active ingredient in Tylenol PM.
Second Generation Antihistamines
Claritin (Loratadine), Zyrtec (Cetirizine), and Allegra (Fexofenadine) are popular over-the-counter second-generation antihistamines. These drugs do not cause drowsiness in most people. If you try one, and you feel out of it and exhausted, try another one. I found Zyrtec to be the most effective for me, but also the one which makes most people I know sleepy. If you find one that does not make you sleepy, take it for a week to really judge its effectiveness. This stuff needs time in your body to work. If you plan to go somewhere where you’ll be exposed, take the pills for at least a few days before hand.
What’s with the “D”? (Claritin-D, Zyrtec-D, Etc.)
The “D” at the end stands for decongestant, and it’s usually Sudafed (pseudoephedrine or phenylephrine) which they’ve added along with the antihistamine. Sudafed is excellent for clearing stuffy/runny noses. It’s also a stimulant (it’s an amphetamine!) so it’s best to not take daily or before bed. I do not take any of these combo versions of antihistamines, but instead have separate Phenylephrine pills in my medicine cabinet for when my allergies are really bad or when I have a cold. I almost never use them.
Nose Sprays
For when the antihistamines just don’t cut it, and I’m still a sniffly mess, I’ll also use either Flonase or Nasacort. You may want to watch a YouTube video to see how to use a nose spray properly if you’ve never done it before.
Eye Drops
If you get really itchy eyes you can try antihistamine eye drops.
Generic! Is! Cheaper! Online!
You guys, generic is a million times cheaper on Amazon than the pharmacy. You can get a year’s supply of antihistamines for like $15 online, and it works just as well.
Hippy Stuff
Some friends of mine swear by Rainbow Light Allergy Rescue. I haven’t tried it myself though.
But What If I Also Have Asthma?
I have allergy and exercise-induced asthma, and all I can say is steroid inhalers are your friends. Popular ones are Alvesco (ciclesonide), Asmanex (mometasone), Azmacort (triamcinolone), Flovent (fluticasone), Pulmicort (budesonide), and Q-Var (beclomethasone), and they all require prescriptions. If you’re hitting that rescue inhaler daily, you probably should be on a steroid – it’s worth talking to your doctor about. Steroids don’t stop an asthma attack, but instead prevent them from happening. They also open my lungs enough to be able to exercise or be around allergy triggers without wheezing. They only work if you remember to take them every day. I put mine in my bathroom next to my toothbrush to remind myself. Wash your mouth out after using, and using a spacer really helps.
Remove The Allergen From Your Body
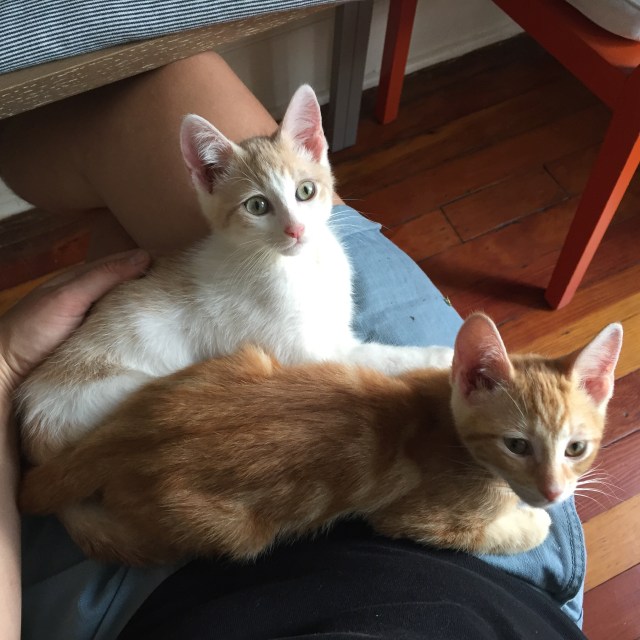
Shower!
Dander and pollen and most allergens are sticky. They’ll stick to your clothing, your face, the inside of your nose, etc. Showering helps remove them. I recommend showering before bed to rinse off the allergens, and not bring them into your bed with you.
Flush Your Eyes
My eyes don’t bother me enough to use eye drops, I just flush them with plain water if they get itchy. I have this vintage eye wash cup which looks like a little goblet which I fill with plain water and blink into a few times. That works for me.
Wash Your Hands!
After you pet the cat, wash your hands. This may sound obvious but I often forget and then rub my eyes. Oops.
Nose Irrigation
Some folks swear by a neti pot or saline spray. I have a neti pot, and I find it doesn’t work for long, but they really help during an allergy attack.
Your Living Space

Wash your clothing often. Keep fabrics to a bare minimum (drapes, upholstered furniture, etc). Place a blanket over your sofa and any other not hard surface and wash it frequently. CARPET IS THE WORST; stay away from it if possible. Dust with a damp washcloth to pick up the allergens, and not a feather duster to kick them up. Use a vacuum with a HEPA filter on it or gently sweep and mop so you don’t kick up the allergens. Wash the cat bed weekly if you have one (recommended, so you can wash it). Don’t leave clean clothes on the floor where your cat can sleep on them. The cleaner you keep your house, the less your allergies will bug you.
Bedroom
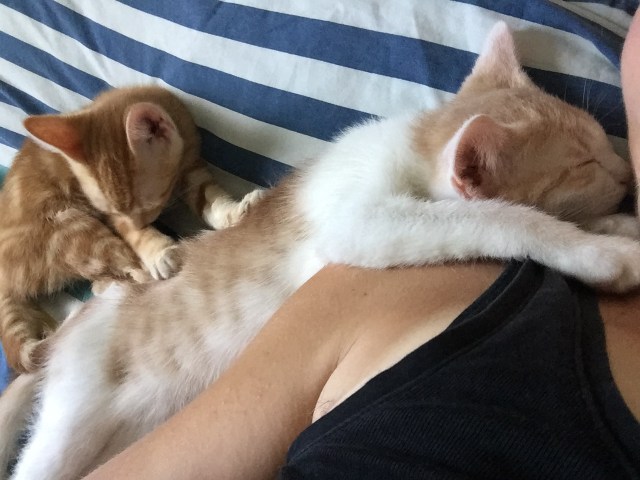
It’s best if you don’t let the cat sleep with you in your bed — but I ignore this advice myself. Maybe try to train the cat to not sleep on your face? Get some pillow protectors and a waterproof mattress pad (good for other reasons too). Wash your sheets a lot (like 1-2x a week), and on the hot water setting. Change your pillowcases often. Wash your comforter and pillows every few months, get a comforter cover and wash that every week. I do not recommend any fancy blankets which you can’t wash often. If you don’t let your cat into your bedroom you can ignore all of this.
A/C
Clean the filter on the window A/C unit every week or two — just run it under hot water. (Yes there’s a filter, and yes you can take it out.)
Air Purifiers
You can buy a fancy air purifier or make one yourself for a lot less by attaching a HEPA filter to a box fan as shown in the video below. This also works really well for folks who want to have a fan in their windows but are allergic to pollen too.
House Furnace Heat
If you live somewhere where your heat is forced air, coming out of an oil or gas furnace, get a HEPA filter for your furnace instead of a regular one. It will clean the air as it passes through the furnace, and will blow out cleaned air into your house, acting like a giant air purifier. Make sure you replace the filter every few months. Talk to your landlord about doing this for you if you rent. Also, cleaning your air ducts out will help a lot if they haven’t been cleaned in awhile.
Anti-Allergy House Spray
I haven’t used these yet, but I just ordered one on Amazon to try it out. I suspect spraying your sofa and cat bed or anywhere else your cat hangs out and the litter box will be helpful.
The Cat

Bathe Your Cat
They usually don’t mind as much as you’d think, especially if you start doing it as kittens (at least my cats never really objected). Use shampoo specifically for cats, not people shampoo. Often shampoo is marketed as hypoallergenic — they mean for the cat or dog’s skin, not for you. There are some anti-allergy cat and dog shampoos, but I haven’t tried them yet. Bathing a cat will reduce allergens only for a few days.
Cat Wipes or Facecloth Baths
There are some products available which are like wet wipes for cats, with no harmful ingredients. These are great for reducing allergens if used daily. Even a daily wet facecloth wipe down works great, especially if you use some of an anti-allergy product on it, and it’s a lot less stressful and time consuming than a full bath.
Cat Box
Clean the cat box often! I’m allergic to the box, so I dump the litter often. You could try one of those anti-allergy sprays in your box too.
Why Even Bother?
I realize this all sounds like a hell of a lot of work, and pretty ridiculous. But for me, the emotional and mental health benefits outweigh the work and physical health detriments. I deeply love and connect with animals, and have for my whole life, and I think my life is a lot more fulfilling with pets.
Do you have allergies and also have cats? What do you do to help minimize your allergies? I’d love to hear your tricks too!
Yes, That *Is* A New Autostraddle Design You’re Seeing
Hello yes you did notice there’s a new design! Alex and I have been working on it for several months now. Alex did the design, and I wrote the code.
New logo
Alex redesigned the logo!
The old logo

The new logo
New header
The header was completely redesigned and overhauled. We realized the about us “star” menu was confusing, and a bunch of our great content was buried several levels deep in the old menu, and we wanted to make it easier for y’all to find what you’re looking for.

The old menu on desktop
The new menu on desktop

The old menu on mobile

The new menu on mobile
New Fonts
We changed the main fonts from Oswald & Open Sans to Vesper Libre* Merriweather & Montserrat.
* We just swapped it out for Merriweather which is hopefully easier to read! Please let us know if it’s better.
Wider
The site on desktop now maxes out at 1300px wide, instead of 1154px like it did before.
Announcement Bar
The announcement bar is at the top of the page now and dismissible. You can click the X and it’ll go away, and not come back until we change what we want to let you know about!
Feedback?
Do you have thoughts or feelings about the redesign? Bugs in your browser? Please let us know in the comments below! Thank you!
This Is How We Do It: Knife Skills Are Life Skills
Welcome to This Is How We Do It, a series wherein we’ll be discussing projects both inside the home and out and explaining, you know, how we do it.
I believe a good sharp knife is the most important tool in a kitchen. In this article I’m going to explain how to select a good knife, how to keep it sharp, how to clean and maintain it, and how to use it properly.
What kind of knife should I get?
You absolutely do not need a knife block or an entire set of knives for regular everyday cooking. Instead, take that money you’d spend on a set and buy just one good knife.
A nice knife, if well maintained, will last you decades and is well worth the money. I’ve had my Shun santoku knife for 15 years and it’s still in great condition. Popular brands I’d recommend are Wusthof, Henckels, Global, and Shun.
I recommend either a Western-style chef knife or a Japanese-style santoku knife. A Western chef knife is typically heavier, its handle usually has finger grooves, the point of the knife sticks straight out and is not angled down, the curve of the blade is more rounded to allow for a more rocking style of cutting, and the blade is ground evenly on both sides to a V shape. A Japanese knife is typically lighter, its handle is often flat, the point angles down, the blade is less curved for more chopping style of cutting, and the blade is often ground offset and not even. To be able to maintain that thinner edge, Japanese knives are made of a stronger steel and often hold their sharpness a bit longer too.
Here are some chef knives I’d recommend (click through!):
And some santoku knives:
I’ve also found decent knives at Goodwill which just needed to be sharpened, so keep a look out for these brands there if you’re on a budget.
Is your knife sharp?
When a knife is sharp enough, you should be able to cut through a held-up piece of paper with very little pressure or slice through a tomato without squishing the fruit or ripping the skin. A brand new knife will be very sharp — try to remember how sharp that is so you know what your baseline should be and you’ll know when it’s dull. While this sounds counterintuitive, a sharp knife is a safer knife. It doesn’t slip, and if you combine that with good knife skills, you won’t cut yourself while preparing your meal. It also makes prep so much faster, less frustrating, and more satisfying.
Keeping your knife sharp
If you have a nice knife, you also absolutely need a decent honing steel. A honing steel doesn’t sharpen your knife, but it trues or straightens the edge of the blade. Often when a knife feels dull the very edge has curled from the pressure of use. Dragging the edge along the steel straightens that edge back up. I use my steel almost every time I cook. To use your steel, either hold it freely in your hand, or place the tip on a cutting board or cloth. Drag the full length of your knife from the base to the tip along the steel at a 15-20 degree angle, away from your hand, or down towards the cutting board. Do each side of the knife, alternating evenly several times. You should hear a high pitched ring if the angle is right.
is this knife play?
Here are some steels I recommend:
If your steel isn’t cutting it anymore it’s time to take your knife to a professional sharpener. Don’t use one of those home sharpening tools that you slide the blade into. A professional sharpener will only charge you a few dollars and it will be much sharper. You should take it in at least once or twice a year, or when your knife feels dull.
Oil the handle
If your knife’s handle is wood, you’ll need to oil the handle every year or so. You can use linseed oil, danish oil, mineral oil, or even vegetable oil. Any oil is better than nothing.
Cleaning and storing your knife
If you’re feeling lazy after you’ve cooked and don’t want to clean up right away, at least clean your knife and put it away. Wash your knife in warm soapy water, dry thoroughly, and put away right after use. I use a magnetic knife strip and love how easy it is to store my knives. If you do use one, make sure your knife is really dry before putting it back so it doesn’t rust.
Do not let your knife soak in the sink, as it will rust the blade and ruin the handle (and create a potentially dangerous situation if you reach into your sink forgetting you left the knife there). Don’t ever put your knife in the dishwasher. If you have to store your knife in the drawer, get a blade protector for it, so it doesn’t get dull banging around in there.
Using your knife
If you want your knife to remain sharp, don’t cut on a dish, plate, pan, glass cutting board, or a stone counter. The only thing you should cut on is a wooden cutting board. I recommend stabilizing your board with a wet towel underneath so it doesn’t slip. Often, slippage of the cutting board is how folks cut themselves with their knives.
Hold your knife by pinching the blade with your thumb and forefinger, and curling your remaining three fingers under the handle, with your middle finger touching the back of the blade.
like this yay
not like this boo
also def not like this
Use your other hand as your guide hand. Hold the food you want to cut with your in the “claw” by placing your thumb behind and curling your fingers under. This keeps your thumb and fingertips out of the way of your blade. Use your knuckles as a guide for the side of your blade. Always make sure what you’re cutting is flat side down and not a wobbly (dangerous) rounded edge. If you’re cutting something round, slice it in half first, and put the freshly cut flat sides down on the board and go from there. It’s much more stable that way, and will greatly reduce accidental slicing of your guide hand.
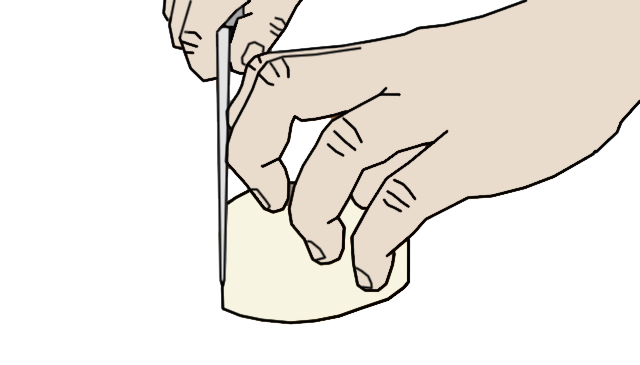
is *this* knife play?
Homework
Practice holding your knife correctly and using the claw method with your other hand. It takes a lot of time to unlearn other methods, but it’s worth the learning curve. Take it slow until you’re comfortable, then try gradually speeding up like you see cooks doing it. You may find that your dinner prep is a lot faster once you learn this method. And go get your knife sharpened professionally — it’s so worth it.
Ask a Gay Nerd: Can My Administrator See My YouTube History?
feature image via Shutterstock.
Editor’s note: Ali here! Hello! Sometimes y’all send me emails — anything from questions about dildos to questions about your computer. A lot of you do this, so I don’t always get to your questions right away. Sometimes I don’t get to your questions at all. Sometimes I mean to get to your question, and then I have six deadlines and I forget (I’m sorry about that). And sometimes I actually do not know the answer to your question. It’s something I hate admitting — if I had my way, I’d know everything about everything all the time forever and ever. Luckily, we do have someone like that on staff. So when I didn’t know and couldn’t definitively find the answer, I turned to our Tech Director, Cee Webster. Here’s the question and what Cee came up with:
I’m hoping you can help me with a tech question, as I’m freaking out currently. I’m a teacher and was logged onto my school Gmail on my home computer for some stuff and closed the window instead of signing out. I was on YouTube which was then linked to my school Gmail account and clicked on a book club discussion video for Tipping the Velvet (titled “Vaginal Fantasy #19: Tipping the Velvet: Featuring Hannah Hart”). ANYWHO, I realized I was signed in under my school e-mail after I clicked on this video (which sounds a whole lot worse than it was, at least the three minutes of it I watched before massively loosing my shit). I quickly signed out of my school account and closed the page. Is this something I should contact my school tech person about? Or should I just pretend it didn’t happen?? I’m in a SUPER conservative district and already not liked by administration for being “too political.” Or is this stuff not really monitored if it’s coming from a home computer? I know I didn’t do anything wrong, but I feel like this could potentially get me into some major shit…

Hello reader!
Don’t panic! It looks like you’re in the clear. From what I can tell, Google Apps admins can not see your web search or YouTube history from the admin panel. The only way they could see the history would be if they had your password and logged in as you. I’m assuming you set your own password, so you’re fine. If not, go in and change your password so only you have it.
As an admin, the only way I can gain access to a user’s account would be to change their password and then log in as them. You’d know this had happened though, because your password would no longer work. So unless they made you reset your password recently, this did not happen.
Google saves your web search and browsing history to help predict and tweak your future search results. Fortunately you can see the history, and delete certain searches or sites. Log into your work account and go see yours. [Editor’s note: this is hilarious. The last two things I searched for were “lemongrab gif” and “don quixote bowl.” I recommend doing this regardless of whether or not you have a problem with your search history. Just for lolz.] Your admins can’t see this – only you can. Find that video anyway and delete it for your own peace of mind.
You can also completely turn off your search and browsing history from your work account going forward, to prevent future freak-outs.
So there you have it! You’re totally safe! To celebrate, here’s the video you were trying to watch — you can definitely get through more than three minutes of it this time.
This Is How We Do It: Refinishing a Table
Welcome to This Is How We Do It, a new series wherein we’ll be discussing projects both inside the home and out and explaining, you know, how we do it.
I bought my first house three years ago, and went from renting a small apartment to owning and then furnishing a whole house. One of my favorite things about finally owning a home is that I feel I can buy “adult furniture” and not have to worry about ruining it by moving over and over again. I slowly started picking up vintage pieces from craigslist and refinishing them, including my dining table.
I set up a craigslist search and waded through hundreds of listings until I found this amazing solid cherry table and chair set for a couple hundred dollars — less than an IKEA set. I went to the seller’s house and was super excited about the quality of the wood and craftsmanship. It was solid wood, all joined, no nails and complete with 8 solid chairs. The only problem was the table’s surface. It was covered in rings from glasses and the finish had worn off in spots and the wood underneath had then become badly stained with dirt. No problem; it was solid wood, I could sand it out. So I brought it home.
the finished table
How to refinish a table
Time: However long your patience lasts for craigslist plus a few hours for sanding and finishing spread over a couple days.
Materials:
fine steel wool (from a hardware store, not the grocery store)
Murphy’s Oil Soap
an electric orbital sander and sandpaper (80, 150 and 220 grit)
Watco Danish Oil, Natural
Howard Feed-N-Wax
some old t-shirts or lint-free rags to use for the finish which you’re ok tossing into the garbage after
Step 1: Acquire a solid wood table
(Already have a solid wood table? Great, skip this step!)
Craigslist has an “email alert” function which you may want to set up for your search if you don’t find anything right away. You’re going to be looking for a table which is solid wood, not veneer. Veneer is a very thin strip of a nice quality wood glued over the top of a cheaper or harder and more stable wood or wood composite. People have been using veneer for centuries, so buying vintage doesn’t necessarily mean you’re buying solid wood. The veneer layer on top is paper thin, so even if you sand very very very lightly by hand you still might sand through or rip & tear the veneer. It’s really not worth the effort, and solid wood is less fragile anyway.
If you can’t tell if a table is veneer or solid wood, look at the edge of the table. Is there an “end grain” at the end of the table, indicating it’s solid wood? Or is there another type of wood edging the table, or a seam at the very edge? That probably means veneer.
If you do have a veneer table, you can usually get away with chemically stripping the finish and refinishing, without sanding. Or even easier, something like Restor-A-Finish will likely be enough to fix most issues (the stuff is magic).
Step 2: Clean it
The next step is to clean the years of dirt and grime and furniture polish off the table. Use your fine steel wool and a bowl of hot water and Murphy’s Oil Soap to get all the crud off. Keep dumping and refilling your bowl of soapy water and wash the table until the water stays clear. Make sure to run it over with a rag with plain water to rinse it too.
Step 3: Sand it
You really should try to get an electric orbital sander if you can, as it’ll save you lots of time. (Do you have a friend you can borrow one from? is there a tool library in your city? do you have a crafty friendly neighbor?). If you can’t at least get a nice sanding block and decent quality sandpaper — it makes the task a lot faster.
sanding the table
Start with a 80ish grit and sand until all the old stain and finish, marks, rings, scratches and whatever else is off the table top. Once you’re happy you can do another pass with a 150 or so, then finally a 220 or higher grit to make it real smooth. Don’t press too hard with the electric sander or you’ll get little circle marks which are hard to get out. Make sure you sand in the direction of the grain, not across the grain. Be careful about the edges of the table; I recommend doing these by hand.
cherry wood turns really light when you sand it
Step 4: Wipe it down
Clean off all the wood dust real well. You can use a wet cloth if you want but you have to wait until the table is totally dry before going on to the next step.
Step 5: Oil it!
I really prefer oiled wood to a varnish or polyurethane — the finished table still feels like wood and not plastic. This is my favorite step because I get so much satisfaction out it. I love to watch the colors of the wood come out when it’s wet with the oil.
Use the lint-free rags or old t-shirts and rub the Danish oil into the wood, and be liberal with it. Allow it to soak into the wood for about 5 or 10 minutes and then wipe off the excess. Allow to completely dry before repeating this process. I did 5 coats on my table.
For one or more of these oil applications you can use fine 400 grit sandpaper or your fine steel wool to wet sand the table. It makes a bit of a slurry of wood dust mixed with oil which fills the tiny pores of the wood, sealing it better from moisture. It’s not a necessary step, but feel free to do it if you want. Wipe off the excess as normal when you’re done sanding.
These oiled rags heat up as they dry, and can be spontaneously combustible. When you are finished, spread them out somewhere to dry that they won’t be in contact with anything flammable and allow them to fully dry before throwing them in the garbage. I lay them in the bathtub or sink and then put them in a sealed container in the garbage when they are dry.
Wait a good 24+ hours before going on to the next step. Make sure the table is totally dry.
Step 6: Wax it
The oil does a really good job at making the wood look beautiful and hardening the surface, but to make it extra waterproof you’ll need to add wax. I really like a product called Feed-N-Wax which is some percentage orange oil and some other percentage beeswax which makes me feel that it’s somewhat safer for me, though that’s probably untrue. At least it smells nice. Apply the Feed-N-Wax liberally and let it soak in, and after 20 mins or so wipe off the excess and you’re good! I take a dry towel and buff the surface to shine it up too, but you can skip that. You should keep doing this every few months or so to refresh the coat. I also did it to my chairs after I cleaned them. It will darken the color of the wood just a bit, so keep that in mind.
Note that you can skip this step and add a layer of water based polyurethane over the top of it all if you don’t want to wax. I don’t find the waxing tedious though, it takes just a few minutes.
cherry wood is so pretty
Maintenance
I clean my table with plain water or Murphy’s Oil Soap, and don’t use any strong cleaning products on it. I reapply the Feed-N-Wax every few months. I do use trivets on my table for very hot things like soup, and use coasters for drinks, but the finish should hold up if you forget.
Feel free to post questions and photos about your table projects in the comments. I can even help tell you if your table is solid or veneer if you are unsure.
Three Autostraddle-Related Tech Tips For Gaying Up Your Internet
Hello all, Ali here—we happen to have a magic tech unicorn on staff named Cee. And collectively, you all and we all ask Cee a lot of questions. Here are the answers to a few questions that get asked over and over again that we thought you might appreciate. The more you know!
Tip #1: You want to get an email each time there’s a new post on Autostraddle
Several readers and some staff have asked me how they can get an email when there’s a new post on Autostraddle. I recommend using IFTTT for this, and I published a recipe for you all to use.
IFTTT is a great free service to link different web things together. Ali wrote a great article explaining it if you are unfamiliar.
Go ahead and add this recipe:
Tip #2: You want an Autostraddle App
And so many more people have asked for an Autostraddle app! Most of you want to be able to read our articles without having to open your browsers and type in the address, etc. I get it! Unfortunately writing an app would take me hundreds of hours, and the process to get it into the apple store is quite difficult and a pain. And that doesn’t even include Android.
Instead, I can show you how to put an icon on your home screen which can save you some time.
Android:
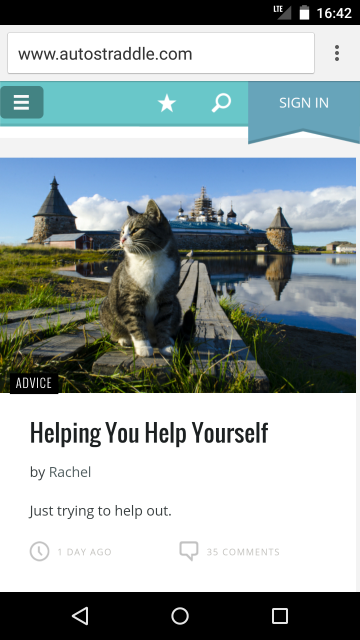
Open up your browser and go to autostraddle.com
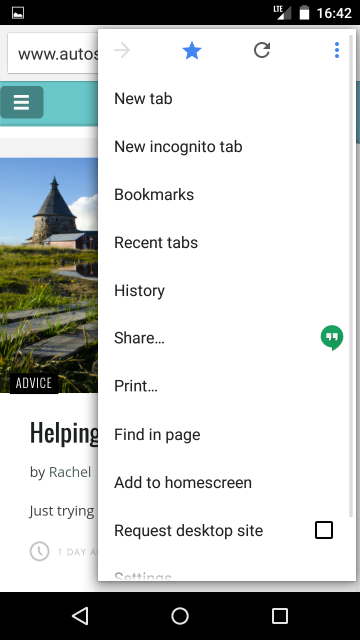
Tap the little menu at the top and select “Add to homescreen”

Name it whatever you want

You’re done!
iOS:
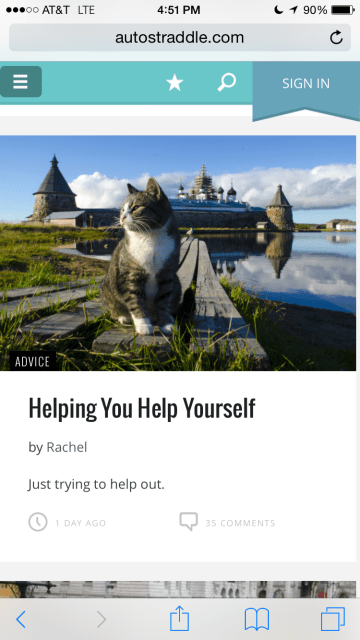
Open up your browser and go to autostraddle.com. At the bottom menu, tap the middle “share” icon.

Tap the “Add to Home Screen” icon

Name it whatever you want

You’re done!
Tip #3: You want to make sure we’re getting the referral fee on Amazon when you buy stuff, but keep forgetting to click through the site first
Autostraddle can get a small referral fee on purchases if you click through to Amazon from our site through their affiliate program. This is one of the ways we pay for our server hosting fees and the like.
I found a few extensions which automatically append the tag to the Amazon URL, without having to go through our site first. So if you install these extensions in your browser, and buy things on Amazon, you’re helping us without even really doing anything!
Chrome:
- Right click on this custom Autostraddle extension and “Save Link As”. Don’t regular click on it because Chrome will give you a security warning. I promise I’m not going to haxx0r your computar.
- Go to Chrome > Preferences > Extensions (or type the shortcut chrome://extensions/ in your URL bar).
- Drag the file you downloaded onto that extensions page and install it!
- Note for Windows users: you may get a security message that this extension was disabled because it’s not from the Chrome store. Unfortunately if that happens we can’t do anything, and you can either use Firefox or try to remember to click through the site first.
Firefox:
Install Affiliatefox, then in Tools > Add-ons > Extensions > AffiliateFox > Preferences, add in the affiliate code autowin-20 to all the boxes.
Safari:
Install Affiliatizer, then go to Safari > Preferences > Extensions and type in autowin-20 in all the boxes except amazon.ca which is autostraddle-20, and amazon.co.uk which is autostraddle-21.
This has been the one-hundred-thirteenth installment of Queer Your Tech with Fun, Autostraddle’s nerdy tech column. Not everything we cover is queer per se, but we talk about customizing this awesome technology you’ve got. Having it our way, expressing our appy selves just like we do with our identities. Here we can talk about anything from app recommendations to choosing a wireless printer to web sites you have to favorite to any other fun shit we can do with technology. Header by Rory Midhani. You bet I got that feature image off of YouTube.
Welcome To The New Improved Autostraddle!
Hello Autostraddle! Welcome to the first day of the rest of our lives together! You may have noticed that things look a little different around here, and I’m sure you have lots of feelings about it, such as “I LOVE THIS!” or “WAY TO RUIN MY FAVORITE WEBSITE, ASSHATS!” Thus, our Tech Director Cee and our Design Director Alex are here to explain themselves and give you a little peek behind the scenes of our brand new world.
Cee: Tech Director
Hi everyone!
Cee here with this massive project’s technical report. Back when the website was really broken (remember all those 503 errors every day?), we launched an indiegogo campaign to fix the website’s code so that it worked. While we were in there, we figured we’d redesign it, to bring it up to date and fix some design issues.
A few months into the project my friend Mike and I did a lot of talking about scaling large WordPress apps like Autostraddle for the kind of traffic we get. He suggested an ideal server setup which would mean getting us off of a “service” hosting and into self-hosting – building the servers ourselves and maintaining them. I figured we had nothing to lose, so around the beginning of January last year we started building the servers and testing the load. After a month or so of that, and lots of various load testing, we realized we were in a much better place on the new servers than where we were hosting (and spending a LOT of money monthly). We were finally ready to move the site, and I moved everything over on Valentine’s Day this year. There was a shaky week where we needed to reconfigure and tweak some settings, but after that the site has been running flawlessly. We’ve had almost 100% uptime for the past nine months. So, by quickly putting out the original fires if you will, we were able to relax and take our time with the redesign.
The redesign is one of the most complicated WordPress themes I’ve built to date, with over 4200 lines of code in the stylesheet alone. I’m proud of some of the more fun functionality we have here – the responsive code, masonry (how the boxes quickly scramble to get to their spots after the window is resized), the click navigation and how the navigation changes from large screen to mobile on resize while still being easily editable by Riese from the WordPress backend. I’m also really loving how the community section (BuddyPress) works finally and looks so much nicer and finally makes sense to me. I’ve added some new features there too – you can now search for local or like-minded Autostraddlers. Look for the “toggle search form” button in the Autostraddle Members page. You can now upload avatars directly to Autostraddle instead of having to use Gravatar (but that option is still there). Avatars are nice and big now, so you can actually see them. And finally, groups now work properly, and you can upload a photo for them.
This redesign has been really fun and interesting for me technically. Alex is a great designer and she’s really pushed me to come up with creative code solutions for her designs. I want to thank all of the supporters personally for helping us, and allowing Autostraddle to hire me. This has been a great project and I’m looking forward to the future!
Alex: Design Director
Whew! We’re finally here! WE MADE IT!
First, I’d like to personally apologize for the delay. The scope of the project was enormous for two people (one designer, one developer) and I’m guilty of optimistic deadlines. What can I say, this was a learning experience – a good one! The only person happier about this launch other than Cee is me.
Good design is obvious.
Great design is transparent.
I must have redesigned the redesign a full eight different times with tons of iterations for each. With each version, I found that I wasn’t adding more but I was taking away because I over-designed and over-thought it in the beginning.
One of the first iterations/concepts of the new redesign, made with construction paper!
Where we’ve ended up is a result of a long process involving many people and much feedback, and but I’m confident that we’ve achieved the goals we set out to achieve.
Responsive Design
Autostraddle is now responsive, which means you can re-size your browser window and the content will adjust accordingly. Go ahead, give it a whirl! This makes our website viewable on many different devices, all at once. Pretty nifty if you ask me. The “boxy” layout we picked from the get-go was especially mobile-friendly.
Every element sits in it’s own “module” because this design best lends itself to a responsive layout. You don’t need to download a separate app — visiting our website on your device is as easy as typing in our URL. You can also save Autostraddle.com to your home screen for easy accessibility.
Navigation
Finding what you’re looking for should be as easy as ever now that we have brand new navigation and different ways to access content around our site. For example, every article is labeled with one (or more) category and tags. Click any of these and you’re brought to a page containing a feed of articles containing that category or tag.
Also like Cee mentioned above, the search function now works. So you should be able to find anything you’re looking for and if you can’t, I want to know about it!
Comments
Comment replies are hidden and you can make them visible by clicking the “Show Replies” button.

This button appears only when there are replies within that comment thread, which we think helps keep the comments more organized by thread discussion.
Showcasing Our Awesome Authors
We believe a big part of the experience here is the accessibility to our authors and writers. These guys do amazing work and they thrive off of you guys and your feedback. So we’ve added a few things in order to give our writers more real estate on the site and more ways for you to get to know them better:
- Better author profiles, which you can access by clicking the name of the writer. Here, check out Vanessa’s profile as an example!
- A short bio of the author follows every article
- Authors are designated differently in the comment section of their articles by a teal circle around their photo
You Should Go
We get a lot of requests to talk about, announce, or feature events and it became clear to us that we needed to offer an event-only space where we can recommend events that y’all should go to. This space is that box you see in the sidebar called “You Should Go”.

Let Us Know When You Like an Article
Let’s say hypothetically that you read an article on Autostraddle and you really like it and you want to let us know that you like it? Well, now we have a button for that! (But as always, it’s your comments that really mean the most to us)
Click that thumbs up button if you like the article, and we can get a much better picture of what you guys like without having to solely rely on comments. It’s another way for us to connect with you on content so we can continue to create shit you like!
WTF is That Star in My Nav Bar?
That star you see up in that teal bar at the top of your screen is where we keep all the stuff specific to the Autostraddle universe!
This includes links to: our social media outlets, information about us, the meet the team page, our brand new fancy event site, and well, you get the idea.
We’ll also be adding a “Feature Article” section post-launch.
We know that redesigns can be hard to get used to at first, but we really think you’re gonna like this. We’ll eventually be going to sleep, of course, as we are wont to do, but will be around tomorrow to chat with you about the new site in the comments!

