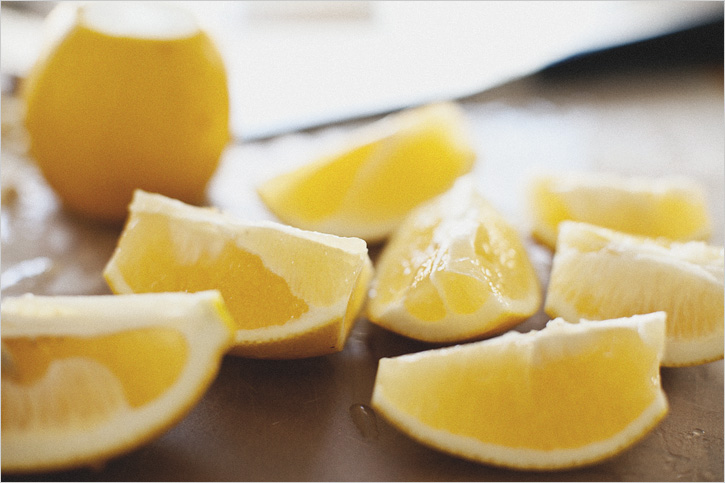
Homosteading: Preserve Lemons, Impress the Hell Out of Everyone
Feature image via s3.media.squarespace.com
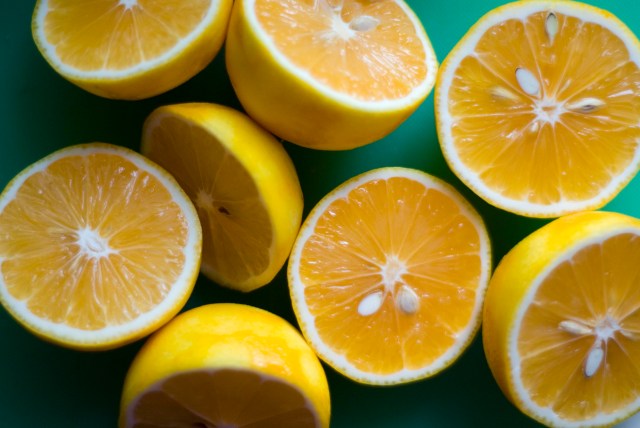
Got boatloads of lemons? Turn them into boatloads of respect.
Citrus is abundant if you live in California (or, you know, just happen to be living in parts of the world where globalism brings non-seasonal produce to your grocery store at every time of year). Fabulous to eat plain and whole, lemons are more commonly used to add brightness to food, cut salt and fat in a dish, and freshen a drink. But as winter marches on, and the weather outside becomes inhospitable for lemon trees, it’s time to start thinking about putting things up, if you haven’t already.
Preserved lemons are a wonderful way to keep citrus in your cupboard year round, and the rinds become soft and subtle in flavor when allowed to soak in their own brine for four weeks. The recipes that use them call for the rind exclusively, which allows you to create a self-preserving brine out of the juice and pulp of the lemon. Just add salt!
You will need:
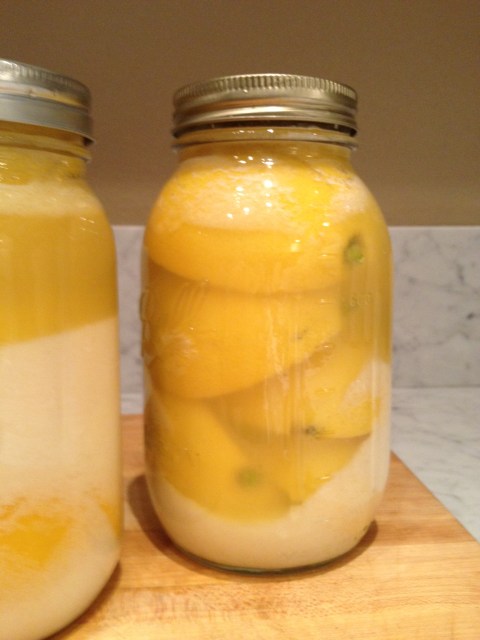
- One 32oz mason jar, or two 16oz, sterilized and ready for canning
- 10 organic lemons, preferably Meyer
- Tons of sea salt
- Fresh herbs (optional)
Directions:
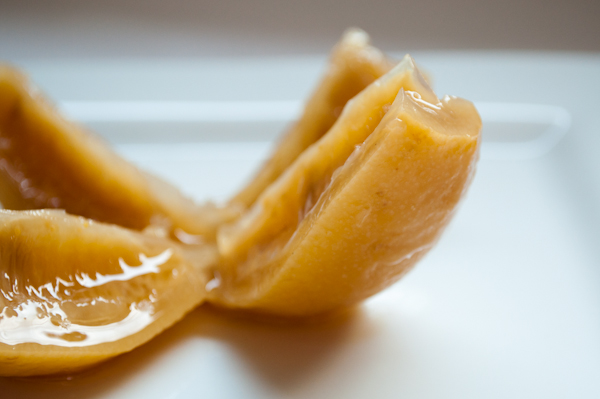
Slice freshly washed lemons into quarters, making sure to cut off the little nubs on the ends. Pat a teaspoon of salt into each lemon quarter and smash into the bottom of the sterilized jar(s), so that the juice of the lemons is covering the rinds. Continue with each lemon quarter until the jar is full. If the juice doesn’t completely cover the rinds, you may add distilled (or boiled and cooled) water until it is completely covered. Add two tablespoons of salt to the mixture, cover with lid, and shake. Let the lemons sit in the jars for one month before using. You may keep them opened in the fridge for up to thirty days, or unopened on the shelf for up to two years.
Curious about what to use your new lemons in? Answer: everything! Remember to use the peels, not the pulp, and to lightly rinse your lemons before use! Here are some great, tried and true recipes from The Huffington Post, but my favorite ever is Chicken With Olives and Preserved Lemons, made in a tagine. I’m also partial to preserved lemon cocktails, which can easily be made into mocktails, or adding a little preserved lemon to your hot tea, kombucha, or toddies! Remember, the lemon brine and preserve will be more salty than bitter/acidic, so anything that pairs well with salt could be a great addition to a cocktail or dish! Happy cooking!
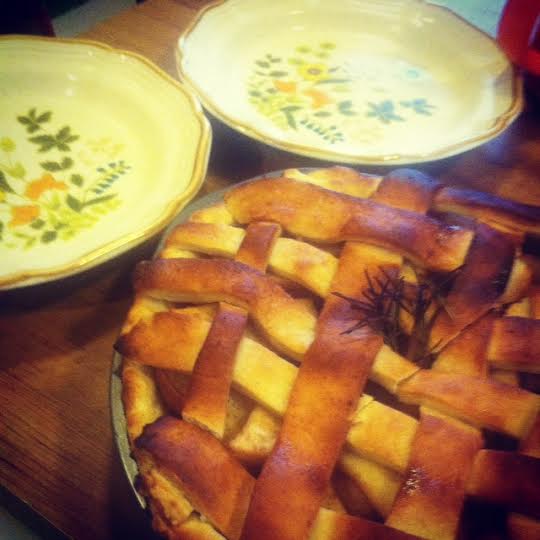
Get Baked: Rosemary Apple Pie With Sourdough Crust
Feature image via jamesandeverett.com
You remember how I wrote an article recently about how to grow your own sourdough starter? In that article, I promised you the recipe for a sweet-savory rosemary apple pie. Fall is here, and it’s baking season! If you’ve been growing your starter since that post, it should be thick, bubbly, and extremely sour. If not, go ahead and read through the above article to make your own (it’s ready to use after about a week!) or ask a friend for some of theirs!
For the crust, you will need:
- 1 cup sourdough starter
- 2 cups all-purpose flour
- 1 teaspoon sea salt
- 1 ½ cups butter (or half butter, have lard if lard is your jam)
- 2 tablespoons butter, melted
Directions:
1) In a mixer (or using a hand-held), mix together the flour, salt, and sugar in a bowl on low. Cut in the butter or lard using a pastry knife or paddle until the dough looks crumbly, with pea-sized lumps in it.
2) With the mixer still on low, gradually pour in the sourdough starter, until the dough begins to come together.
3) Turn the mixer off and cover the dough bowl with plastic wrap, letting rise in a warm place for 7 hours.
4) After the dough has risen, remove the dough from the bowl and allow to chill in the freezer for upwards of ten minutes. This will harden the fat and create a flakey crust.
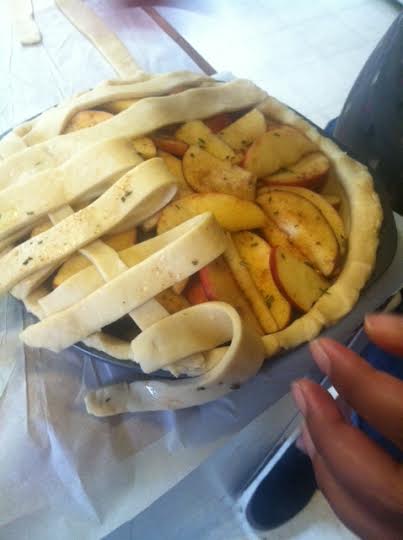
5) Roll out dough on a lightly floured surface using a rolling pin (when I created this, I used a beer bottle since I didn’t have a pin but since then my dad gifted me a gorgeous marble pin for my birthday!). Brush with melted butter and drape over pie pan, cutting the edges with a pastry cutter. Save scraps to make a lattice top crust or discard!
For the filling, you will need:
- 1/3 cup brown sugar
- ¼ cup all-purpose flour
- ½ teaspoon ground cinnamon
- ¼ teaspoon nutmeg
- two 2″ springs of fresh rosemary (or 2 tablespoons dried)
- 1/8 teaspoon salt
- 8 cups thinly sliced, peeled tart apples (I used pink ladies)
- 2 tablespoons butter
Directions:
1) Preheat over to 425 F.

2) In a large bowl, mix together apples, sugar, spices, rosemary, flour, and salt. Mix until apples are thoroughly coated, and spoon filling into pastry-lined pie pan. Cut butter into small pieces, dotting the apple filling. If making a lattice crust, follow these instructions.
3) Cover pie edges with tin foil to keep from burning, and bake for 40-50 minutes, checking every twenty. Remove foil for the last ten minutes of baking. Allow pie to cool for fifteen minutes, and then serve or keep in fridge for up to four days.
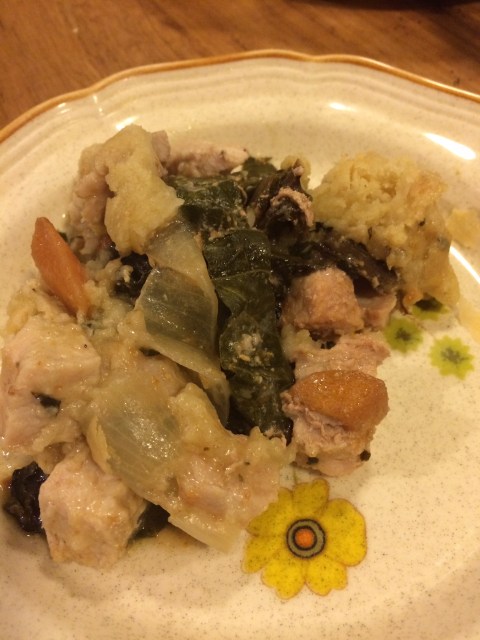
Get Baked: Pork, Collard Green, and Persimmon Pot Pie
Is anyone else getting a metric ton of persimmons? Sure, they’re beautiful, but how many display bowls can you have around your house before you start to feel bad for using the fruit merely as ornamentation?
Growing up, I never really liked persimmons. They reminded me, botanically and texturally, of tomatoes, and I hate tomatoes (sorry!). It’s true that, like tomatoes, persimmons are not widely considered to be berries, but in terms of botanical morphology, it is a berry! This Autumn, I’ve been blessed enough to be gifted with bagfuls of persimmons (mostly the squat, pumpkin-shaped ones), and have been reaching out to my friend and family network to see what to do with them.
So what do we know about the flavor palate of the persimmon? When ripe, they are extremely sweet, which means they could pair well with something salty (mild cheese, tuna), acidic (kombucha-dressed salad with fennel and pears), and fatty (avocados in a smoothie/dressing, or pork). Since I’m a fan of potpies when it turns cold out, I decided to experiment with a recipe a friend sent to me, and make a persimmon pork pot pie with collard greens. It was time consuming, even when using store-bought dough, but absolutely worth it (and following these instructions should yield two pies — perfect for now, for sharing, and for freezing). The original recipe is from Peanut Butter & Peppers, but I added pineapple sage, collard greens, fennel seeds, more pork, and made it into two pies.

Ingredients:
- 2.3 lbs pork roast (loin works super well!)
- 7 persimmons (I used a combination of super ripe, soft fruit and harder fruit), peeled and sliced
- 1 medium onion, cut into chuncks
- Olive oil (for drizzling on pork
- 2 tablespoons chopped, fresh pineapple sage
- 1 teaspoon salt
- 1 teaspoon pepper
- 1 teaspoon fresh fennel/dried seeds
- 1 cup chicken stock (or white wine)
- 2 teaspoons cornstarch (for thickening the gravy)
- 1 bundle collard greens, chopped (can substitute kale or chard, but collards really hold up well in this stew-like recipe)

To do:
1. Preheat oven to 350.
2. In a baking dish, place the pork loin on a bed of chopped onions, persimmons, and greens, covering pork with sage, olive oil drizzle, salt and pepper.
3. Roast for 1 hour 40 minutes, or until pork temperature reaches 165 degrees F.
4. Meanwhile, roll out store-bought crusts (I used Trader Joe’s brand, though you’re free to use your own favorite, or make your own, as long as you make enough to cover the pie, too!). Line two pie tins with dough in preparation for the filling.
5. When pork is cooked through, remove pan from oven and cut the roast into chunks. Raise oven temperature to 400 F.
6. Go ahead and start the gravy, by adding chicken stock or white wine to a medium sauce pan and whisking in cornstarch. Slowly add fennel, whisking quickly until mixture is thick and bubbly (about 7 minutes).
7. Divide the roasted greens, meat, and onions into the separately prepared pie tins, drizzling with equal amounts of gravy. Cover with top crusts and slice little holes in the crust to allow steam to rise. Brush on a mixture of beaten egg yolk for crispiness (option), and bake for 35 minutes, or until crust is done.
8. Remove pies from oven and allow to cool for twenty minutes. Serve immediately, store in airtight containers for up to ten days, or freeze for up to six months.
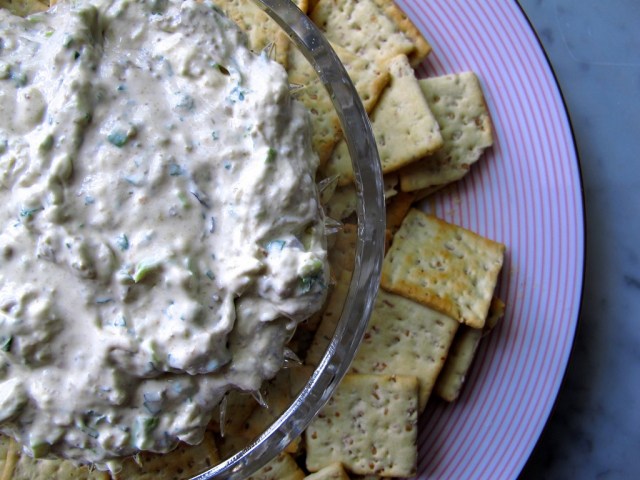
Let’s Get This Party Started: Fancy Smoked Oyster Dip
Feature image via peaceandloveinthekitchen.com
The holidays are approaching, and all of us are feeling the financial crunch; a year is coming to a close, which means (unpaid) holiday break for many of you, and slow work for those of us who freelance. For me, the end of the year means prepping myself for tax season, buying/making presents, and increasing my therapy sessions—all of which add up, leaving me few funds to entertain with.
Luckily for me (and for you!), I’m a resourceful sort. Are you dreaming of throwing a big-budget party on a teacher’s salary? Fantasizing about Gatsby’s glitz while pocketing that non-profit paycheck? Working the seasonal grind just to get discounts? Never fear! Fancy redemption is possible, and it comes in a little, inexpensive can.
Behold: canned smoked oysters. Ever had them? They are fantastic. They taste amazing in a sandwich, with crackers, in salad, paired with fruit, and, best of all, in a dip to share with all your friends.
You will need:
- 1 (3.75 oz) can smoked oysters (Trader Joe’s and Whole Foods have sustainably-caught options!)
- 3 oz yogurt cheese (from this recipe here), or 3 oz of cream cheese if you don’t have time to make your own!
- 1 pinch lemon pepper
- 1 teaspoon hot sauce (you can substitute Worcestershire sauce if you don’t like it spicy, but only if you can pronounce it)
To do:
The day before the party, mash up oysters in a medium bowl and add cheese, sauce, and lemon pepper. Allow to chill for 24 hours for the most flavor. This dip can be served with water crackers, gluten-free rice thins, or pumpkernickel toasts, if you’re feeling particularly fancy! Enjoy!
Grow Your Own Sourdough Starter, Get Prepared to Bake Delicious Fall Treats
Feature Image via wikimedia.org
I love Fall, y’all. It’s a season of pumpkin-flavored everything (candy corn, too, but I’m just going to pretend that’s not actually a thing), long scarves, crisp air, boots with tights, and power-lipsticks (my favorite is MAC’s Lady Danger, which is a particularly bitchy shade of orange). The day of the Equinox, my roommates and I set about cooking up a storm, including hen stew with figs, and a particularly incredible rosemary-cardamom apple pie with homemade sourdough crust and homemade vanilla whipped cream. I took tons of pictures for all of you, knowing you’d share in the joy of autumn apples, but then it struck me that we haven’t yet talked about how to make your own sourdough starter! So, baby steps.
Most folks traditionally have starters passed down to them, like kombucha starters. Boudin, the famous San Francisco sourdough company, has used the same sourdough starter since the dawn of time, which accounts for the delicious, buttery sour taste of their bread products. However, if you don’t have homo-steading pals like me around (but seriously, if you like in Oakland, I will totally give you some sourdough starter. And kombucha. And probably some homemade butter. Maybe some cheese. Just come over, ok???), then you can make your own with a few ingredients and a little patience.
You will need:
- Flour (you can use rye, whole wheat, or all-purpose depending on your tastes)
- Water
- Glass jar or bowl
- Kitchen towel
- Non-metal spoon or stirring implement
- Temperate place for storing, such as the top of the fridge
Directions:
Combine 1 cup flour with ½ cup water in the glass bowl or jar of your choice. Make sure the mixture is as smooth and well mixed as possible. Cover the top lightly with the kitchen towel and set on top of your fridge where it won’t be disturbed. Allow to ferment for 24 hours. Repeat this process for five days, adding flour and water every day, until the dough smells and tastes sour.

After Day Five:
Continue to add flour and water to the starter, but decrease the frequency to three times a week. Make sure to use your sourdough regularly (pancake and crumpet recipes coming soon!), always leaving at least one cup of starter to continue the batch. (Starter can also be stored in the fridge and fed once a week if you need to use it a little less frequently or are going out of town.)
Note: Your starter should never ever grow mold! If it is dry and covered in fur, throw it out and start again. If it is too watery (and the water has a grayish sheen), just pour out the water, add a tablespoon of flour, and stir together.
Voila! You’re ready for fall!
The Casual Monger: Lemon-Thyme Cheese for the Intermediate Monger
Feature image via 4.bp.blogspot.com
One of the first Homosteading articles I wrote introduced the concept of making the world’s most basic and delicious yogurt cheese using minimal ingredients. In the spirit of mongering on the cheap, I wanted this week’s post to provide a slight challenge to the economic dairy enthusiast, and broach next-level cheese with gusto. Behold! A delicious cheese that introduces the use of acids (vinegar and rennet) without all of the complications of full-fledged mongering.
You will need:
- 4 cups whole milk
- 4 cups buttermilk (tutorial coming soon on how to make your own, but for now, use what works for you an your food politics!)
- 1 tablespoon sea or cheese salt
- Three drops rennet (animal or vegetable is fine)
- 1 teaspoon distilled white vinegar
- 2 tablespoons fresh lemon thyme (you can use any herb here, but lemon thyme really brings out the acidity of the cheese)
Directions:
Bring the buttermilk, rennet, vinegar, milk, and herbs to a slow simmer in a stockpot, stirring frequently to avoid scorching. This process, which is called curdling the milk, is what separates the curds from the whey, and how the majority of cheeses are made.
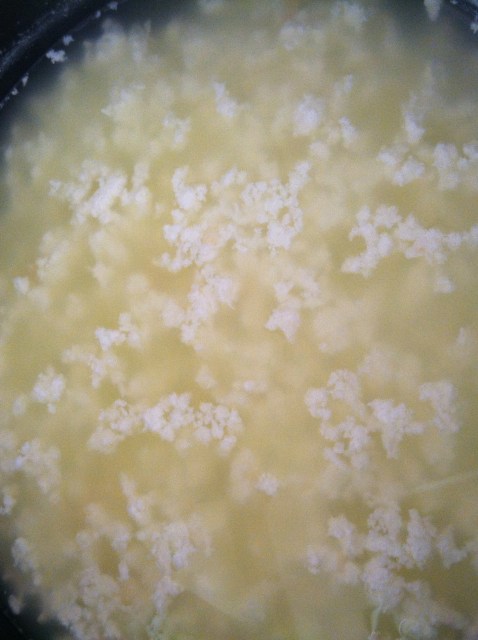
Allow the milk and acid to separate, keeping an eye on the pot to gauge when you think all of the curds have formed. The process is fairly quick, only several minutes at most. When the curds have separated from the whey, drain mixture over a large bowl using a colander and double-folded cheesecloth.
Using the cheesecloth, wrap curds into a ball, squeezing as much liquid as possible out of the mixture. Allow to drain for four hours.
After all the whey has drained into the bowl, unwrap the cheese and blend or stir in the salt. Shape into a ball or log (like goat cheese), and allow to chill in the refrigerate for 12 hours before eating.
This cheese has the consistency of firmer ricotta, and a similarly mild taste. It can be served on toast, salad, pizza, or whatever fashion you deem appropriate, and will keep in the fridge for up to ten days.
Pro tip: due to my avid cheese making, I’m typically confronted with an enormous amount of leftover whey and no clue what to do with it. A pal recently sent me this awesome article and now I can’t wait to generate boatloads of whey to try these all out!
Let me know how this goes for you, or if you have any other creative uses for whey in the comments!
5 DIY Wellness Recipes for Your Next Sick Day
Feature Image via usesofherbs.com
I’m writing to you from bed. I’d planned on my third Homosteading piece to be about veggie gardens, or creating your own compost pile, but I’ve been unable to make it outside much this week. Somehow, in between training for a new job, planting kale and amaranth for my winter garden, and wrapping up the final touches on a recent project, I managed to catch myself an extremely unpleasant strain of strep throat.
As someone who has worked in healthcare in a peripheral and community-based sense for awhile now, I’m more than familiar with the go-to staples of a well-stocked first-aid closet. Though I’m more accustomed to making care packages for others than for myself, there are a few well-loved items that easy enough to make that I keep them in ready supply in my arsenal, ready to break out at any sign of bodily misery. When I can, I make or grow the ingredients myself, and when I can’t, I use local sources (or trade/forage for them amongst my community). Sustainability in medicine-making is important to me, and I believe it contributes to the health of the people I’m making remedies for.
1. Home-brewed Ginger Ale

Via thebruncher.com
This is my signature sick-move. The recipe was first taken from Rebecca Katz’ The Cancer Fighting Kitchen, but it’s been modified so dramatically it’s not the same recipe anymore. Ginger calms both the stomach and the throat, making it a good home remedy for a variety of illnesses, and cinnamon stabilizes blood sugar, which can help with fatigue. Plus, it’s so delicious, you’ll wonder why you ever drank store-bought ginger ale in the first place.
Still utilizing the basic concept for creating any kind of root-based syrup, this recipe asks you to create a slow-simmering ginger concentration, that is then mixed with sparkling water and your choice of sweetener (optional).
You will need:
- 1 branch fresh ginger (about six inches long)
- 1 tablespoon whole cardamom pods
- 1 cinnamon stick
- 1 tablespoon whole cloves
- 5 whole peppercorns (optional)
- The juice of one half of a lemon
- Your choice of sweetener (I use honey, but you’re free to use whatever you like and adjust to taste)
- Sparkling water (unflavored)
Directions:
Slice ginger into one-inch thick slices. Add ginger and spices to a stock pot, and cover with six cups of water. Bring mixture to a slow boil, then lower heat to a simmer and allow to reduce until the water just covers the ingredients. Strain and allow to cool.
When mixing in the carbonation, I usually make single-servings so that I can let folks determine how gingery they’d like their ale to be. A good rule of thumb (barring taste) is ¼ ginger syrup to ¾ sparkling water, plus sweetener to taste.
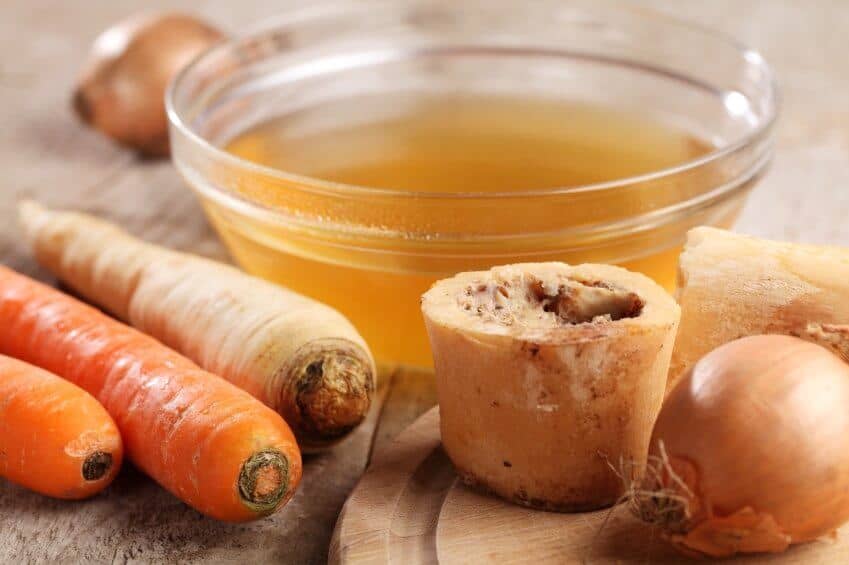
2. Magic Get Well Bone Broth

Via draxe.com
I believe in always having two things in my kitchen at all times: popcorn (it’s one of my favorite snacks) and broth. Popcorn can make you look like an unintentionally amazing host (“Wow, that’s exactly what I wanted while we watch Veronica Mars and talk about our terrible Ok Cupid experiences!”), and broth can add nutrient-rich flavor to teas, grains, and sauces with minimal effort of your part. Every week, I check out the contents of my crisper to see what vegetables (and sometimes fruit) I have left over to make stock. My roommate (who is a budding personal chef) suggested that we celebrate our shared love of stock by starting a scraps dish in the fridge for all our meat/bone cuttings, scrap vegetables, and herbs.
But my absolute favorite is bone broth. I get my bones (and all my meat) from Tara Firma Farms, which offers grass-fed and pasture-raised meat — essential for sustainability and also for the maximum absorption of nutrients. When we eat animals who have eaten well and been treated well, we are also eating the nutrients they absorbed. Bones are a particularly nutrient-rich part of the body, and the high collagen content of bone broth makes it excellent for boosting the immune system, and adding a healthy dose of phosphorus, calcium, and magnesium to the diet. Bones also have the excellent bonus of being inexpensive and easy to come by.
The recipe for making bone broth is simple, and a good rule of thumb is to use two pounds of bones for each gallon of water.
You will need:
- 2 lbs beef bones
- 1 gallon water
- 3 dried lemons (lemon juice works here if you can’t find dried)
- 3 cloves garlic
Bring ingredients to a boil in a stock pot, then lower heat and allow to simmer for one hour. Strain and deliver to all your sick buds, or store away and freeze for up to six months.
3. Aloe Green Tea
Via cdn.shopify.com
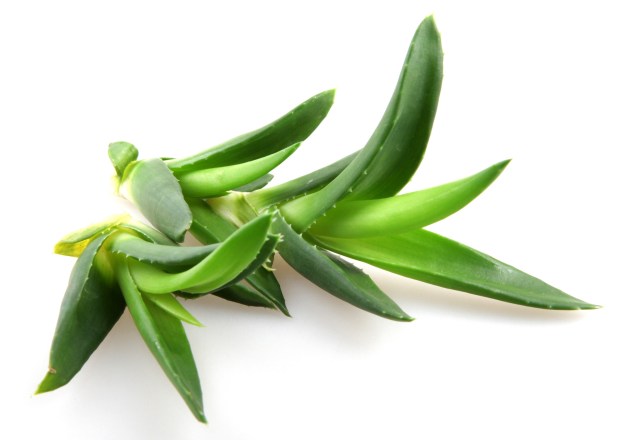
My friend R showed me this trick during this current bout of strep throat. I was over the moon, not only because the aloe tea did wonders for me, but also because there are forty million aloe plants in my front and back yard, and I was running out of ideas of what to do with them. Aloe soothes and coats the throat, and also cleanses out your system (so proceed with caution if you’re a person with a sensitive stomach). This one is definitely for flu and cold-type illnesses, and not those with a stomach bug!
You will need:
- 1 two-inch cutting of aloe
- 3 cups water
Slice the aloe down the middle and squeeze out the gushy insides. You can use this part as a hair conditioner, face wash, burn ointment, etc, but not for this tea! Set aide. Place the rest of the aloe in a small saucepan with the water and simmer for ten minutes. Allow to cool. Discard the aloe and drink the tea, or deliver it fresh to a pal in need. Voila!
4. Herbal Sachet

Before making this section, check to see that you/your friend in question isn’t allergic or sensitive to any scents or herbs you might be using. Some folks are extremely affected by scents and smelling them could trigger up headaches, pain, or discomfort, which we definitely want to avoid!
The herbs here can be used in a bath, if the person who is ill isn’t running a fever. If they are, it can be placed on their pillow next to them, to help relieve congestion, headache, and/or just to soothe them. Everyone needs a little extra comfort when they’re sick!
You will need:
- Dried roses and/or rose water
- Eucalyptus leaves/oil
- Chamomile flowers
- Bougainvillea flowers (if they grow near you)
- Lavender flowers and stems
The roses, lavender, and chamomile create a soothing smell, the eucalyptus helps to break up congestion in the nasal passages and lungs, and bougainvillea is known to be an emotional-wellness flower, and aids in grief, distress, and mental exhaustion.
How to steam:
Using a mesh tea ball or piece of nylon (I sometimes cut the feet off of stockings I don’t use and wash them thoroughly), steam or steep herbs in hot water (not boiling!) for fifteen minutes. Then, create a steam tent for yourself using a towel and a bowl of herb water, steaming your nasal passages, lungs, and pores for as long as you can stand (no longer than 20 minutes).
Combine the above herbs in a cloth or paper bag with instructions, and you’re good to go!
5. Capsaicin Muscle Balm

This last DIY care-component is for those who have undergone injury, or are just achy and sore from being bedridden. It’s important to note that this balm contains hot peppers, so proceed with caution! Don’t go touching your eyes or other sensitive areas after dealing with capsaicin. You may choose to wear gloves while mixing this balm, just to be safe.
You will need:
- 2 tablespoons cayenne powder
- 2 teaspoons ginger powder
- ½ cup coconut oil
Place cayenne, ginger, and coconut oil in a saucepan and gently heat until oil is melted. Be sure to make sure the mixture doesn’t scorch or boil, since inhaling the hot cayenne could cause you to cough! Once the oil is melted, remove from heat and allow to sit for a half hour. Do this two more times, then pour mixture into an airtight jar, seal, and allow to infuse for at least 24 hours before using. If you aren’t a fan of the oily texture of this balm, you may whip the concoction with 1 teaspoon arrowroot powder, or 1 teaspoon (non-GMO) cornstarch, or ¼ cups cocoa butter. Rub into any parts of the body that are experiencing soreness, avoiding sensitive areas and mucous membranes (like eyes, nose and mouth).
Enjoy, and feel better! Remember, caring for your community is caring for yourself, and making your own medicine allows you to know exactly what’s going into your body. Feel free to share your own remedies and modifications in the comments — I’m always looking to change up my first aid arsenal!
Our Streets, Our Selves: Tips for Post-Harassment Self-Care
Feature Image via Shutterstock
Street harassment is no new thing, but it has been in the spotlight, following Doree Lewark‘s controversial piece in the NY Post. We recognize that it is ridiculous and potentially dangerous to make statements such as ‘catcalling is awesome and so flattering!’ for all folks who get harassed, so let’s take a moment to focus instead on how to practice self-care after street hollering.
Unfortunately, the micro-aggression of street harassment takes a different kind of detox than, say, free radicals. The repetitive trauma of being out in the world as a person who isn’t considered to be an actual person (i.e.: women, people of color, queers, folks with disabilities, poor folks, fat folks, etc.) works its way into muscles (tense shoulders, stiffened backs, tightened jaws) and patterns of being (taking different routes home, constantly checking surroundings, etc). Studies have linked the trauma of walking around in the world as a sexualized body to that of combat PTSD faced by soldiers returning from action. Flawed though it may be, the United States has a system for aiding those in the military who suffer from PTSD, but currently has no institutional strata for sufferers of sexualized violence, which street harassment falls under. Fighting back isn’t always a safe option, nor an option for everyone, so the often radical-seeming idea of self-care is what is currently available to us.
I get street harassed on a daily basis, partly due to the area of Oakland I reside in (which sees a lot of transience, racial tension, gentrification, and general street activity, since I live pretty near the urban epicenter of the city), and partly due to the overt sexualization of femininity. When I was particularly devastatingly street harassed yesterday while walking home from a coffee date with a friend, I reached out to my community to help create this gentle guide.
1. Reconnect with your body

Because repetitive micro-trauma often takes you out of your body (through disassociation or escapism), it’s important to reconnect with yourself. After getting yourself to a safe place (the nearest store, your home, a friend’s house, your car, etc), take a moment to ground yourself. This could be by using somatic techniques (such as cradling your body in a hug), putting your hands on the surface of something in order to concentrate on what it feels like, taking deep breaths, humming from your belly — whatever trick you have for bringing yourself back to yourself is key.
2. Reach out for support
Because harassment sometimes feels like a public private thing that happened to you, it’s important to find someone or something that can hold space and bear witness to you. Having a friend come scoop you from your location (if you’re far from home) and sit with you and mirror back to you how valid your fears are helps to dissipate the trauma; you are, after all, not alone in this. If you feel like what you really need is alone time, reach out for support virtually, or through the phone. You can even find support in your favorite book of poems, passages from dog eared fiction, your tarot deck, your dog, or a podcast you love.
3. Physical touch from others, if you want it
It’s a radical act of self-care to have control over when and how you get touched. Practice regaining your sense of autonomy by asking someone you trust and care about to hold you a certain way, or rub your shoulders, just the way you like. If sex is something you feel up to, it can be a powerful way to reconnect with yourself in ways that change the cellular trauma of what happened to you.
4. Carve a space for yourself

If you have the luxury of a little free time, lay on your bed (or in a room that feels comforting to you) and stare at the ceiling. Put on Mariah Carey. Allow your job to be only feeling yourself breathe.
5. Get dressed up, however that applies to you
It’s important to remember that nothing you did caused your harassment. You are worthy of walking around in a world that loves and appreciates you in ways you want to be loved and appreciated. Nothing you could have done, changed, or predicted would have stopped this from happening to you, and to the millions of others who experience it on the daily. Your miniskirt is not a crime. Your fat/disabled/masculine/brown/black/genderqueer/femme/pierced body is divine, and you’re still the fantastic magical creature you were this morning.
No Tampons, No Diva Cup, No Problem: Two Earth-Friendly Tampon Alternatives
In a society that (largely) doesn’t talk about menstruation (and when it does talk about menstruation, it is often rife with body shaming/misogyny/the bullshit notion that bleeding makes you dirty, etc), it can feel radical when there are not only conversations about how to deal with bleeding and all of its complications, but when we are also provided with alternatives to the often toxic products made available to us. Tampons and disposable pads can be full of illness-causing chemicals, as well as impossible to dispose of responsibly, and can take a toll on your finances. Behold! A list of alternative menstrual products that promote health, chemical-free lifestyles, sustainability, local economies, and the wellbeing of your pocketbook — and we’re moving beyond Diva Cups (sorry, Diva Cup fans!).
Menstrual Sponges
Menstrual sponges are the absolute shit. I was converted to using them almost a year ago, when my pal Ash Fisher (who is a badass comedian, as well as femme extraordinare introduced me to Holy Sponge, an Oakland-based, queer-owned company that sells sustainably harvested sponges in a variety of sizes. I reached out to founder Janeen Singer to ask her to talk to me about her process, mission, and why she loves sponges so much.
“Sea sponges are the only menstrual product for insertion that is 100% natural. They come from the ocean and return the earth (they can be composted!). My main motivation in beginning to use them myself was how incredibly friendly they are to our planet. Obscene amounts of tampons, pads and packaging end up in the ocean and ironically, there is this beautiful resource in the very ocean we are trashing — a resource that does not have toxic cancer-causing ingredients like dioxins, furans, pesticides, and who-knows-what-else.”
Janeen and the fine folks at Holy Sponge are also committed to consumer-accountability and sustainable business practices. “If you are in a position where you are unable to pay full price for a kit, contact us and we can discuss possible solutions or a trade. If you are buying tampons, the kit and eventual refill sets will end up saving you money in the long run. One thing that is important to note is that our sponges come from a company in Florida that harvests the sponges in a sustainable way, under Florida laws. You may pay a bit more for our sponges (vs. craft supply sponges shipped from overseas with no labels or accountability) but your heart, mind, and body can be at ease knowing there are ethics to all parts of our process.”
The sponges feel pretty great, especially for those of us who experience wicked cramps — filling the sponges with warm water before insertion acts as an anti-spasmodic, almost like having a mini heating pad inside you. The only downside to these magical sea creatures? “The very thing that makes sponges so comfortable (the way they mold to the inside of a person’s body) also presents a side that can make them challenging — like sneezing and feeling your sponge contract with your body! We recommend using a thin re-useable pad alongside the sponge to catch any leaks that accompany belly laughs or sneezes,” Janeen writes.
The kits run around $20 for a new kit, and $14 for refills. They include two sponges, a muslin carrying bag, a sprig of sage (because Holy Sponge promotes the idea of menstruation as ritual), and a vial of tea tree oil for cleaning.
Cloth Pads
For those of you who can’t get behind insertion, there are some great alternatives to disposable pads! Gladrags and Amazpads all have a variety of colors, size, and fabrics to choose from, which helps make your red less monochromatic. However, my two favorite methods of procuring quality, fashionable cloth pads are to purchase them off Etsy, which allows you to support menstruation artists everywhere, and to make my own. You know you’ve got a bunch of old flannels lying around — utilize the cuffs to make super-gay plaid pads that have fancy snaps to fit around your underwear! Did your ex leave her favorite shirt at your house? Bleed all over that shit! Have leftover clothes from your last clothing swap? BOOM, FREE PADS! The possibilities are endless.
Cloth pads last about two years, especially if you aren’t picky about residual stains, and are easy to clean. Most companies recommend soaking them immediately after use, and then throwing them in the washer with a little vinegar or baking soda. They can then be line-dried or put in the dryer with your other clothing. Be mindful, of course, if you are using cotton that could shrink, and plan your pattern to allow for a change in size. Cloth pads can range from $10-100, depending on the materials used, sizing needed, and company you purchase them from.
The only downside to cloth pads? They can be bulkier-feeling than their disposable cousins, and you need to carry them around with you while you’re out in public or traveling (which can definitely lead to some hilarious situations, as I’ve experienced!).
As Janeen of Holy Sponge says, there is something radical and transformative about connecting with your body and the way it bleeds every month: “It stands in stark contrast to decades of menstrual product marketing which promises to make a the monthly flow “invisible,” pure white, like no one would never even know they were bleeding in the first place. Many people have a strong reaction to the idea of having to come in such direct contact with their vaginas and blood, and I think this is just a symptom of a larger social disease of disconnection from life’s processes. Life is not permanent and here inside of a the body is the possibility every month for new life. When new life is not created, the body sheds and re-creates itself anew. The life-death-life cycle is within us, but we live in a culture in denial of the death aspect, therefore we deny a natural letting-go.”
The Casual Monger: How to Make Simple Herbed Yogurt Cheese
It’s no secret amongst my friend group that I have an obsessive personality. I get fixated on a particular subject, and I have to know all about it. In my curiosity’s history, this has included tree house construction and theory, urban gardening, the Donner Party, literacy rates during the Great War, prostitution rings in pioneer United States, Virginia Woolf’s letters, urban foraging, tapping trees for maple syrup, and on and on. When I lived (for a very short time) in Utah a few years ago, I was determined to ‘figure out local culture,’ which seemed to me at the time to include canning, picking apples, and figuring out how to garden with seasons (as frost times and snow aren’t really a thing where I grew up in California). Essentially, my move to salt Lake City launched me into the biggest homesteading obsession known to man. I tortured my girlfriend at the time by devouring books and books on developing cold cellars, making a composting toilet, sewing our own everything, pickling everything known to man — I could barely hold a conversation with someone that didn’t involve testing soil pH, or figuring out how to make your own sourdough starter.
The biggest obsession of all proved to be one of the more expensive hobbies: making my own cheese. I spent months reading cheese books and websites before taking the plunge to purchase equipment, because I wanted to make certain that it would be an interest that stuck. And so far, three years later, it has! And though there are varying levels and requirements for making different types of cheese, I’m happy to report that there are also really simple, inexpensive ways to make your own cheese that maximize beneficial bacteria and probiotics — you win hosting awards for having homemade cheese, and your gut wins health awards by being full of healthy flora. You’re welcome.
The recipe below is one of the first cheeses I ever made, and remains one of my favorite. The second part of the recipe can be varied using whatever herb-palette. I use a lot of rosemary in my cooking because there’s a shitload in California, growing all up in my backyard. Same with lemons. But use whatever herbs you feel comfortable with—and feel free to branch out and let me know how it goes in the comments!
Simple Herbed Yogurt Cheese

You will need:
- 4 cups plain yogurt (I use Strauss)
- Cheese cloth
- Strainer
- Large bowl
- Olive oil
- Herbs of choice
- 1 tsp salt
- 2 tbsp fresh rosemary
- 1 tbsp whole peppercorns
- 1 tbsp lemon zest
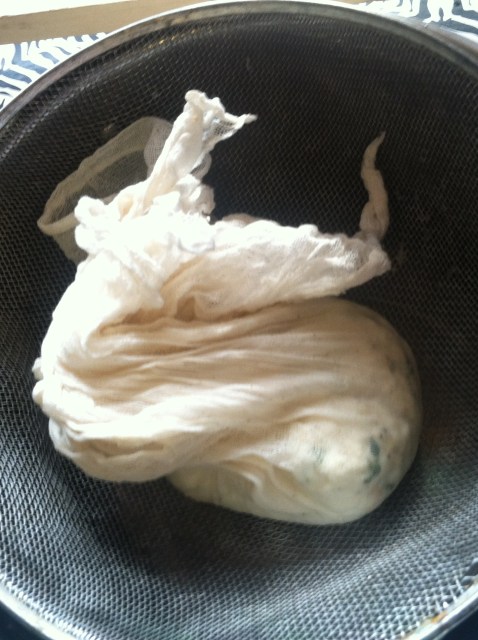
1) To begin, set the strainer on top of the large bowl. Cover the strainer with one layer of cheesecloth, making sure you have enough to double back over your cheese.

2) Pour yogurt directly onto the cheesecloth, making sure all the whey from the yogurt can drain into the large bowl.

3) Cover yogurt with cheesecloth and allow to sit at room temperature for 24-48 hours, depending on how tart you would like your cheese to be. Allowing it to set at room temperature allows the good bacteria and probiotics in the yogurt to multiply, as well as helps to thicken it.
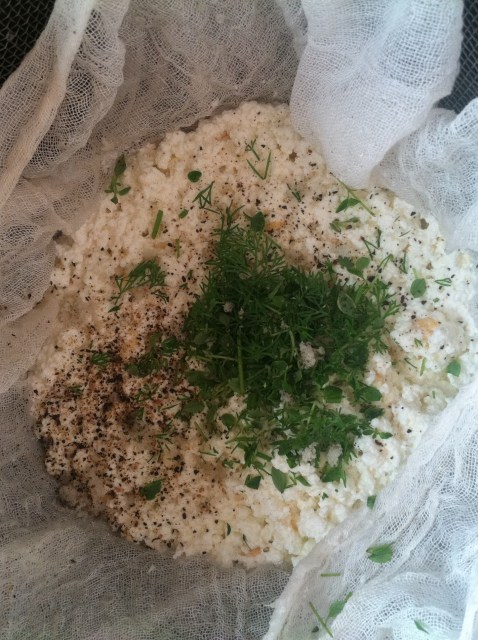
4) After 24-48 hours passes, check on the cheese, which will have thickened to a mozzarella-consistency. Carefully drop the cheese into a mixing bowl, combining with the salt, and whip until creamy.
5) Scooping the cheese out of the bowl, make small balls of it with your palms and put them in a jar or Tupperware. Cover with zest, rosemary, and peppercorns (or your herbs of choice.
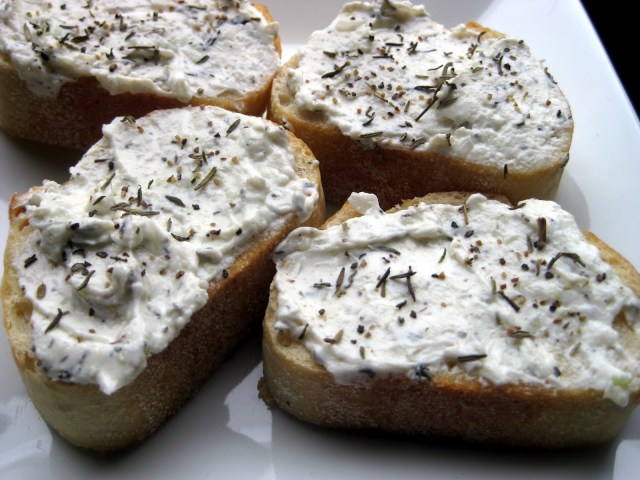
6) Pour in enough olive oil to submerge the cheese and herbs. Cover with a lid and allow to sit in the fridge for 24 hours before serving. Fresh cheese can be kept for up to five days in the fridge, and is delicious with biscuits, bagels (makes an excellent cream cheese substitute), with fruit, or in savory dishes. Enjoy!
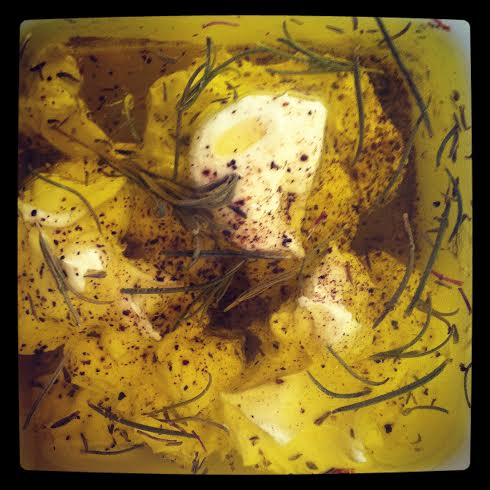
* BONUS: when your cheese is done, you can use the herbed olive oil to make garlic bread, marinate meat, or dress salads!
VIDEO: GAYmous Gives Me Seriously Not-Pretend Feelings
Self-identified electro slut-step synth band GAYmous is the best and jazziest band to ever come from a game of truth or dare. From their Facebook fan page:
Motivated by a dare and a mutual belief in the power of the synthesizer, GAYmous started emotionally scissoring with audiences in 2012 and now fans never want it to stop. Bay Area Slut Step artists, Pizza Cupcake and FXBoi, heat up the stage with their interactive theatrical shows. They have shared the stage with the likes of Nicky Click and Double Duchess. Choreo breakdowns and tiny shiny costumes complement a queer electro-pop sound that is the child of Prince and all his lovers’ bands, Gravy Train!!!, and the sound of the kinky sex your neighbors have upstairs. Their current single “(Let’s Pretend We Don’t Have) Feelings” will leave you covered in sweat and glitter and ready to process your myriad relationships.
(Let’s Pretend We Don’t Have) Feelings from GAYmous on Vimeo.
“(Let’s Pretend We Don’t Have) Feelings” has been on a loop on my computer for the past week, cheering me with its deluge of iconic queer community familiars which range from the classic Collective Tarot deck to the amazing space-kitten onesie jumpsuit thing everyone and their gay momma seems to have. It helps that the video features at least a dozen people I know, either in real life or from trolling Bay Area Tindr and OkCupid, and that Pizza Cupcake and FXBoi are super babes with mad keyboard and choreography skills. (Seriously, everyone in the video is a total dreamboat. Um, and if anyone in that video is reading this, I’m single, soooooo…) The video makes camp of the concept of faux stoicism, featuring queers crying and eating, crying and petting their dogs, crying through their glitter, and crying while using colored hankies to stop their tears (if you’re up on your hanky code, you can even view the video using the lens of codification, which serves to make the savvy queer viewer feel a bit like a homo Harriet the Spy). Though the video is light-hearted and funny, it touches on the all-too-real concept of playing cool in the dating world, especially as a community full of folks who have been socialized to believe that they are undesirable or unworthy of being wanted.
One of the most compelling messages of the song drives home criticism of playing it cool. My ex used to have a game with their friends in which they would say ‘put the phone in the drawer’ when one of them was too interested in a person they liked. For example, if I were totally obsessed with Jennifer Beals (no, I totally don’t have a 40″ poster of Flashdance on my wall, and no, Bette Porter isn’t my dream girl. Nope.), and Jennifer Beals and I started dating, I’d probably be all over my phone texting her, snapchatting all the food I make, emailing pictures of my cat, or sending her audio recordings of poems, because I would totally love the shit out of her and I’d want her to know all of my FEELINGS. But with the rules of the Play It Cool Game (or the theory of my ex and their friends), I would have a good friend who would say, “July, put the phone in the drawer.” Which means, essentially, “Show some feelings, but not like, ALL of them.”
But Feelings are valid, and GAYmous knows that. I know experiences of community, coming out, safety, and relationships are super varied and different for everyone, but “(Let’s Pretend We Don’t Have) Feelings” celebrates the tenderness of queerness that isn’t often visible or allowed to exist without stigma in popular culture (without the moniker of ‘lesbian processing’, or use of ableist language that marks queer feelings as ‘crazy’ or ‘insane’).
So let’s revel in this amazing new video, with this Bay Area sensation! And if you’re feeling particularly celebratory, you can preorder GAYmous’s album, and help fund them here. Even better, if you’re in the Bay(be) Area, you can see GAYmous live on September 18th, 2014 at The Stud in San Francisco (399 9th Street).
Hauntings and Banishings: Loss and Rage for a Queer Adoptee
feature image via shutterstock.com
I attended a craft lecture entitled “Mrs. Brown and Mrs. Woolf: The Marriage of Life and Art” at the University of the South in Sewanee, Tennessee. The lecture was given by Margot Livesy, a Scottish fiction writer whose six books include Banishing Verona, The House on Fortune Street, and Criminals, to name a few. While her lecture focused on braiding together the complex narratives of Woolf’s novels with Woolf’s personal life, I was most struck by her description of what she called Virginia’s “hauntings and banishings” — which refers, in part, to the sensation of writing a personal narrative out of a personal history. “Virginia Woolf,” she said from her perch at the podium, “felt a great sense of relief when she finished writing To the Lighthouse, having mourned her mother’s death from the ages of 13 to 44, and having completed a story based on what she remembered of her mother, suddenly found the hauntings of her quite inexplicably gone.” Woolf, as far as she has been portrayed after her death, struggled with mourning the death of her mother for nearly all of her short life. This is due, in large part, to her father’s insistence that the family not mourn the passing, and that they instead continue as if nothing transpired at all.
The inability to discuss and mourn her mother played a significant role in Virginia Woolf’s writing, as well as her notorious mental breakdowns and sense of self and place in the world. In a letter to a friend, Woolf described this uneasiness “as if I were exposed on a high ledge in full light. Very lonely. L (Leonard Woolf, Virginia’s husband) out to lunch.. No atmosphere around me. No words. Very apprehensive. As if something cold & horrible – a roar of laughter at my expense were about to happen. And I am powerless to ward it off: I have no protection.” (Lee, pg. 187) In Mrs. Dalloway, Clarissa “always had the feeling that it was very, very dangerous to live even one day.”
Listen. Despite the fact that I have been at this creative writing conference in a kind of strange time warp for the last ten plus days, I am not trying to turn this into an undergraduate thesis on unease in modernist thinking/writing. However, the lecture on Virginia Woolf was also presented to me at the same time that Riese’s amazing article on loss was being circulated around (even by Cheryl Strayed! Ahh!!!). So, coupled with the nearly 25th year anniversary of my own mother’s death, I’ve had loss and belonging on the brain. Though my own story is different from the two brilliant babes I just mentioned, it got me spinning my wheels about what belonging and loss mean to a sense of identity, particularly in the queer community, where a sense of belonging and origin is so fragmented and complicated and even, for some, rooted in intense trauma depending on how/when/why/if we come out. Whether or not you are out in the world, being queer and belonging to a community of marginalized folks (even if it’s a community you only align with in a spiritual or distanced way) has its own problems with feelings of enoughness and the disenfranchisement or everyday trauma of living with an identity that is consistently questioned or belittled. To say nothing, of course, of how queerness intersects with race, class, ability, gender identity, etc.
But what about how identity interacts with having a dead parent? Woolf was a cisgendered, educated white woman who has been re-appropriated into the “queer canon” of literature, and even in the comfort of her relative privileges, the loss of her mother (and reaction of her father to that loss) was enough to un-self her for the majority of her short life. With the information, how does this show up in my own story, having two dead parents and an adoption narrative? How does queer identity make more difficult feelings of belonging, and how does it seek to repair it? On a more basic level, what resources are even available to adoptees, and is there a community to speak of where one can find themselves reflected in others who share similar stories of origin? These questions, of course, have basis in my own history. I lost both of my parents before the age of five and bounced around the Arizona state housing system until I finally moved to California to live with my maternal aunt. I was adopted by her when I was eight, in 1994.
These were also the questions that I was asking myself in 2010 when I stumbled across a blog called Bitch, You Left Me which was started in 2010 by queer writers Liz Latty* and Mariama Lockington, who saw a lack of representation and community in adoption narratives. The two connected at a reception for a literary reading that was part of the AFAAD, or Adopted and Fostered Adults of the African Diaspora Conference in Oakland, CA.
Bitch, You Left Me is “a collaborative effort between adoptees to create a space where we are ‘allowed’ to explore our rage in an environment where we will not be chastised for being ungrateful or fucked up for being really pissed off about our experiences as adoptees. We are interested in building community and healing through creative expression, transforming our fear of attachment into action, and reclaiming our authentic voices, the ones that have been silenced by the fear of losing family and home.” The name comes from the lack of representation of anger and rage in adoptee communities. “We were most troubled by our own feelings of anger and where to put them since adoptees are usually never given space or permission to explore those particular feelings. Seeing that anger reflected back to us in an adoptee-only space (the reading) that was a safe container really struck a chord with us,” Latty said of the project’s title. When I reached out to her to ask her about queer adoptee identity and the origins of BYLM, she responded with this:
“It really did feel like a new reality, an atmospheric shift. I think that adoption so often happens in forced isolation — either because of closed adoptions and old school thinking about disclosure, or adoptive families don’t have or don’t try to create community for their kids around this experience. You know, sometimes parents want so desperately to pretend we are their bio kids, or that we’re just like every other family and generally not call attention to the whole ‘one of these things is not like the other’ situation, that we’re forced into wearing this thing in isolation. And besides feeling like you inherently don’t belong where you are is just isolating in some ways even if your family does have adoption community or if you have adopted siblings.”
Latty has an excellent point. Depending on the specific situation, adoption tends to happen away from the public eye, on the complicated precipice of trying to merge backgrounds and people into a streamlined family. In the most general sense (which assumes that an adoption is relatively ‘straight-forward’, or occurs while the child is young, by strangers, is an amicable arrangement, etc), adoption attempts to bridge the gaps between families and individuals utilizing a(n arguably deficient) model of nuclearness that has little give and elasticity for accommodating differentness. Add any one of many other factors (transracial adoption, adoption of older children, international adoption, adoption with unclear boundaries, adoption of children from different socioeconomic backgrounds, adoption of queer or trans children, etc), and the stakes of belonging and integrating get even higher.
What’s interesting about the point that Latty makes is one of public versus private: if adoption (generally) happens in insolation, and queerness (generally) happens in the public eye (assuming, of course, that the adoptee in question is out), then how do we merge the two potentially conflicting identities in a way that holds up and makes space for all of their complications? The closet is particularly complicated for adoptees, who have much at stake when considering being open about something that has historically incurred rejection, compounding the initial trauma in particularly traumatic ways. Many adoptees feel as though coming out as queer is a risk that could lead to further alienation and abandonment by their families.
Latty continues:
“I honestly felt like I grew up not knowing anyone else who was adopted. There was no one to talk to about it or reflect my experience back to me. I felt very, very alone in the world. It wasn’t until I was almost 30 that I sat in this room full of adoptees at the AFAAD reading and heard this deluge of words that I now understand, in part, as is the language we (adoptees) use to talk about ourselves and our experiences to each other. When it’s safe. When there’s no one around we have to protect or stroke. It was fucking mind blowing. Does this have anything to do with queerness? I’m not sure where all the intersections lie, but and I’m really interested in that investigation.”
When Bitch, You Left Me first came across my table in 2010, I was eager to submit and was thrilled when one of my poems was chosen for publication. When Latty sent me the proofs of the poem, along with a copy of my bio, I saw that she had listed me as “July Westhale is an adoptee living out of Oakland, California … .” Horrified, I emailed her immediately and asked her to remove the identifier from the page. I didn’t identify as an adoptee. I didn’t know anyone else who was adopted. I was taken into a family that was related to my bio fam, and so I felt more like I’d had a different experience. I wasn’t a plant in a new, foreign garden; I was a cutting transplanted into familiar pastures. Though this analogy is flawed and actually not true of my experience of my adopted family, I was nonetheless unenthused about claiming an identity that, until very recently, I hadn’t even thought of as an identity. Latty obliged, but was curious about my hesitation, and asked gentle, probing questions about my decision. Over the course of following months, we had an illuminating conversation in which I found myself much changed: I felt seen, heard, and validated in my experiences just simply having another person who mirrored back to me a common landscape.
As for how adoption relates to queerness, I recognize the problems of paralleling and making similar two such distinctive experiences and identities, particularly when the margin for differing intersections is so high. However, both identities struggle with a sense of belonging, or of lacking. Both identities struggle with how to reclaim family if and when their bio family fractures. To bring it back to the opening of this essay, Woolf was living in a time when queer women were thought of as ‘inverts’, and homosexuality (or genderqueerness to speak of) was considered to be a result of mental illness or deficiency. Considering that both identities fall into the same fault lines of family and how the individual takes up space in the world or sees themselves reflected in the world, it’s not horribly far off to believe that the two can be in conversation with each other.
*Liz Latty is the author of Split (Unthinkable Creatures Press, 2012). Her work can be found or is forthcoming in make/shift magazine, Jupiter 88, The Feminist Wire, and HOLD: A Journal, among others. She was a 2012 Lambda Literary Fellow and has been nominated for a Pushcart Prize, as well as the Jackson, Phelan, and Tanenbaum Literary Awards from the San Francisco Foundation. She earned her MFA in creative writing from Goddard College and lives in Brooklyn.